Trying to set up a WooCommerce added to cart popup on your store?
These popups can be a great way to improve the shopping experience on your store, while also giving you an opportunity to promote other products, such as displaying “Frequently Bought Together” offers in the popup.
As you might’ve already found out, WooCommerce doesn’t have a core feature to do this. But with the right plugin (that we’re going to cover in this post), you can easily access a no-code solution for setting up an added to cart popup on your store.
Below, you’ll learn how to easily set up your own customizable popup that looks something like this:
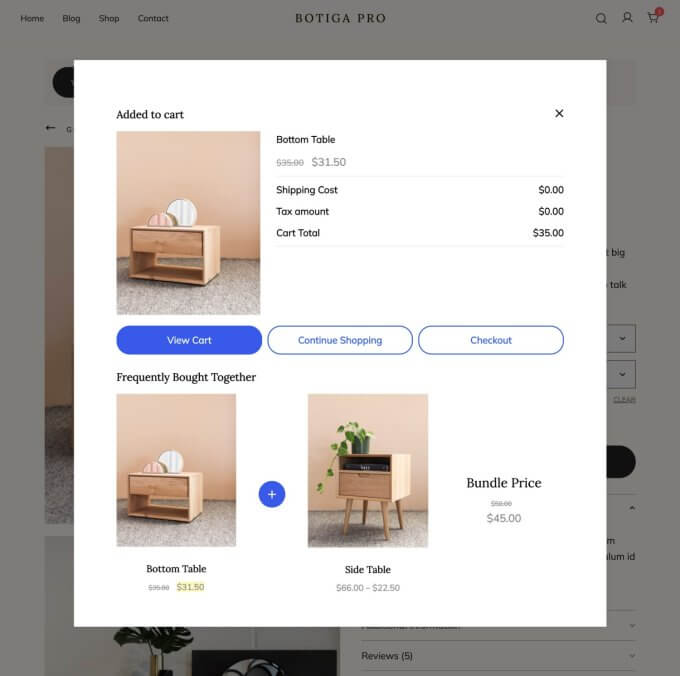
To accomplish this, you can use the Merchant Pro plugin.
Let’s go over how it works.
How the Added to Cart Popup Works in Merchant
Before I get into the step-by-step tutorial, I want to first give you a quick overview of how the feature works in Merchant Pro so that you have a better understanding of whether or not it meets your needs.
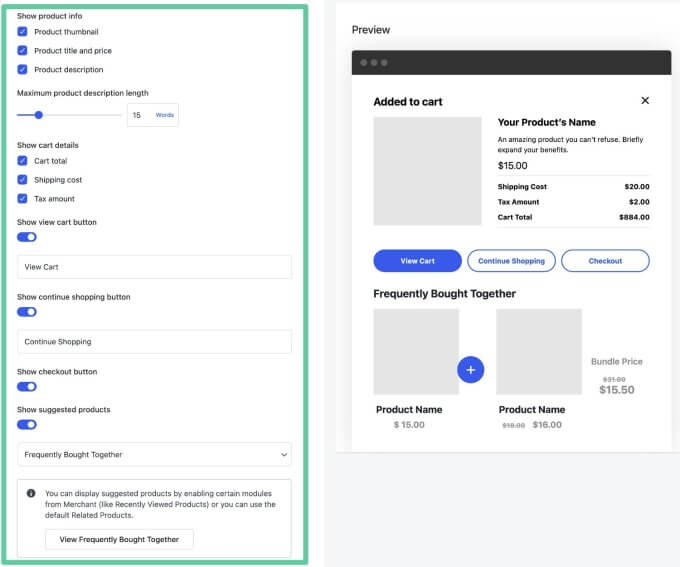
To start, Merchant Pro gives you lots of options to control what content to display in the popup.
Here’s a quick rundown of the content that you can display (you’re also free to disable content if you don’t want to include it):
- Product info – You get options for the product thumbnail, title and price, and description.
- Cart details – You get options for the cart total, shipping cost, and tax amount.
- Buttons – You can display a View Cart, Continue Shopping, and/or Checkout button.
- Suggested products – You can encourage users to purchase more products by displaying products that are related to the item that the shopper added to their cart. You can display related products, recently viewed products, frequently bought together products, or “Buy X, Get Y” deals.
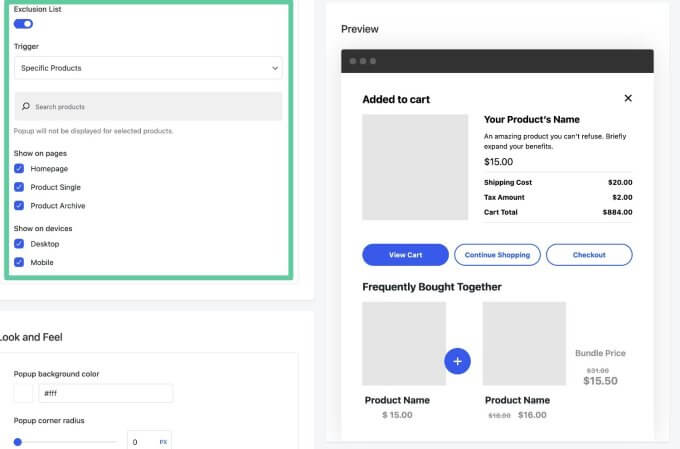
You also get lots of options to control when and where to display the popup.
One option is to display the popup every time someone adds an item to their cart, for every visitor and part of your store.
However, you can also target your popups to specific pages/types of content on your site, as well as different types of users:
- Content targeting – You can only show the popup if a user is adding the item to their cart from a certain page on your site. You can show it on the homepage, product single pages, and/or product archive pages. You can also exclude specific products or product categories from triggering the popup.
- Device targeting – You can show the popup to all visitors, only visitors browsing from a desktop device, or only visitors browsing from a mobile device.
Finally, you also get tons of layout and style options. You can choose from three different basic layouts and then customize the colors and other details to match your store.
Merchant Pro is not just an added to cart popup plugin, though. It’s a toolkit of 40+ different modular features that you can use to improve your store and boost your revenue.
The added to cart popup feature is one module, but you can also access other modules for things such as quantity-based discounts, storewide sales, “Buy X, Get Y” deals, product bundles, frequently bought together products, and lots more.
So, while you can use it for just the popup, you’ll probably find some other features that can help your store. And because all of these features are modular and only load when you enable them, you won’t have to worry about features that you’re not using slowing down your store.
How to Set Up a WooCommerce Added to Cart Popup With Merchant
Now that you have a high-level understanding of how the added to cart popup feature works in Merchant Pro, let’s get into the actual step-by-step guide for how you can set everything up.
Once you’ve purchased and installed the plugin, the actual process of setting up your popup will only take a few minutes.
1. Purchase, Install, and Activate Merchant Pro
To get started, you’ll want to install the Merchant Pro plugin on your WordPress/WooCommerce site.
If you don’t already have a copy of Merchant Pro, you can purchase it here. The Merchant Pro license gives you access to all 40+ modules in the plugin, including the added to cart popup feature.
Once you purchase the plugin, you can download a ZIP file of the plugin and install it on your site just like any other plugin (Plugins → Add New Plugin → Upload Plugin).
After activating the plugin on your site, we also recommend adding your Merchant Pro license key, which will ensure that you can access automatic updates. You can do this by going to Merchant → Settings in your WordPress dashboard.
2. Enable the Added To Cart Popup Module
As I mentioned earlier, Merchant Pro uses a modular approach, which keeps your store lightweight by only loading the specific features that you enable.
So, before you can start setting up your popup, you first need to enable the module on your store.
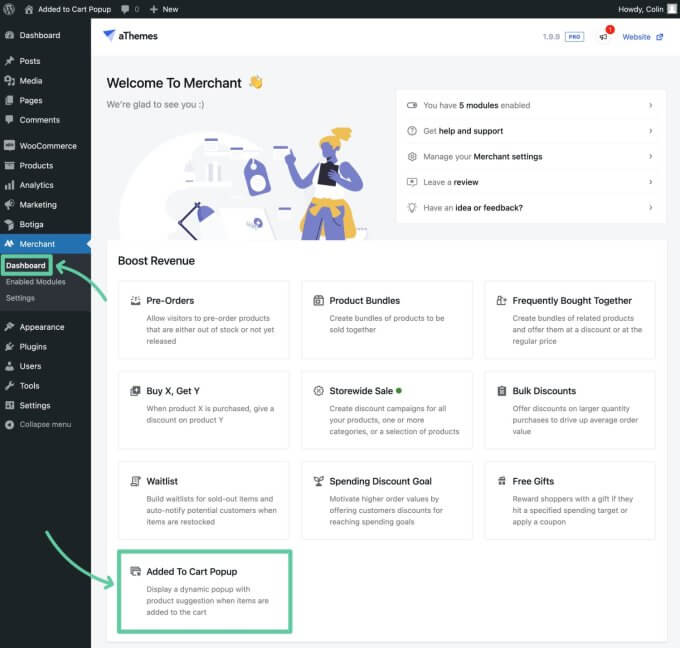
To begin, go to Merchant → Dashboard and select the Added To Cart Popup module, which should be listed in the Boost Revenue section:
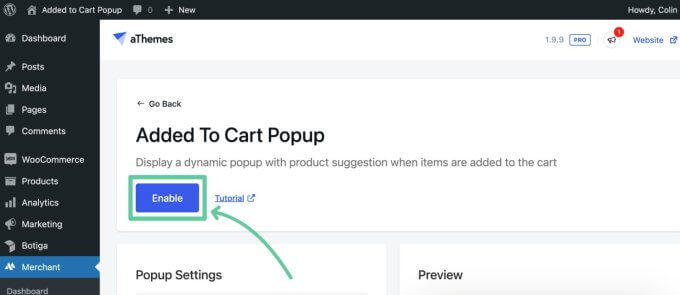
This will open the module settings area. To activate it, all you need to do is click the Enable button at the top:
3. Configure Your Store’s Added to Cart Popup
Once you enable the module, you can use the settings on that same page to configure the layout, content, and design of the popup:
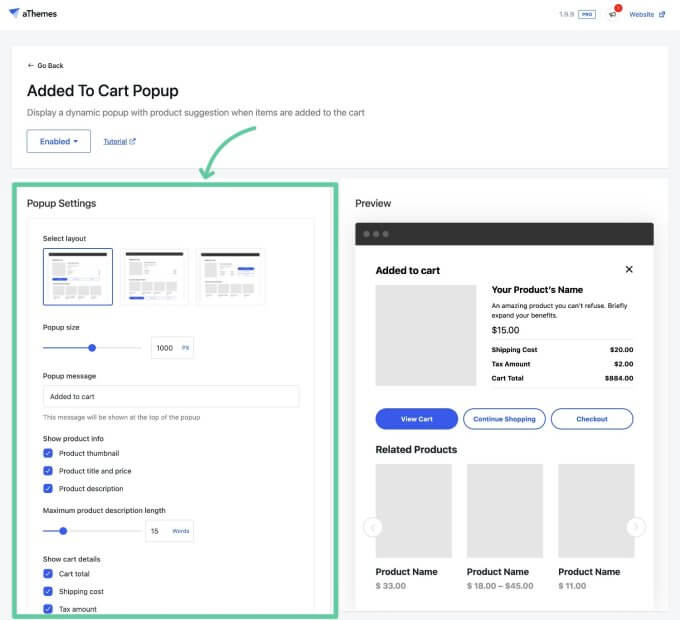
Let’s go through how to configure the various options:
Layout and Size
To start, you can choose from three different pre-made layouts for your popup.
As you change the layout, you should see the live preview update based on your choice.
Below that, you can adjust the width of the popup (in pixels) using the Popup size field (later on, you’ll also be able to adjust the colors and font sizes):
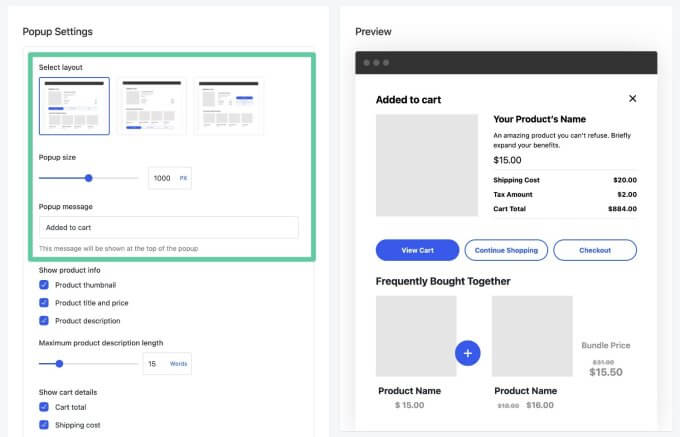
Content
Next, you can choose the content that you want to display in your popup using simple checkboxes and toggles.
First, you can select what product information to display by enabling some or all of the following options:
- Thumbnail
- Title and price
- Description (if enabled, you can also set a maximum length)
Next, you can choose to display some or all of the following information about a user’s cart:
- Cart total price
- Shipping cost
- Tax amount
Then, you can choose what call-to-action buttons to display. If you enable a certain button, you can also adjust the button text. You can show some or all of the following options:
- View Cart button
- Continue Shopping button
- Checkout button
Finally, you can decide whether to show suggested products in the popup. If you enable this option, you can then choose from four different types of suggested products:
- Related products – The default related products that come from WooCommerce.
- Recently viewed products – This is powered by Merchant’s Recently Viewed Products module. It shows other products that the person has looked at during their visit.
- Frequently bought together products – This is powered by Merchant’s Frequently Bought Together module. It lets you promote other products that pair well, similar to how this feature works on Amazon. For example, if they’re buying sunglasses, you could also show a case for those sunglasses.
- Buy X Get Y products – This lets you display “Buy X, Get Y” deals powered by Merchant’s Buy X Get Y module. For example, you could tell users that if they buy three items, they can get another product 25% off.

Display Conditions (by Product, Page, or Shopper Browsing Device)
To control when your popups should display and who should see them, you can access three different types of display conditions:
- Product exclusions – You can exclude certain products or categories of products from displaying the popup. That is, if the shopper clicks add to cart on one of the excluded products, the popup will not display. You can set these up by enabling the Exclusion List toggle.
- Page targeting – You can only display the popup if a user adds the item to their cart from a certain type of page. You get three different toggles: Homepage, Product Single, and Product Archive. For example, you could show the popup when someone adds an item to their cart from the single product page, but not if they add that item to their cart from the main store page.
- User device targeting – Because of differences in user experience, you might only want to show the popup to users on certain types of devices. With the Show on devices toggle, you can choose whether to show the popup to all shoppers, only shoppers using a desktop device, or only shoppers using a mobile device.

Colors and Design
To finish things out, you can control the style and design of your popup by adjusting all of the colors, along with some other design elements such as the corner radius for the popup.
You can make these adjustments from the Look and Feel section.
As you make changes, you should see those changes updated on the Preview. This gives you a real-time look at how your changes will affect the design of your popup:
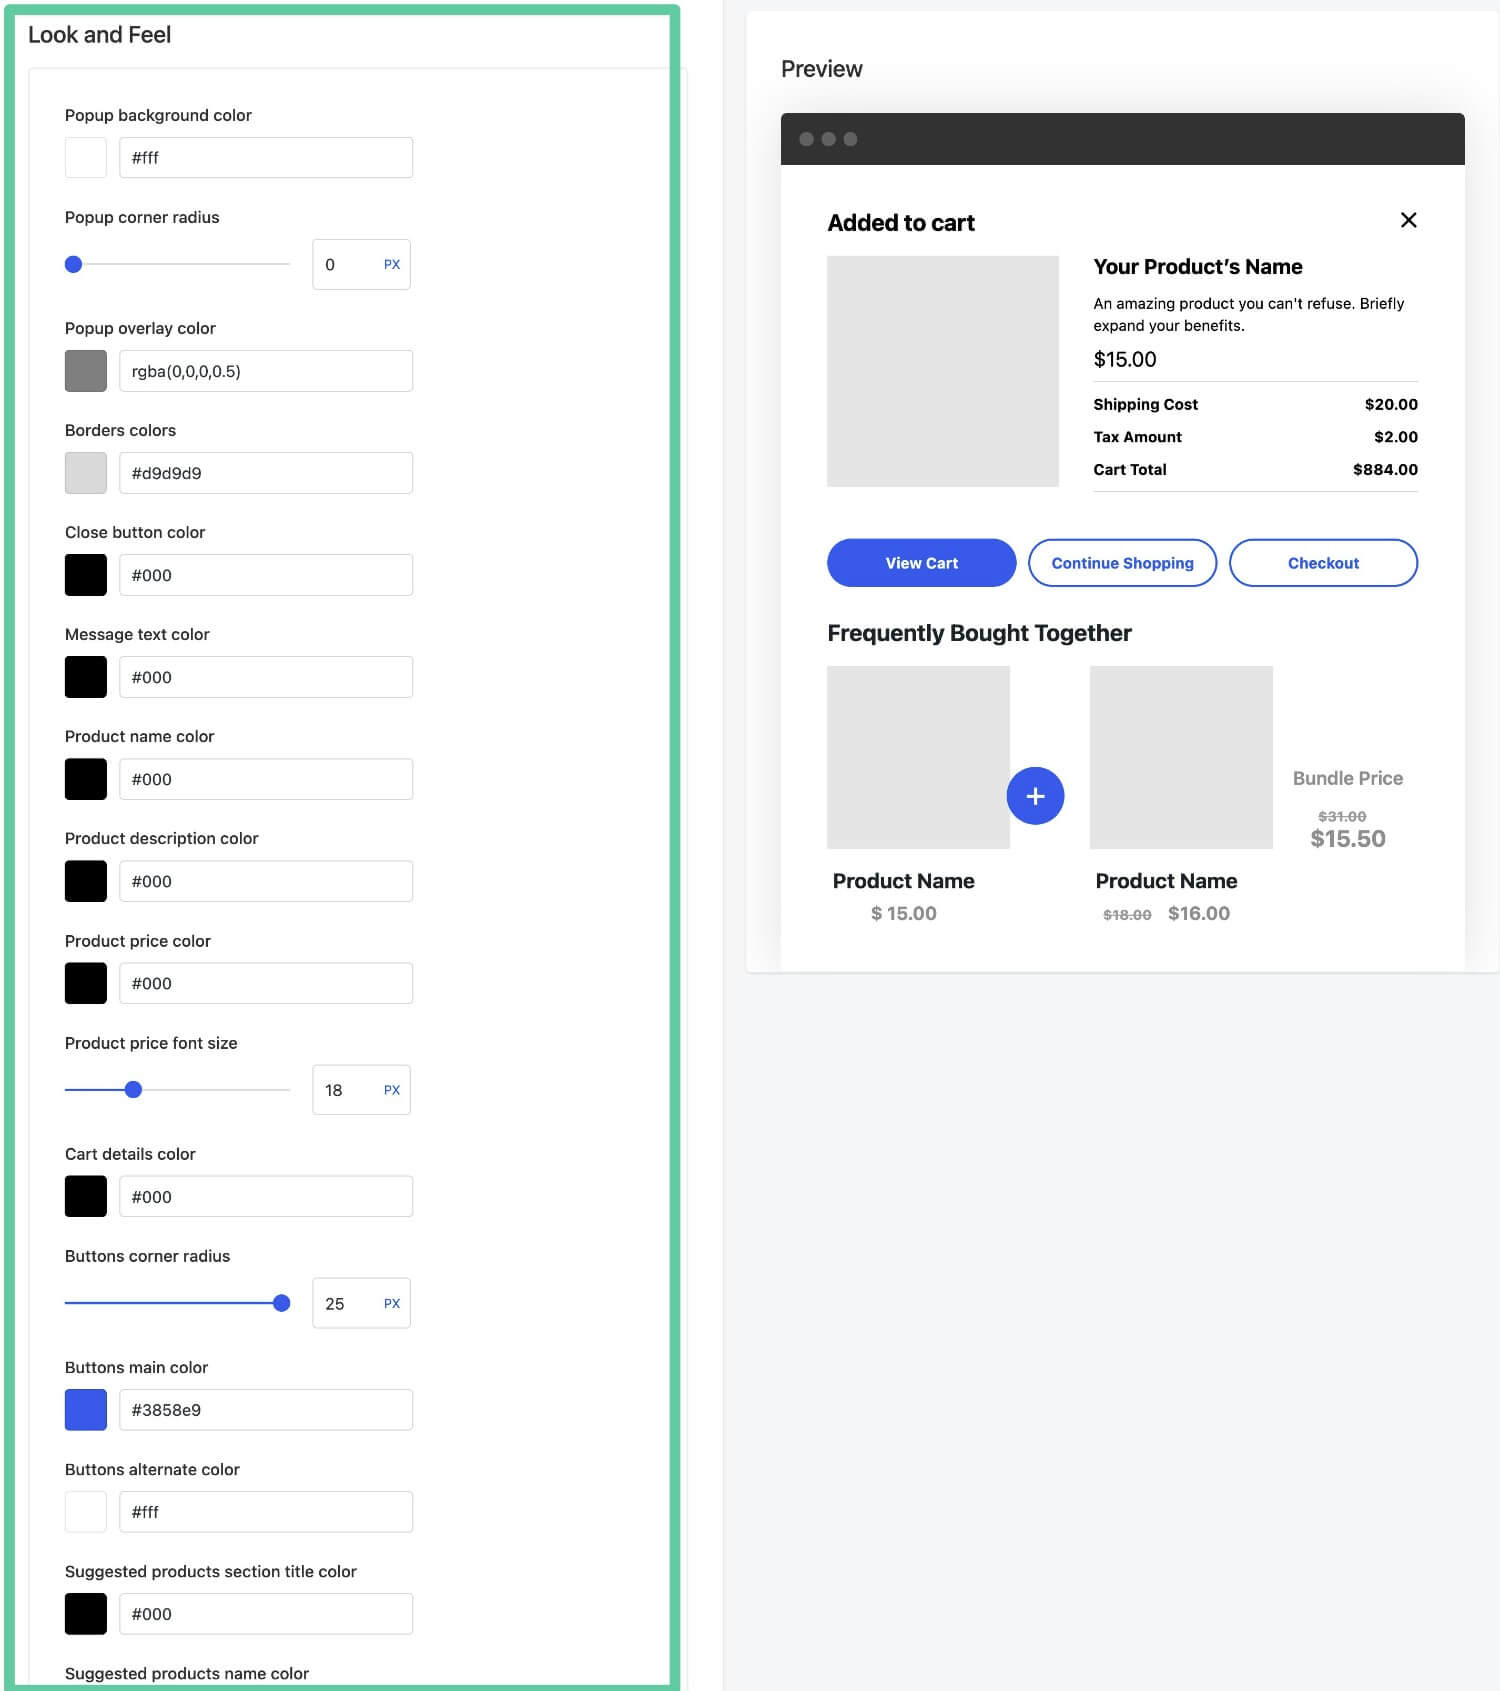
When you’re finished, make sure to click the Save button that appears on the toolbar at the top.
4. Test Your Popup
At this point, the added to cart popup should be live on your store.
To make sure it’s working as intended, I recommend testing it by adding a product to your cart. You should see the popup appear using the layout, content, and style that you configured in the plugin’s settings:

If you’re using exclusion rules to not show the popup in certain situations, I also recommend testing those situations to check if the popup is working as you’d like.
For example, if you chose to hide the popup for shoppers on mobile devices, you could try adding a product to your cart from your smartphone to make sure that the popup doesn’t appear.
If everything is behaving as you want it to, you’re all finished!
If you ever want to change things in the future, you can just come back to the module’s settings and tweak as much as needed.
Video Walkthrough
Check out the video below for a live demo of the Added to Cart module:
Create Your Added to Cart WooCommerce Popup Today
Adding a popup that displays after a user adds an item to their cart can be a great way to improve your store’s user experience, while also boosting your revenue by highlighting related products or deals.
Because it’s good for both you and your users, it’s a win-win when it comes to optimizing your store.
With Merchant Pro, you can easily add this type of popup to your store in a smart way, including using it to promote other products and deals that the shopper might be interested in.
Plus, beyond the added to cart popup, you’re also getting access to 40+ other modular features that you can use to improve your store.
If you’re ready to get started, purchase Merchant Pro today.
