Searching for the best solution for how to create product bundles in WooCommerce?
Product bundles are a great way to boost your store’s average order value (AOV) and encourage people to add more products to their orders. However, as you’ve probably figured out because you’re reading this post, the core WooCommerce plugin doesn’t include a feature for product bundles.
Don’t worry! In this tutorial, you’ll learn an easy, code-free way to set up WooCommerce product bundles using the Merchant plugin.
After a short and simple setup process, you’ll be able to build unlimited product bundles that look something like this:
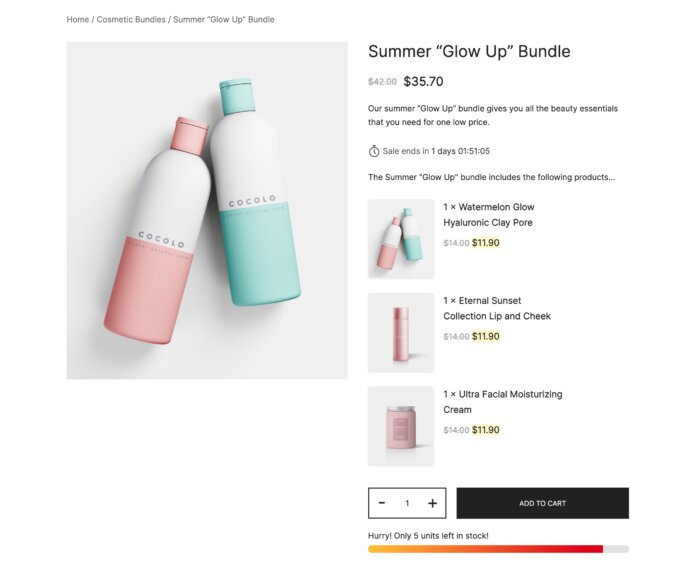
And you’ll be able to easily set them up on the backend just by searching for each product’s name that you want to include in the bundle:
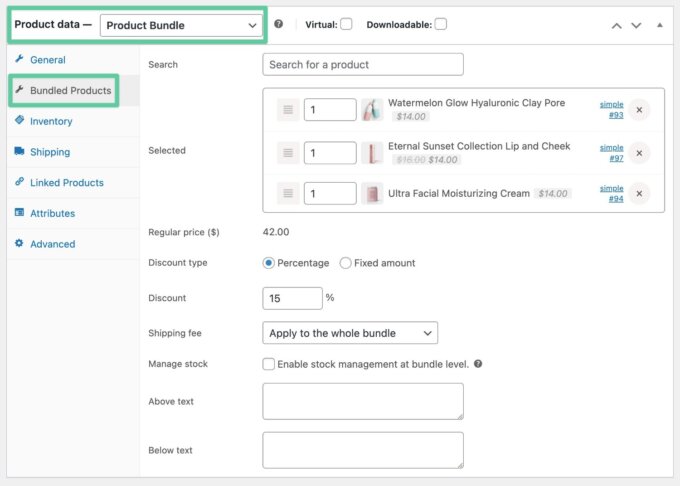
Ready to learn how it works?
Keep reading for the full guide on how to create product bundles in WooCommerce.
Key Details for This WooCommerce Product Bundles Tutorial
I’ll show you the full, step-by-step tutorial below. But before doing that, I think it’s helpful to go over the high-level details.
That way, you can know whether or not this guide is for you without having to read through the whole thing!
To set all of this up, you can use the Merchant plugin. Merchant is an all-in-one toolkit that includes 40+ features to improve your store and boost your revenue, including the ability to create product bundles.
Don’t worry — Merchant is totally modular, so you can choose exactly which features to enable and avoid bloating your store with features that you don’t want.
If you want, you can choose to only enable the product bundle feature. However, if you explore the other features, you’ll probably find some that can make a meaningful improvement to your store’s revenue and/or shopping experience.
With Merchant, you’ll be able to create unlimited product bundles, each of which is made up of unlimited existing products from your store.
You do not need any special technical knowledge to set anything up. You can add a bundle just like any other product (all you need to do is select the “Bundle” product type).
You also get some really handy features to configure how bundles work:
- Stock management – You can choose to manage product stock at the bundle level. Or, you can have Merchant automatically calculate the stock status based on the stock numbers of the products in the bundle.
- Price calculations – You can set up automatic price calculations based on the products in the bundle. So, if you change the price of one of the individual bundle products, you can have the bundle price automatically update (based on your discount formula).
- Shipping calculations – You can choose how to handle shipping for the bundle. You could calculate shipping for the entire bundle or for each individual product in the bundle.
You also get lots of options to control how to display product bundle details on various pages of your WooCommerce store, including the single product page, shopping cart page, and checkout page.
How to Create Product Bundles in WooCommerce
Now, let’s get into the full step-by-step guide. By following these steps, you can have your first product bundle up and running in under 15 minutes.
1. Purchase, Install, and Activate Merchant Pro
To get started, you’ll want to install the Merchant Pro plugin on your WooCommerce store.
If you haven’t done so already, you can purchase a copy of Merchant Pro here. Plans start at $79 and get you access to 40+ modules in total, including the product bundle functionality.
Once you’ve made your purchase, you can download the plugin’s ZIP file and install it on your store.
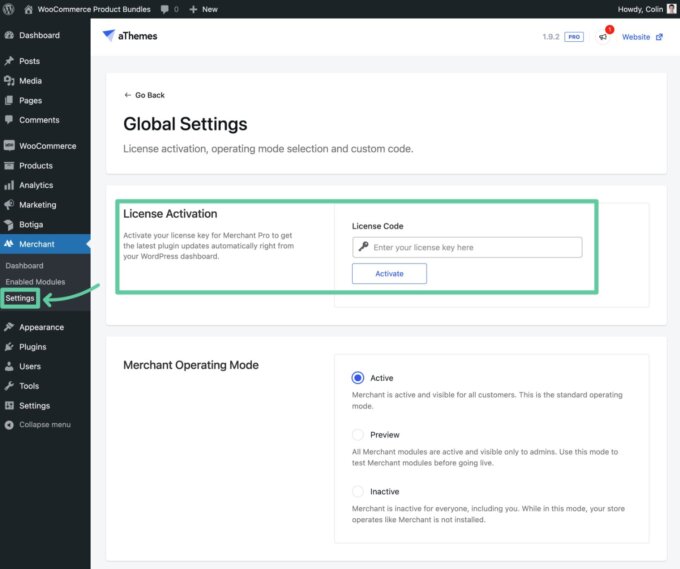
To ensure that you’re benefiting from automatic update notifications, you should also add your license key to the Merchant Pro settings area by going to Merchant → Settings in your WordPress dashboard:
2. Enable the Product Bundles Module and Configure Basic Settings
To keep your store lightweight and loading fast, Merchant uses a modular approach for the 40+ features that it adds to your store.
By default, all of its features are disabled (which means they aren’t adding any “weight” to your store). Then, you can go in and enable the specific features that you do want to use.
So — before you can create WooCommerce product bundles, you’ll first need to enable the Product Bundles module:
- Open your WordPress dashboard.
- Click on the Merchant option in your dashboard sidebar.
- Select the Product Bundles module (it should be listed in the Boost Revenue section).
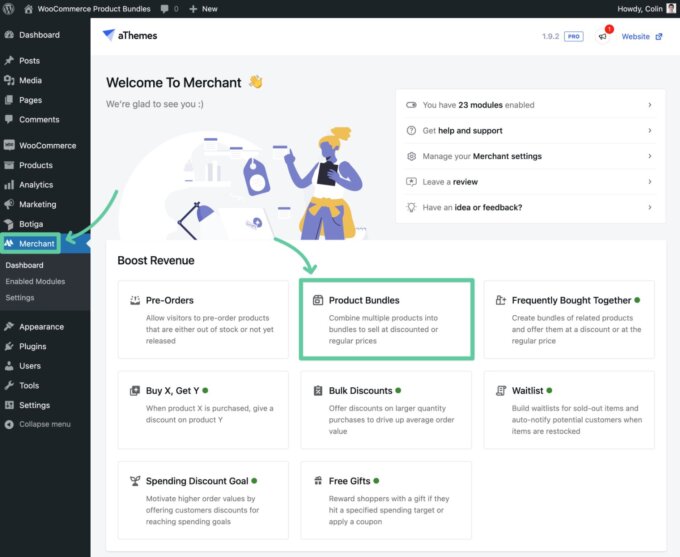
First, click the button to Enable the module:
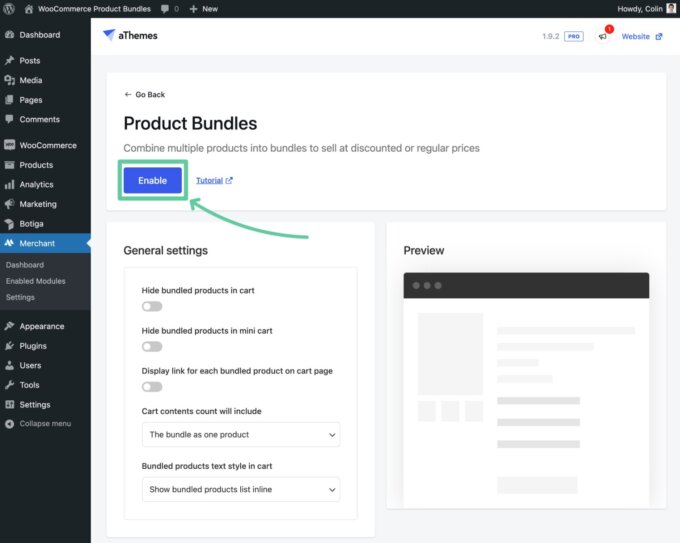
Then, you can use the settings below to configure the default behavior for product bundles on your store.
We recommend exploring these settings now and configuring them according to your preferences.
However, you’re always free to come back and adjust these settings after you’ve actually created your product bundles. In fact, you might find it easier to make your choices after you’ve set up your bundles because you’ll be able to more easily visualize what each setting does.
Let’s go through the available settings.
General Settings
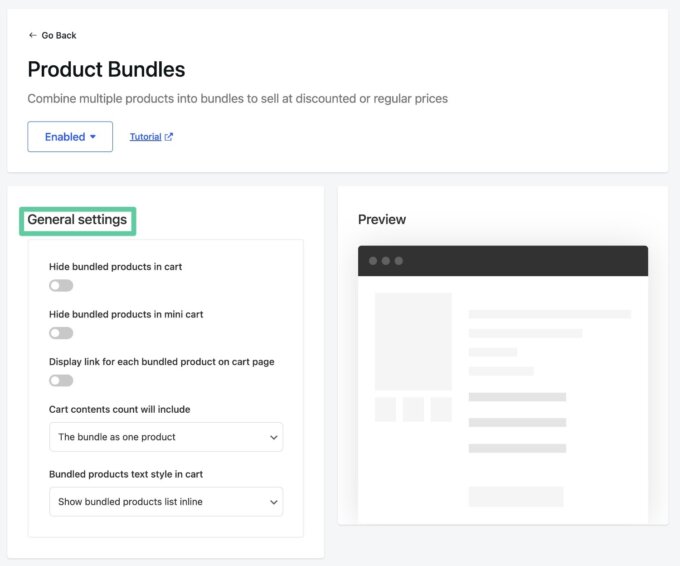
In the General settings box, you can choose how to handle bundled products in a user’s shopping cart.
For example, you can choose between showing the entire bundle as one single product, or showing both the bundle and the bundled products:
Product Single Page
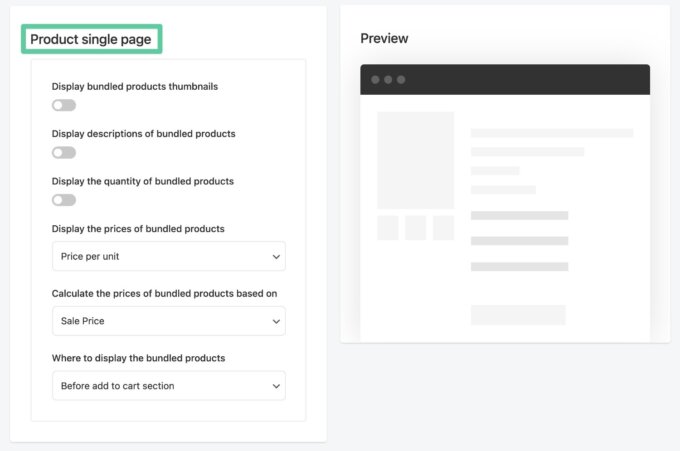
In the Product single page section, you can choose how to display product bundles on the single product page.
For example, you can choose what information to display about each product in the bundle and where to display the bundled products. You can also choose how to handle prices for products in the bundle:
Here’s what it might look like to display bundled products “Before add to cart section“:
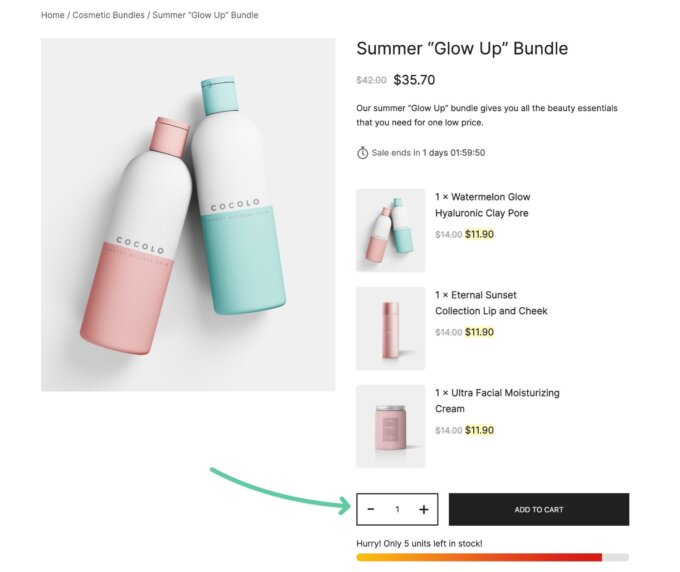
And here’s what it might look like to display bundled products “After add to cart section“:
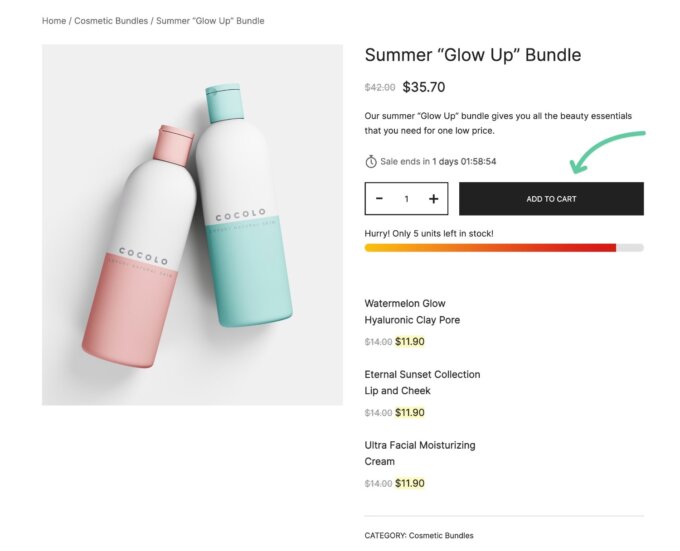
Note – The exact style/placement of the bundled products will depend on your store’s WordPress theme. Both of the examples from above are using our Botiga WooCommerce theme.
Use Shortcode
By default, Merchant will automatically list the individual products in your bundle on the single product page according to the settings from above (e.g. “before” or “after” the add to cart section).
However, if you want more manual control over placing the bundle product list, you can enable the Use shortcode toggle.
When activated, this will let you manually place the list of bundled products using the
[merchant_module_product_bundles]
shortcode:
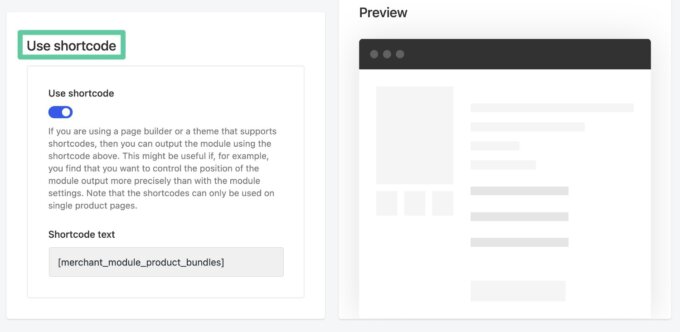
You can add this shortcode in a few different places:
- In your page builder template for single product pages (works with Elementor Pro, Divi, Beaver Themer, and so on).
- Directly to your WordPress theme’s template files using the
do_shortcode()function. - In the WordPress editor, which can be especially helpful if you’re using the Site Editor and a block-enabled theme.
If you don’t need to manually place the product bundle lists, you should leave this setting deactivated.
Once you’ve configured the settings, click the Save button in the top-right corner of the page.
3. Create All of the Products That You’ll Use In Your Bundles (If You Haven’t Already Done So)
Next, you’ll want to make sure that you’ve created all of the individual products that you want to use in your bundles.
If you’ve already done that, you can skip ahead to the next step.
If not, you’ll want to add each individual product that you want to include in your bundles.
4. Create Your Bundle Product
Once you’ve created all of the individual products that will go inside your bundle, you’ll want to create a new product that will act as your bundle product:
- Go to Products → Add New to create a new product (just like you’d create any other WooCommerce product).
- Add all of the basic product details for your bundle (e.g. name, descriptions, categories, image, etc.).
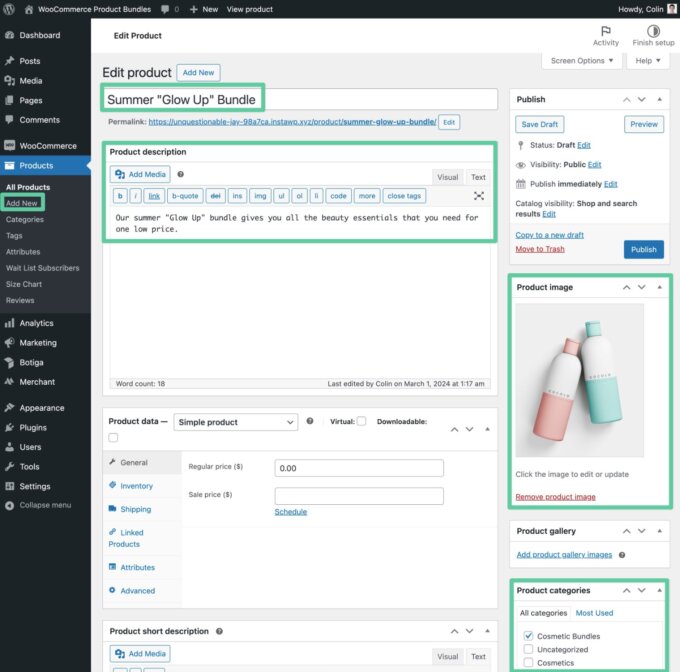
Once you’ve added the basic details, you can set up the product bundle functionality:
- Select Product Bundle as the product type in the dropdown at the top of the Product data box.
- Go to the new Bundled Products tab that appears in the Product data box.
- Use the Search field to search for the individual product names that you want to include in your bundle. As you add a product to the bundle, it should appear in the Selected box.
- Choose what Discount and Discount type to use. You can offer a flat discount or a percentage discount.
- Select how to calculate the Shipping fee. You can apply it to the entire bundle or each individual bundled product.
- Choose whether you want to Manage stock at the bundle level. When unchecked, your store will manage bundle stock availability based on the individual products in the bundle. For example, if there are only two units left for one of the products in the bundle (in that product’s individual stock settings), the bundle itself will only have two units left.
- Optionally add text that appears above or below the list of bundled products.

Once you’ve filled out everything, you can Publish your product to make your bundle live:

If you want to tweak any of the bundle behavior, you can go back to the Product Bundles module’s settings in Merchant and adjust things as needed.
If you want to create additional product bundles, you can repeat this step as many times as needed to create unlimited product bundles for your store.
Video Walkthrough
Check out the video below for a live demo of the Product Bundles module:
Create Your First WooCommerce Product Bundle Today
That wraps up our guide on how to create product bundles in WooCommerce using the Merchant Pro plugin.
With Merchant Pro, you can easily create conversion-optimized bundles to boost your store’s average order value and increase your revenue.
Plus, Merchant Pro can do a lot more than just product bundles — it offers 40+ different modules designed to boost your store’s conversion rates and revenue, while also creating a better shopping experience for your customers.
And again, all of these features are 100% modular, so you can pick and choose which features to enable without adding any bloat to your store.
If you’re ready to get started, purchase your copy of Merchant Pro today. All plans are backed by a 30-day money-back guarantee.


