Are you planning to add a Buy X, Get Y discount to your WooCommerce store?
Buy X, Get Y discounts are great for increasing the average order of your store, as customers are incentivized to purchase more to get the deal.
Out of the box, there’s no way to add this type of discount to a WooCommerce site because WooCommerce core doesn’t include this functionality.
Fortunately, there’s a plugin for everything.
To add a Buy X, Get Y discount to your WooCommerce website, you can use a plugin called Merchant Pro. It’s an all-in-one WooCommerce plugin designed to help you grow your sales.
In this tutorial, I’ll show you how to add Buy X, Get Y discounts to your WooCommerce store using Merchant Pro.
Let’s get started.
1. Install and Activate the Merchant Pro Plugin
To add the Buy X, Get Y module and other features of Merchant Pro to your WordPress site, first, you need to purchase a license.
Once you have made your purchase, you can download the plugin from either the welcome email or your aThemes account.
Then, go to Plugins > Add New Plugin in your WordPress admin area and click the Upload Plugin button.
Once the file upload section shows up on the screen, click the Browse button and upload the merchant-pro.zip file from your local computer to your WordPress site. Then, click the Install Now button to install the plugin:
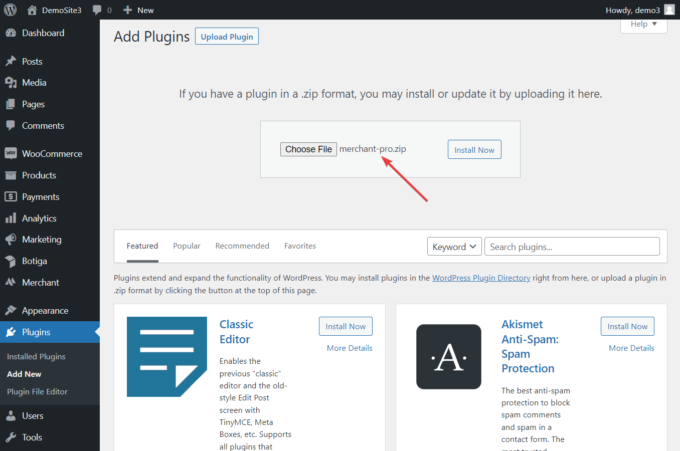
Once the installation process is over, click the Activate link to activate the plugin.
Please refer to our quick start guide for more on getting set up with Merchant Pro.
2. Enable the Buy X, Get Y Module
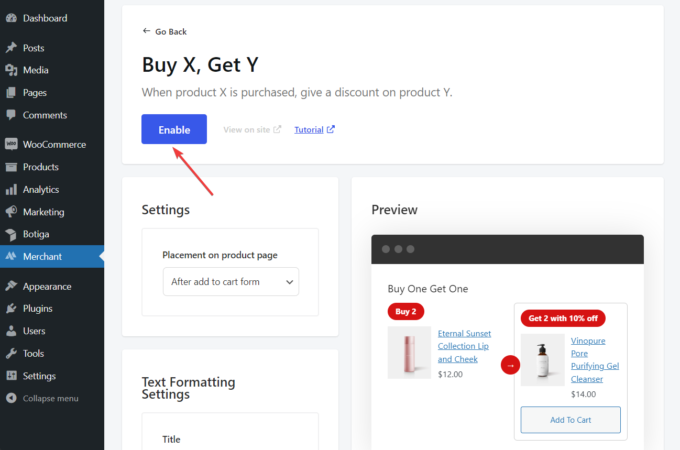
In the Boost Revenue section of your Merchant dashboard, click the Buy X, Get Y module to open its settings page:
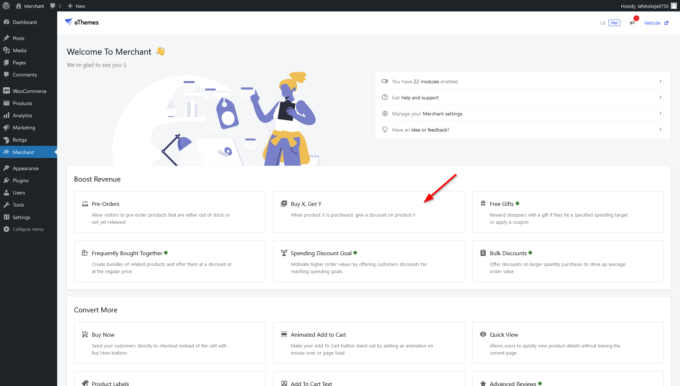
Here, the first thing you’ll notice is the Enable button.
Click it to activate the Buy X, Get Y module on your WordPress site:
3. Set Up a Buy X, Get Y Discount
Right now, you won’t see any discount offers in your WooCommerce store because you still need to set up the discount.
There are two parts to a Buy X, Get Y discount:
- Buy X: It refers to the product you want to add the discount offer to.
- Get Y: It refers to the product you want to offer for a discounted price if the customer buys product X.
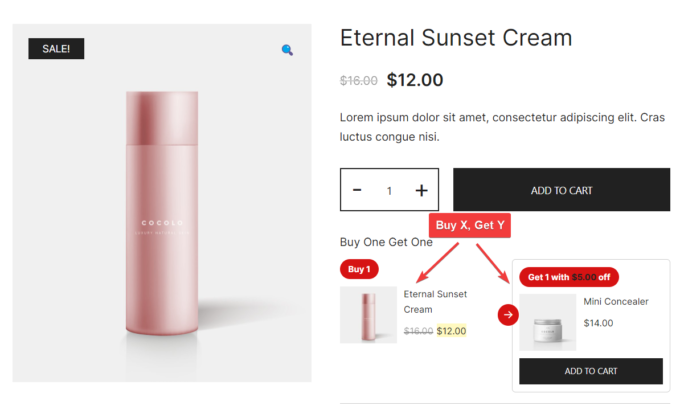
On the example page below, we have created a discount offer for a product called Eternal Sunset Cream (this is product X).
The discount offer includes another product called Mini Concealer at a sale price (this is product Y).
If a customer buys the cream, they have the option to buy the concealer for the sale price:
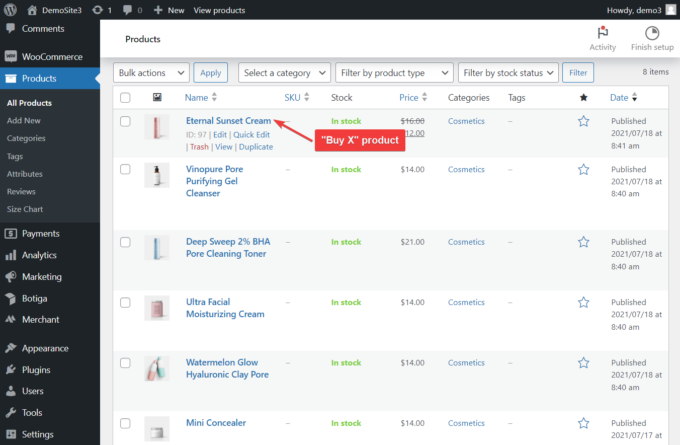
To create the discount above, go to Products → All Products in your WordPress admin area and click the Edit button below product X (Eternal Sunset Cream):
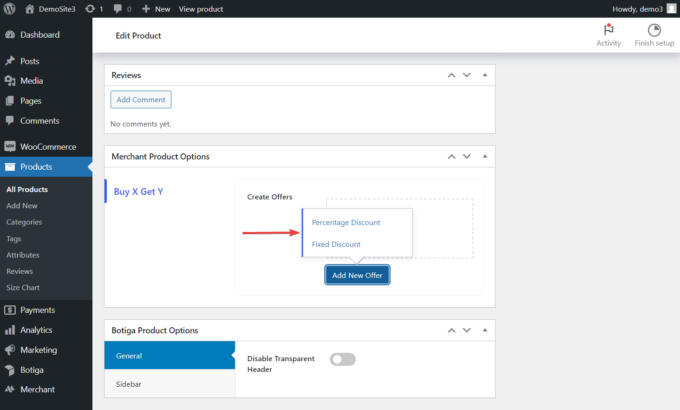
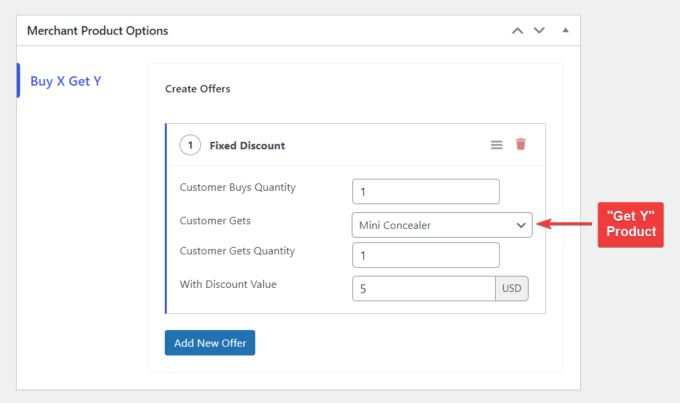
On the product page, scroll down to the Merchant Product Options section and click the Add New Offer button.
You will be asked to choose between a percentage and a fixed discount.
Choose based on the type of discount you want to offer on the product that is up for sale. On our demo site, we chose a fixed-price discount:
Next, fill in the following fields:
- Customer Buys Quantity: The number of items that a customer needs to purchase from product X to access the sale price for product Y.
- Customer Gets: This is the name of the product on sale (product Y).
- Customer Gets Quantity: Here, you can define the number of items that the customer will get at the sale price from product Y.
- With Discount Value: This is the value of the price reduction the customer will get for product Y (for the defined quantity).
After adding the offer, scroll up and click the Preview Changes button to preview the discount on your product page.
All good? Then, click the Update or Publish button before exiting the product page.
4. Configure the Buy X, Get Y Module
To change the default location, text, and colors of the Buy X, Get Y module, return to the module’s admin page where you can configure how the module will appear on your WooCommerce product pages.
In the Settings section, you can set whether the discount module appears before or after the add to cart form on the product page.
Below the Settings section, you’ll find the Text Formatting Settings.
Here, you can change the text that appears inside the module, including the title, the buy and get labels, and the button text:
You’ll also find a Style Settings section below Text Formatting Settings.
Here, you can modify the weight and size of the title font, the border radius of the offer’s box, and the colors of the title, label, arrow, and border:
Once all the settings are configured, click the Save button at the top of the page to save your changes.
Finally, check out your discount on the product page of product X in your WooCommerce store.
Video Walkthrough
Watch the video below for a live demo of the Buy X, Get Y module:
BONUS: How to Further Increase the Revenue of Your WooCommerce Store
There are a number of tried and tested methods to boost the revenue of a WooCommerce store.
These include offering bundles (e.g. Frequently Bought Together), discounts (e.g. Bulk Discounts), and spending incentives (e.g. Free Gifts).
There are also ways to potentially improve the user experience with sticky add to cart bars, floating mini carts, and advanced reviews — among other things.
You can access all of these features and much more with the Merchant Pro plugin — without having to write any code.
If you have any questions about how to implement a Buy X, Get Y discount on a WooCommerce website after reading this tutorial, let us know in the comments section below.


