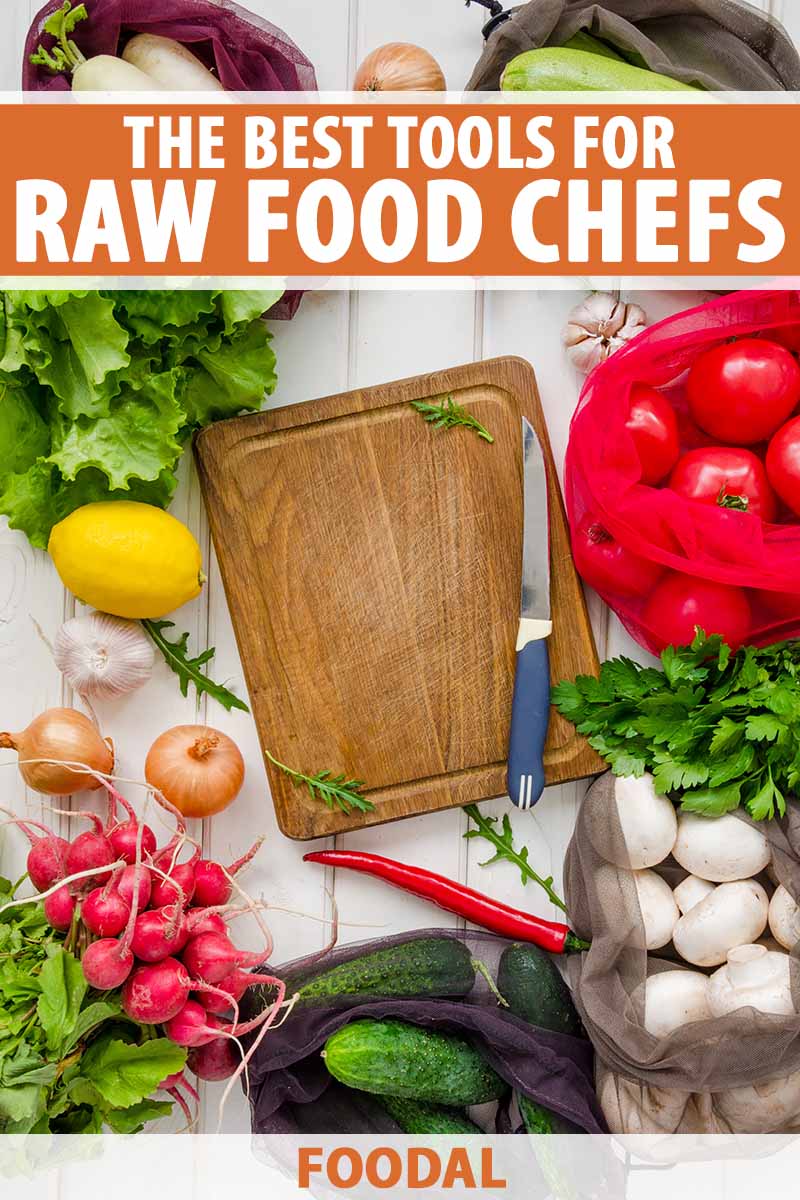
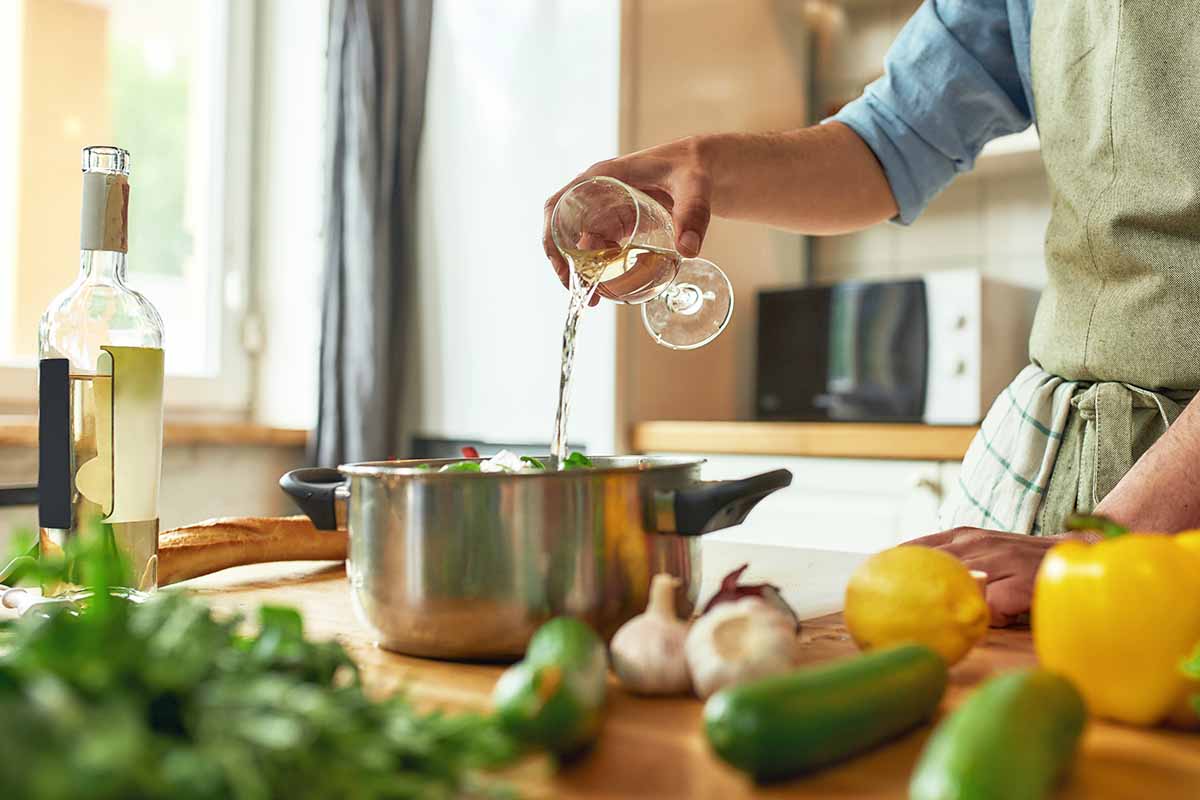
If you’re interested in following a raw food diet, get ready to give your kitchen tools and appliances a workout!
With a raw food diet, you will be preserving as much nutritional content as possible by not cooking or baking anything, and you will be eating natural ingredients without consuming heavily processed items.
But you still will need to do some food preparation!
We link to vendors to help you find relevant products. If you buy from one of our links, we may earn a commission.
Don’t take for granted tools you use on a daily basis, such as a sturdy knife set or cutting board. And don’t shy away from bigger appliances, like a high-speed blender or a powerful juicer.
All of these, and more, will help you safely, quickly, and efficiently prep your ingredients, supporting your healthy diet every single day you’re in the kitchen.
Gourmet quality raw food meals are definitely on the horizon, with the help of the following eight essential appliances and tools!
Here’s what you’ll find:
8 Essential Tools and Appliances for Raw Food Chefs
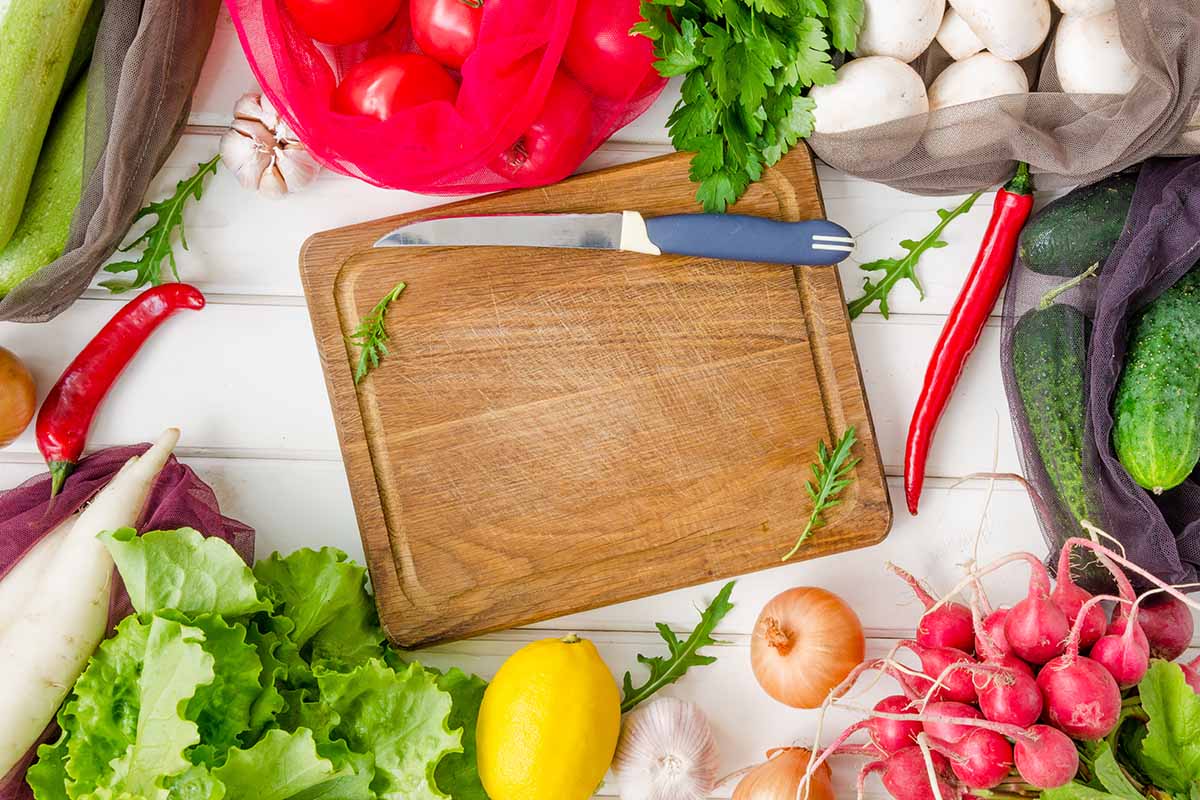
1. Knife Set
One of the most useful tools in any kitchen, but especially in a raw foods kitchen, is a knife set!
With the amount of chopping, slicing, dicing, and mincing of assorted produce and other ingredients, you will want to buy the best collection of knives within your budget.
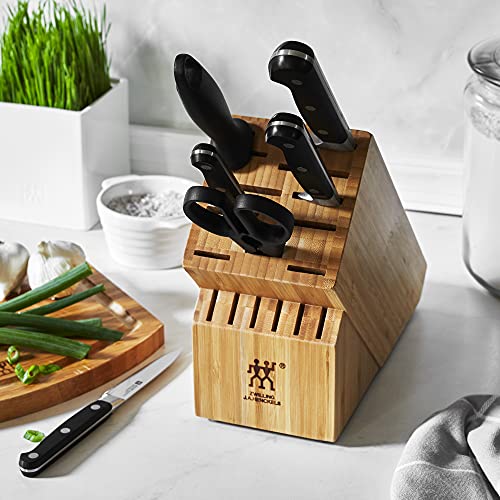
Zwilling Professional 7-Piece Knife Block Set
The Zwilling Professional 7-Piece Knife Block Set features the basic cutlery you’ll need for kitchen prep work, and they can all be stored in a birchwood knife block.
The collection includes a 4-inch paring knife, a 5-inch serrated utility knife, a 5-inch santoku knife, an 8-inch chef’s knife, kitchen shears, and a 9-inch sharpening steel.
It’s currently available to purchase from Sur La Table, Wayfair, and Amazon.
If this will be your first knife set, or if you are finally updating the old and rusty ones you have owned for years, I recommend avoiding discount stores or buying online – at least at first.
I suggest initially going in person to a restaurant or kitchen supply store, somewhere you can see the knives in person and physically touch and examine the quality of the workmanship.
Combined with reading knife reviews and choosing reputable sources, you can use that foundation to then shop online for the best deals.
If you would rather start small, you should at least purchase a set of two knives that will both be important tools you’ll use constantly: a paring knife and a chef’s knife.
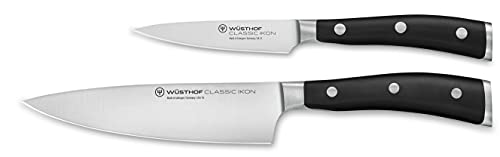
Wüsthof Classic Ikon 2-Piece Knife Set
Consider the Wüsthof Classic Ikon 2-Piece Knife Set, which includes a paring knife with a 3.5-inch blade and a chef’s knife with a 6-inch blade. Each knife is forged from a single piece of tempered high-carbon stainless steel.
Find this set on Sur La Table or Amazon.
You can build your set from there with more specialty cutlery items when you start developing your menu and find you need other options.
2. Cutting Boards
As a necessary accompaniment to your knives, the cutting board is another important kitchen item to own in multiple styles and sizes.
Go to any cooking discussion site, and you will find a heated debate on the quality versus the antibacterial properties versus the knife-dulling properties of various materials of cutting boards.
Everyone has a favorite, as well as a favored theory.
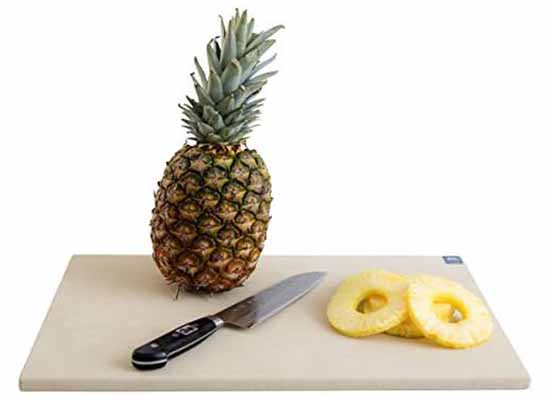
Sani-Tuff T45 12-by-18-inch Rectangular Cutting Board
There are multiple considerations to keep in mind, in addition to the material you prefer. You also need to understand the necessity of disposing a cheaper board when it becomes heavily gouged, warped, and scratched, or to resurface the more expensive boards when the time comes!
Having worked in professional kitchens for years, I personally prefer the cleaning ease and practicality of a rubber board that can be resurfaced, but do also appreciate the aesthetic and the feel of chopping into a nice solid wooden block.
And, believe it or not, wooden boards often harbor a much smaller bacteria load than a badly mauled plastic board.
I generally use my wooden boards with all non-protein food items, and keep a rubber Sani-Tuff board on hand for prepping meats and fish, or when I know I’ll be doing a lot of prep work.
Strong and resilient, the Sani-Tuff 12-by-18-inch cutting board will give you sturdy foundation and ample prep space. Purchase it now from Amazon.
Alternatively, instead of splurging on one high-quality item, you can purchase multiple cheaper plastic versions that you are willing to throw away and replace when they get too worn.
I try to avoid glass or stone – such as marble – for general prepping, instead reserving these as beautiful serving platters instead. These types of hard materials can wreak havoc on the edges of your blades.
3. Mandoline
Even with a nice new knife set, you may want to consider purchasing a mandoline slicer.

OXO Chef’s Mandoline Slicer 2.0
They nicely fill the niche of yielding thinly sliced fruits and vegetables that are consistent in shape, something that is difficult to achieve safely with a chef’s knife.
Though you still have to be very careful when operating it to avoid any serious injuries! You’re slicing veggies, not fingers!
Ensure you do the research to find a high-quality tool. The whole point is to slice ingredients swiftly by hand – do you really want to have your fingers near a sharp blade in a flimsy tool?
Read Foodal’s complete guide to choosing the best mandoline.
The OXO Chef’s Mandoline Slicer 2.0 has stainless steel blades, and can create up to 21 different cuts. A sturdy, nonslip stand keeps it stable as you operate it. Make sure you use the hand guard, which comes includes with your purchase!
Buy it now directly from OXO, or check reviews and prices on Wayfair.
4. Food Processor
For slicing, grating, shredding, and pureeing, a food processor will be your best multi-purpose bud in the kitchen.
Sure, you can do it all by hand with a knife or with a box grater… but if you have a lot of mouths to feed, and you often prep large amounts of food, why not gift yourself with an incredibly practical tool to assist you?
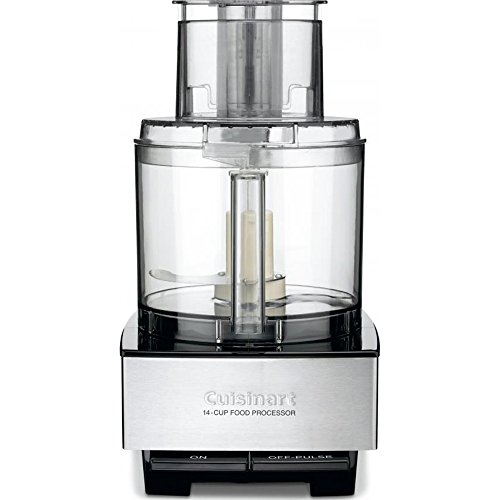
Cuisinart 14-Cup Stainless Steel Food Processor DFP-14BCNY
If this describes your preparation needs, I advise that you should stay away from the “micro” processors. For the amount of food preparation that you are likely to do, you may risk burning out the motor with a miniature version.
You need a larger version, for sure!
We particularly like the well-reviewed Cuisinart 14-Cup Food Processor, which you can purchase from Amazon, Sur La Table, and Wayfair.
This behemoth has a 720-watt motor and a large-capacity processor that will hold an impressive amount of ingredients. Multiple styles of blades and attachments optimize its prepping versatility.
For more information on various makes and models, take a look at Foodal’s food processor buying guide.
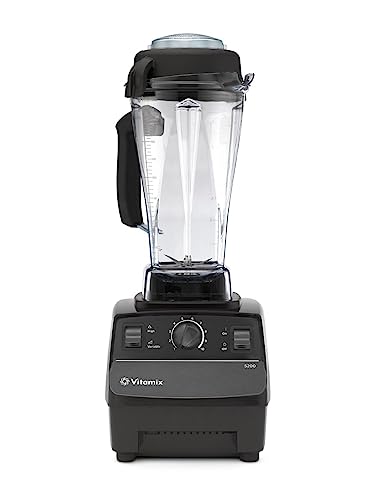
5. Blender
For whizzing up velvety soups and sauces, fresh salsas and condiments, and refreshing smoothies and smoothie bowls, nothing beats the power of a high-speed blender!
Consider buying a blender with a powerful motor, which is more successful in breaking down frozen, solid ingredients.
There is nothing worse than trying to create the perfect on-the-go beverage with an underpowered appliance – no one wants to munch on half-pureed banana bits and pieces halfway through sipping on a smoothie!
If you frequently rely on a blender and need a lot of space for bigger batches, choose a food industry favorite with the Vitamix brand of blenders.
Read our review of the Vitamix 5200 – this blender features a 64-ounce container and a variable speed control. You can read reviews on check prices on Amazon, or directly on the Vitamix website.
You’ll literally laugh like a maniac the first time you use a Vitamix blender, and realize what it can do with a quick click of a button and twist of a dial!
If a full-sized, high-powered blender like a Vitamix is too overwhelming for your own small-scale kitchen requirements, we have other suggestions for you to review.
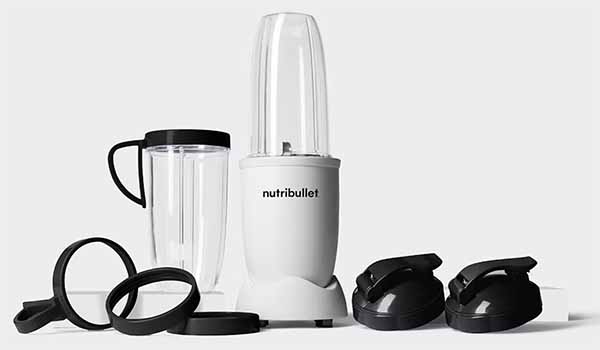
If it’s because you’re trying to save minimal counterspace, or if you only need to prep food for personal use, the Nutribullet Pro 900 will be a more practical choice for you.
It’s available to purchase directly from Nutribullet in various colors, but you can also find this model on Amazon as well as Wayfair.
Make creamy single-serving smoothies, or small amounts of soups and sauces, with the Nutribullet Pro 900. It may be small, but its 900-watt motor base and 32-ounce cup will get you far!
6. Spice Grinder
A fast way to grind up small amounts of whole seeds and spices is by using a spice grinder.
With this nifty appliance, you can create your own spice blends in order to enjoy the freshest and most flavorful food experiences.
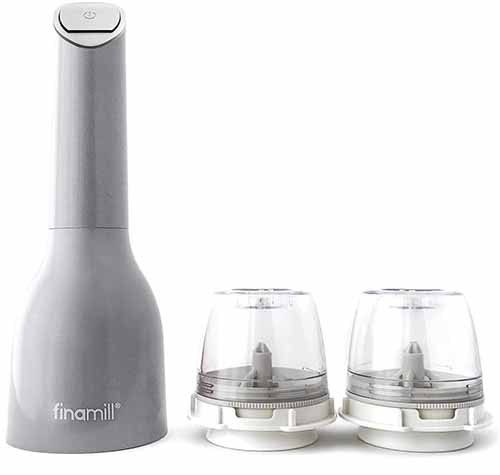
FinaMill Electric Spice Grinder
Savor the taste of freshly ground cacao beans in homemade chocolate date bars, or that spicy sprinkle of ground chili powder over juicy, ripe slices of mango.
This small gadget makes a big difference from the store-bought pre-ground spices and blends you purchase. When you own a tool like this, you can freshly grind your whole spices as needed for recipes.
And if coffee is permitted in your diet, you can also use your tool for freshly grinding whole coffee beans.
Unless you want everything to taste like your single-origin coffee beans – or your cup of coffee to taste like your savory homemade ras el hanout spice blend – make sure to buy one specifically for grinding spices, and another one for only grinding your coffee.
And don’t forget to label them!
Compact and convenient, you’ll love the strength and cordless design of the FinaMill Electric Spice Grinder, available to purchase in different colors from Sur La Table, Amazon, and Wayfair.
The push-button design allows you to operate the tool with only a single hand, and the interchangeable spice pods accommodate individual spices – ideal if you don’t want to blend or cross-contaminate flavors.
7. Juicer
Fresh vegetable and fruit juices are not only healthy to drink as a simple and refreshing beverage, but they are also key ingredients in many raw food recipes, such as soups and sauces.
Think of enjoying a beautifully concentrated carrot soup with a medley of fresh herbs, or a super green pesto combined with a hit of juiced spinach for added color and nutrition.
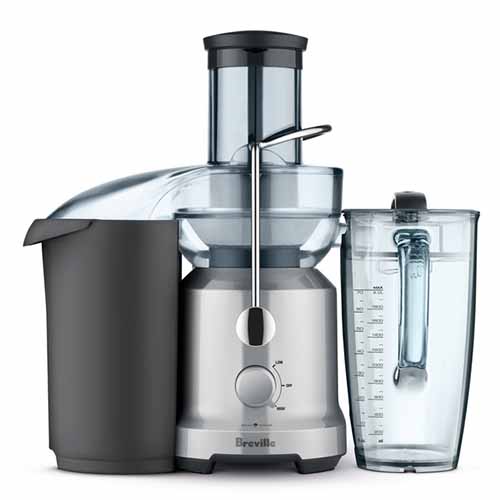
Breville Juice Fountain Cold Juicer
While a blender can quickly puree your food, you might prefer enjoying your juices without any fiber or pulpy bits intruding your drinking or dining experience.
And while you could remove the liquid from the blender through a fine-mesh strainer – that’s a lot of extra, messy work!
For the ultimate smoothness without any textural interruptions, the juicer is the tool for you to get the job done well… and far more cleanly!
My recommendation is the Breville Juice Fountain Cold Juicer, which you can purchase directly from Breville. You can also find it now on Sur La Table.
If you’re serious about buying a quality tool that can quickly process and filter juice with a dual-speed control, this is a stellar model.
8. Food Dehydrator
A food dehydrator is a useful appliance to own for so many reasons – and they’re all tasty!
The most common reason, of course, is to help preserve your ingredients for long-term pantry storage.
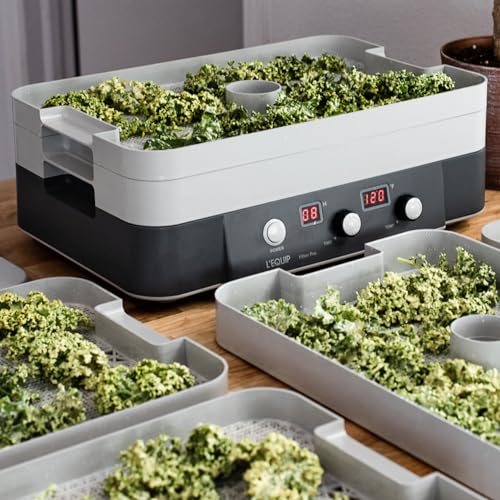
L’Equip FilterPro Food Dehydrator
But dried foods are also used in recipes to concentrate and capitalize on the characteristics inherent within the dehydrated ingredient itself.
For example, dried food has an ability to provide punches of pure flavor in relatively small amounts, or to offer a hearty, chewy, and meaty texture, or to act as a thickener when pureeing.
Dehydrators run the gamut from cheap to ultra-expensive; if you can live with a noisier fan and a shorter lifespan, and won’t be using it all that often, less expensive models may serve you perfectly fine.
With dehydrators, you definitely get what you pay for. Review Foodal’s dehydrator buying guide to help you choose the right one for your needs.
Currently, we’re big fans of the L’Equip FilterPro Food Dehydrator, available to purchase from Amazon.
This option has a digital temperature control unit and timer, and the filtered air system keeps your food clean of contaminants during the drying process.
It includes six trays, but is expandable up to 20 trays – you’ll want to dehydrate everything
Read our full review of the L’Equip FilterPro Food Dehydrator for more thorough information regarding its design, performance, capacity, features, and maintenance.
RAW DIET MADE EASY
Whether you’re a vegan, vegetarian, or an omnivore, introducing more raw foods into your diet is a delicious and natural way to improve your overall health.
And a better diet is even easier to achieve with a well-stocked kitchen of essential tools and appliances.
The modern conveniences of high-quality gadgets and utensils, like what we recommend here as our top choices, can greatly assist implementing a fresh and nutritious diet with minimal processing.
How have you adapted your kitchen to prepare a raw foods diet at home? Is there a tried-and-true tool you love that we did not list here? Let us know in the comments!
We have many more kitchenware guides, so don’t let this article be your final stop! Here are three more to read next:
- The 7 Best Foodie Gifts Under $100
- 5 Helpful Gift Ideas for Anyone Who Hates to Cook
- 13 of the Best Kitchen Gadgets to Save You Time and Money
© Ask the Experts, LLC. ALL RIGHTS RESERVED. See our TOS for more details. Uncredited photos via Shutterstock. Product photos via Amazon, OXO, and Breville. Originally published on February 18, 2015. Last updated on January 5, 2023.
About Nikki Cervone
Nikki Cervone is an ACS Certified Cheese Professional and cheesemonger living in Pittsburgh. Nikki holds an AAS in baking/pastry from Westmoreland County Community College, a BA in Communications from Duquesne University, and an MLA in Gastronomy from Boston University. When she's not nibbling on her favorite cheeses or testing a batch of cupcakes, Nikki enjoys a healthy dose of yoga, wine, hiking, singing in the shower, and chocolate. Lots of chocolate.

I’ve almost completely stopped using plastic cutting boards. It’s almost impossible to wash them properly and there are always microscopic left overs from the cutting, One very important thing regarding wooden cutting boards is proper drying after cleaning. You have to let the board dry up completely before storing it otherwise you risk bacterial growth.
Am sticking to my plastic board come rain or sunshine…well at least until i find a good wooden cutting board that will not with-hold the smell of onions or garlic even after washing thoroughly…the type of wooden cutting boards in my locality {sorry/sad to say} are poorly made 🙁 …but am on the look out on amazon plus some advice in that regard from this wonderful website 🙂
Diane, some of the hardest, durable, and beautiful wood comes from your part of the world. However, some of it can be toxic (at least the sawdust) so I’d be a little leery as well.
Or another trick to stabilize a wooden board is to purchase one with feet and leave it out on the counter. The feet allow for air circulation. These are really only suitable for certain parts of the world though (i.e. McMansions in the USA and Canada). Most kitchens in Asia and Europe are much too small to sacrifice that much real estate on the counter tops.
Now that’s a brilliant idea.. am in the market… shopping/looking for a house so i’ll remember to keep this idea in my head while making those hard decisions…i sort of get the picture you are painting across in this regard 🙂
It is funny hearing all the debate and conflicting information about cutting boards. Just my opinion, but I stick to plastic ones and use bleach after certain preparations. Even being in a science based profession, I never know for sure if cutting board bacteria is a real risk, or if it is just something that gets exaggerated.
This is a great review. I’m not interested in going raw, but I like to see how the other half lives as it were. It seems that half the raw recipes I’ve seen require almost more work than cooked recipes and the other are incredibly simple. I suppose it depends on what you’re trying to accomplish. These gadgets are good for any cook though, so it makes it nice and flexible.
This is a great review, can’t wait to read about the mandoline slicer’s. I have several friends who have gone raw, and other who are on the fence , I will refer them to this article so they can get some insight first hand.
Although there are many things in raw-food you do not do much in regular cooking, depending on cuisine many things are surprisingly the same. And good tools are essential.
Knives and cutting boards are essential for cooking in general as well.
I’ve always wanted to get a food dehydrator and make healthy versions of the fruit roll-up snacks. In the summer, I tend to buy lots of fruits and they go bad quickly; Dehydrators, blenders and juicers are a good way to use up the fruits and make them into healthy smoothies.
Vitamix is ridiculously expensive. Don’t get me wrong, I’ve used them & I love them but five hundred dollars for a blender is a tall order. I’m wondering if anyone has had any luck buying one used or a different (equally good but exponentially cheaper) version?
Joan,
In my mind, the Vitamix is worth it. I’d rather save up for a decent tool rather than settle for a subpar version. If you click the link in the article to our guide, you’ll find that there are some cheaper options (Chinese made) that are apparently as powerful or nearly so. I’d rather buy from a USA manufacturer who has been making the same product (or nearly so) for decades and who keeps parts on hand in the event repairs are need. However, YMMV.
I understand entirely the argument behind spending for quality but jeez Louise on the cost of that blender. I would have no problem dropping three hundred (which is still a chunk of change) on a Vitamix but when you get to the level where I can purchase a used car for the same amount I start to get apprehensive.
Thanks for the knock off suggestions but I’m sure there’s something made in America a couple steps under the Vitamix. I’ll throw another reply in the ring if I find what I’m looking for.
My husband is a chef so he has been able to use the Vitamix at school and in various restaurants but we certainly can’t afford to spend that much on a blender. The ninja series that you can get at Walmart and other big box retailers is no Vitamix but it is good for home use. 🙂
Wow I had not thought of my glass cutting board taking a toll on my kitchen knives! I appreciate your inputs on this article, since I am not always the most kitchen-savvy person around it really helps me plan what appliances and utensils I’ll be needing to purchase soon. I have been looking into getting a food processor, I did not realize how handy they can be for making so many different types of foods! Definitely a very insightful and knowledgeable article!
Plus, yes glass boards are one of my pet peeves. They are horrendously damaging to the edge of your knives (if you like to keep them sharp like I do). I’d recommend clicking on the link to my cutting board article to read more of the role that cutting boards play in keeping your tools in tip top shape.
I can understand how going live is like a lifestyle change that requires these helpful tools. They seem like they provide more convenience by saving time and effort. Plus, if you have these tools, it seems you could be more creative with your meals. I can not see going all raw because I feel I would be bored. These tools would help with that. Like the mandoline slicer and the dehydrator. I really like dehydrated snacks. Also, the high powered blender can produce creaminess in drinks and dishes. Thanks for this quick run down of these various time saving devices.
I’ve been looking for a list like this for several weeks. I am planning on taking on a raw til 6 approach to nutrition and this is just what I needed to prep. I hope that you will post some delicious raw recipes for us to use!
GPM, I’ll try to work some up; the next three weeks are going to be hectic though so I can’t guarantee anything in the short term.
I think the post was great for basic stuff, but from the stories I heard from raw-eating people, they always seem to love stuff like zucchini noodle for making spaghetti. I imagine it needs one of these devices to get your veggies twirled and all in different ways — I’d like to see recommendations for what to look for in that.
Speaking of blenders…the last one we {my mom & i} had, while the motor would run…it would emit some sort of awful smell and it would really scare me/us steep…now i know what to look for…a heavy duty blender with a powerful motor and ‘wave action’ {thanks for the great advice in that regard} 😉
I love cutting boards not just for cooking but they can be used in so many ways. Heck we’ve used them in place of a table mat before because their easy to clean. Sometimes I use the thick ones on the table to sit a pot of food onto that is really hot. So aside from prepping they are wonderful to have.
What an array of appliances! I think if I were to have all of these in my kitchen, I would be some sort of Iron Chef! While the knives and boards go without saying, there are few others that I own. The next thing for me will be the Vitamix blender, I’ve heard so many great things about these, I can’t wait to double my vegetable intake through smoothies and raw juices. Not to mention making your own flours and spice mixes.
I need to get a sturdy cutting board. I use a cheap plastic cutting board that has so many cuts in it, which probably means I’ve been eating plastic pieces for years. I also have a coffee grinder lying around the house, and I can attest to the fact that it’ll grind up more than just coffee beans.
That dehydrator would be nice to have. All the other ones are obvious must haves.
I think having the right cutting board and knife set makes such a difference. I used to use a cheap knife set. I would always slip and almost cut my fingers. Also I would never be able to cut my veggies thin enough. I finally invested in a a good quality knife and it makes such a difference. I’m able to slice veggies thinner then I was ever able to. I also don’t slip which cutting as much. I’m a big fan of cutco knives. I invested in a vegitables and meat knife and those are the only two I ever use.
When my current girl friend introduced his work mate as a raw food chef i almost burst with laughter. I never imagined a raw food chef would look so sassy. I however came to realize that their existence is really significant in our day to day lives. I’m sure this article is really going to draw her attention.
The mandolin is the king of all kitchen cutting tools if you do any cutting in volumes.
I’m not into the whole raw food fad, but I make a lot of things at home that need to be sliced like homemade potato chips or vegetable fries.
The mandolin does the job in 1/10 of the time as a conventional knife, leaving me more free time for the important things in life (like drinking craft beer and reading this blog!)
I am not on a raw food diet, but I do try to make some raw food regularly. I am also very interested in raw cakes and desserts (hint, hint 🙂 ) I agree that knives and a cutting board are very important in any kitchen, and my blender was a very good investment. I do not own a dehydrator, but use the sun for drying food sometimes. A food processor and mandolin or on my wish list.
Will definitely be getting these the next time I go to a food appliance store. I love making raw food because it is much healthier. With raw meals the appliances are used much more and can shape the whole meal. Food processors and blenders are essential to great raw meals because they can make the meals so much more interesting. I need to invest in a new high power blender. Mandoline slicers can also make dishes very interesting.
Learning to eat better is hard. I did not know I would need all of these devices to do so but I know now. I understand what everyone is saying about cutting boards. I have a plastic one and I hate cleaning it. It seems like everything sticks to the board. I also think that a blender is great to have in general. I like my ninja but I am not a heavy blender. At least not yet.
I was hoping that this article would discuss how to pick the best fresh fruit and veggies. This is something I struggle with on every trip to the grocery store. You can look at an apple and clearly see that it is bruised or rotten. Or with tomatoes if they are really soft, you can know that it is probably not a good one to buy. But what about spaghetti squash or avocados. There is so much to learn about choosing produce.
Thanks for sharing this wonderful article with us. I have been vegan for 6 years and now a raw vegan for 1 year and 2 months, and I really love it. I have had a strong passion for natural health ever since I was young and I love preparing food. It has been ringing in my ear to start a raw vegan business since I have such a passion for it, and I have prerecorded lots of raw recipes on my computer, but am stuck a to how to start. I have many friends who have commented on a few recipes I shared on my timeline. Please can you give me any advice? Thanks.
Knife sets are a waste of money: you need a good chef’s knife, a utility knife, and a serrated blade. Maybe good poultry shears.
Immersion blender over a regular one, unless you’re into smoothies. I’ve taken my blender out once, maybe twice in the past year, but use the immersion blender weekly.
And an electric pressure cooker will be FAR more useful than a dehydrator for almost everyone.