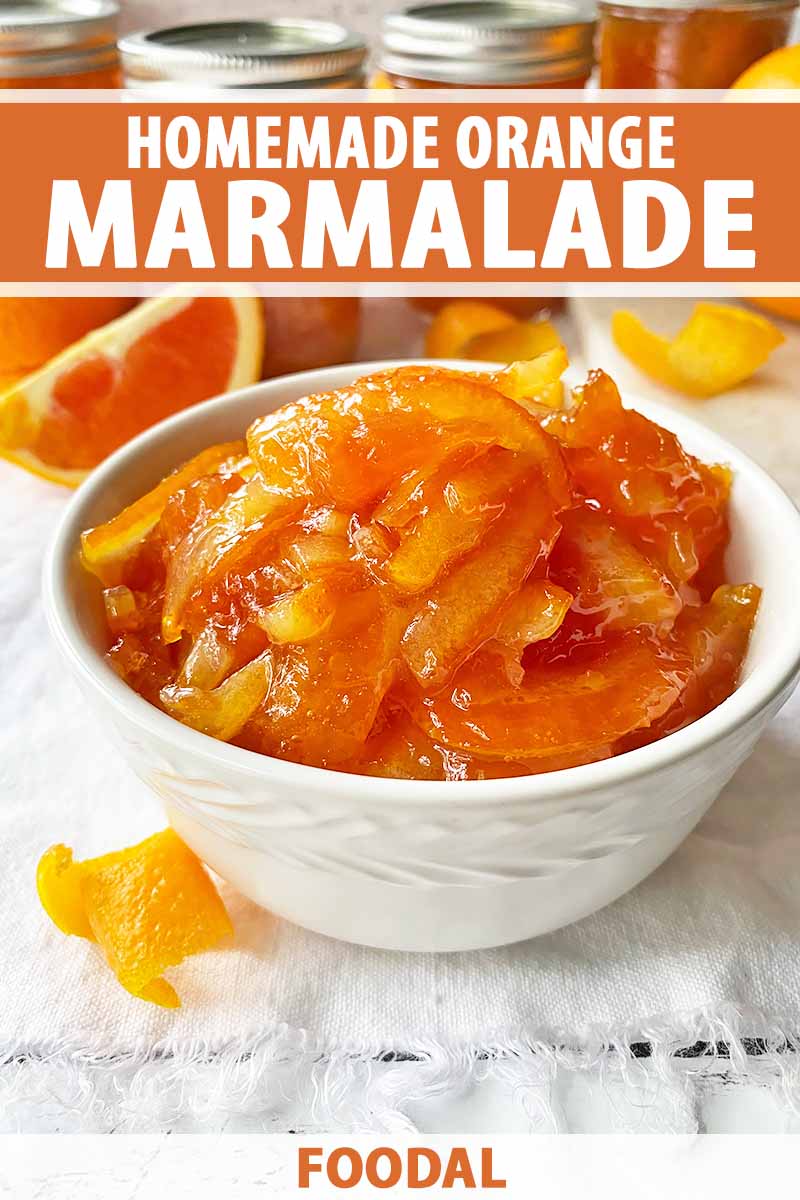
With its vibrant and sunny color, equally matched by its bright and perfectly bittersweet flavor, here’s a recipe that will immediately “spread” a smile across your face:
Homemade orange marmalade!
Beloved by wise bears – Paddington Bear always keeps a marmalade sandwich in his hat in case of emergency – and humans alike, this gorgeously hued condiment is a truly unique offering for breakfast, brunch, snacking, and beyond.
Resolutely standing out among all the other jams, jellies, and preserves, this citrus-based spread has earned an entirely separate level of respect, fame, and use different from your typical PB&J restrictions.
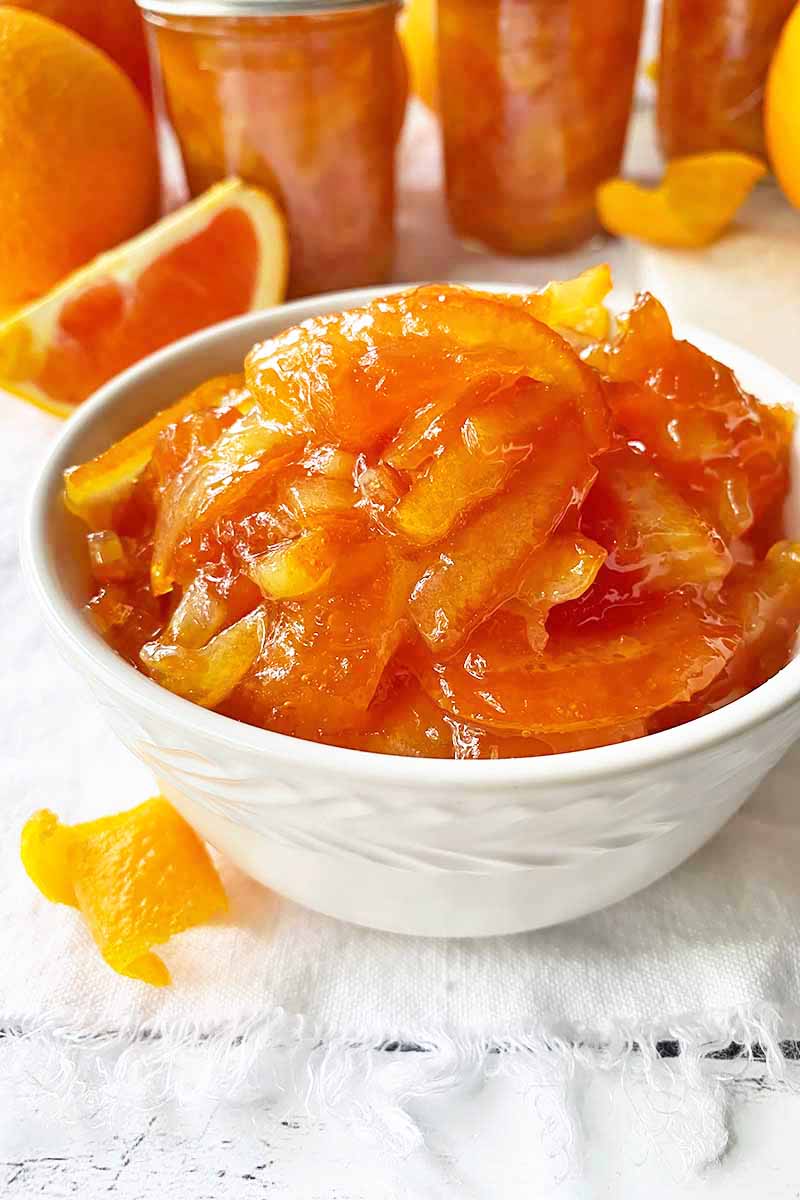
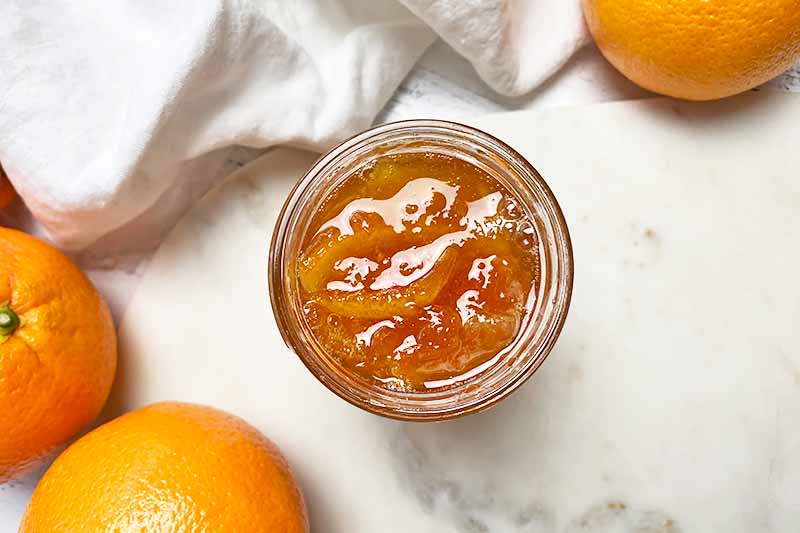
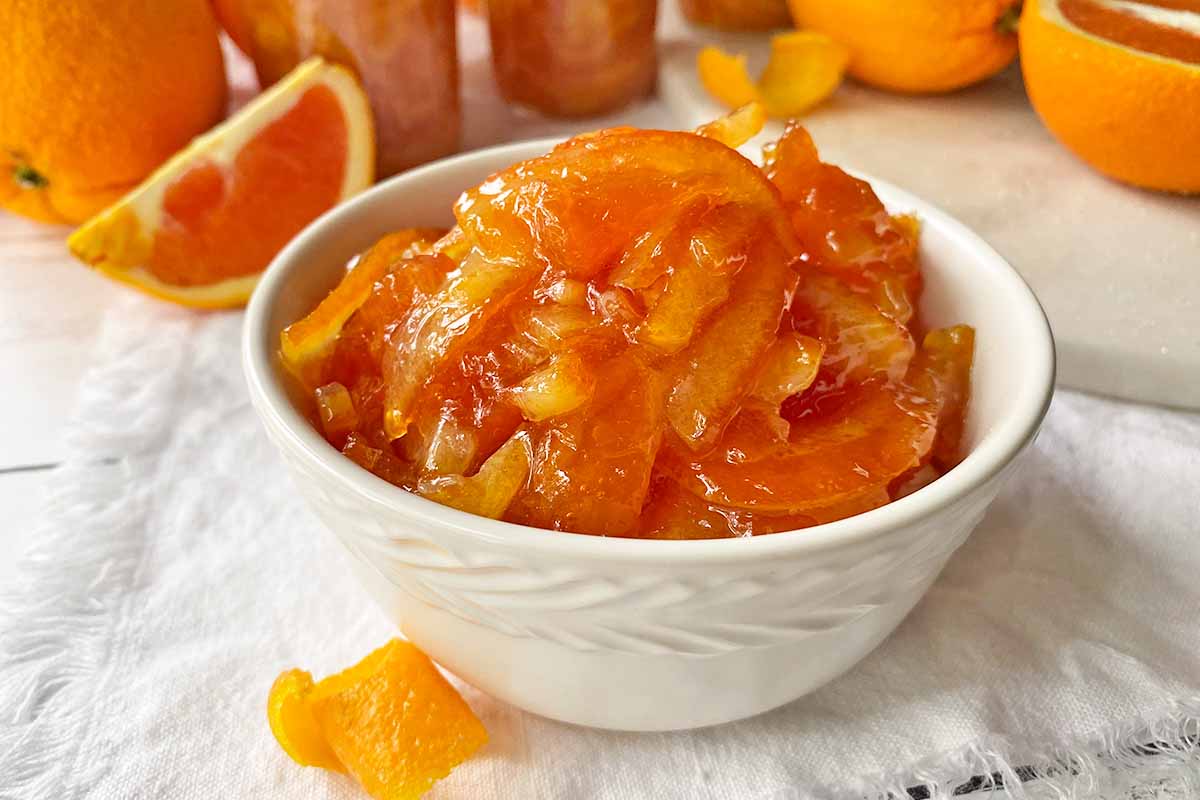
Suspended throughout the thickened base, thin strips of the softened rind offer kaleidoscopic beauty in the glass jar.
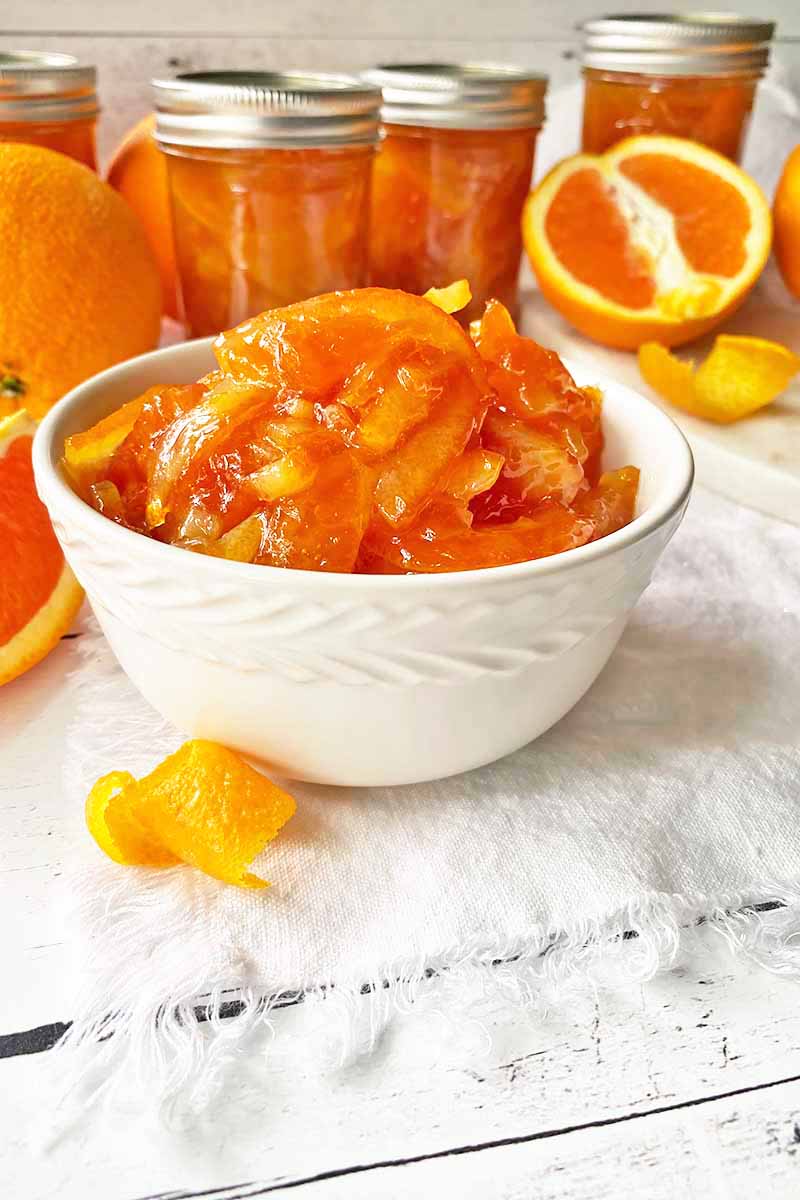
And once you are finally able to peel away your eyes from staring at this mesmerizing display to try a taste, you’ll enjoy the playful consistency and dynamic flavors.
Maybe The Verve had it all wrong.
While the band makes a compelling argument that life is a bittersweet symphony, this might be a more fitting description for our homemade marmalade.
Both sweet and bitter, as well as soft and chewy, there is an artful yet strategic balance of sugar, acid, and texture that echoes the same focused care a composer takes to creating a musical piece.
But you won’t be required to have a thorough understanding of music theory and composition to make the recipe.
You just need 4 ingredients – oranges, lemon, sugar, and water – and some time and patience to compose your own beautifully bittersweet symphony.
Print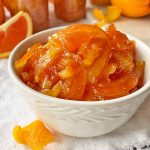
Homemade Orange Marmalade
- Total Time: 10 hours
- Yield: six 8-ounce jars 1x
Description
Love a little orange marmalade on your toast? Learn how to make our beautifully bittersweet recipe, and you’ll be set with a sunny spread.
Ingredients
- 2 pounds whole oranges (3-4 medium oranges), scrubbed, rinsed, and dried
- 1 large lemon, scrubbed, rinsed, and dried
- 4 1/2 cups granulated sugar
- 6 cups water
Instructions
- Remove and discard both ends of each orange. Slice the oranges in half, then cut the halves into thin, even slices about 1/8-inch thick. Reserve any orange juice, and discard any seeds.
- Zest and juice the lemon.
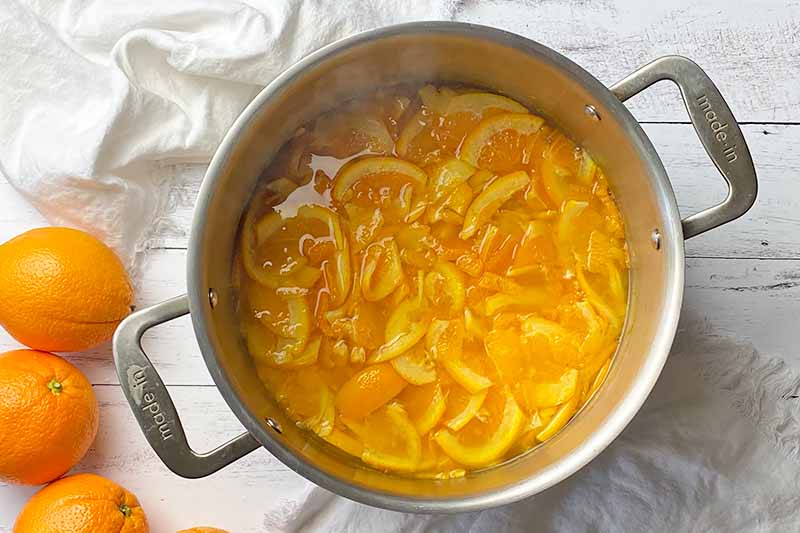
- Place the oranges, orange juice, lemon zest, lemon juice, and water in a large saucepan, one that can hold at least 6 quarts.
- Place the saucepan on the stovetop over high heat and bring to a boil. Reduce the heat and gently simmer for about 40 minutes, stirring regularly, until the fruit has softened significantly.
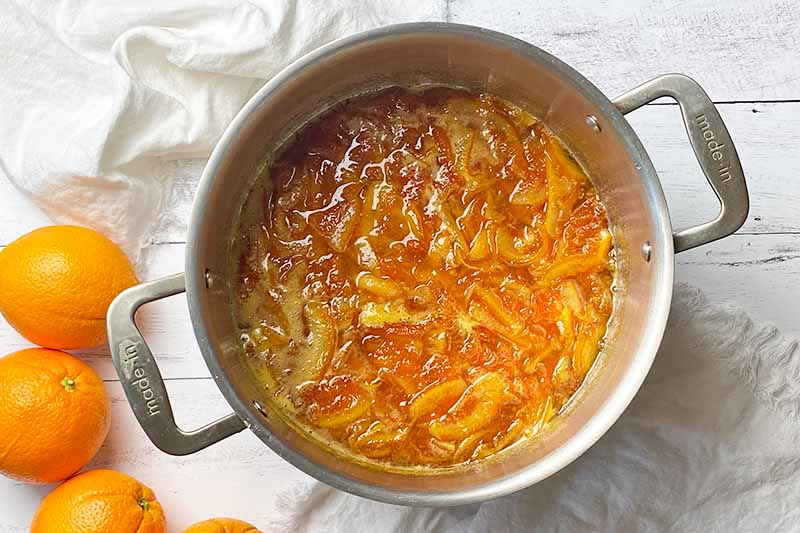
- Stir in the sugar and increase the heat to high. Bring the mixture to a boil. Stirring continuously, boil the mixture until it reaches 220°F on a thermometer, about 35-45 minutes. The mixture will darken and thicken slightly. Turn off the heat and remove the saucepan from the stovetop.*
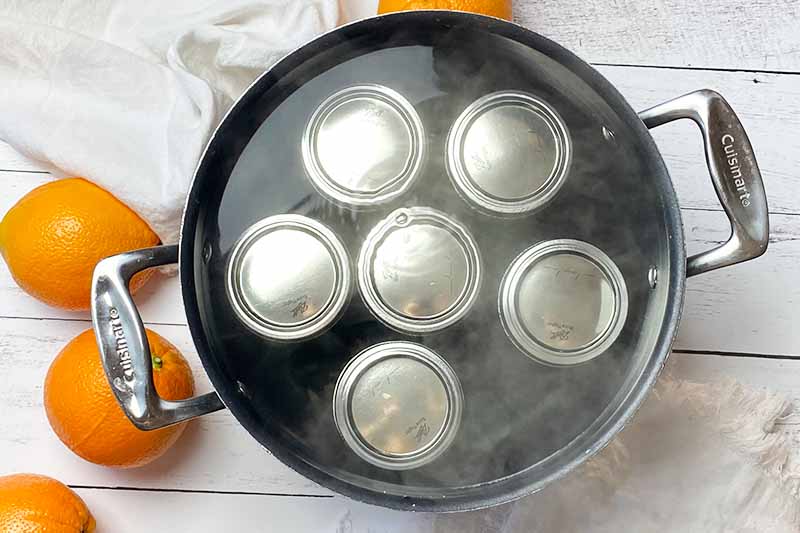
- While the mixture is cooking, clean the lids and rings in hot, soapy water. Rinse, dry them completely, and set them aside. Fill a large, 12-quart pot with water. Submerge the clean, empty jars (without the lids and rings) right side up, making sure the water level is at least 1 inch above the tops of the jars. Bring the water to a boil, and continue boiling for at least 10 minutes to sterilize the jars.
- When ready to fill, remove one jar at a time from the pot of boiling water with tongs, draining any water inside the jar back into the pot, and keep the water at a steady simmer. You’ll use the same water to process the jars after they have been filled.
- Working quickly and cleanly, ladle the marmalade into one jar, leaving about 1/2 inch of headspace. Use a wide-mouth canning funnel for the cleanest filling procedure.
- Wipe the rim of the jar clean, center a clean jarring lid on top, and tightly screw on a clean jarring band. Set aside for processing as you fill the remaining jars.
- Quickly repeat Steps 7-9 with the remaining jars.
- As soon as you screw the band on the last jar, immediately and carefully place all of the filled and enclosed jars in the pot of simmering water, using tongs. You may need to refill with more water as needed to maintain at least 1 inch of water above the lids. Bring the water back to a boil and process for 10 minutes.
- Remove the jars from the pot and set them aside to cool completely without disturbing them, for at least 8 hours or up to 24 hours. If the lids have created a seal, label and store the jars in a cool, dry place for up to 1 year. Any jars that have not sealed must be refrigerated immediately and used promptly.
Notes
*For another means of testing the marmalade’s consistency, place a small plate in the freezer as you are cooking the mixture. After 25 minutes, place a teaspoon of the mixture onto the chilled plate and allow it to sit for 30 seconds. Tilt the plate. The mixture should be a soft gel that moves very slowly. If the mixture is thin and runs easily, it is not ready. Continue boiling for an additional 5-10 minutes and test again.
- Prep Time: 30 minutes
- Cook Time: 1 hour, 30 minutes
- Category: Marmalade
- Method: Stovetop
- Cuisine: Spread
Cooking by the Numbers…
Step 1 – Check the Equipment
Before you start, review what’s required for the correct procedures of water bath canning – now is the time to refresh your memory and learn about the safety precautions for every step. This is also a great guide for beginners.
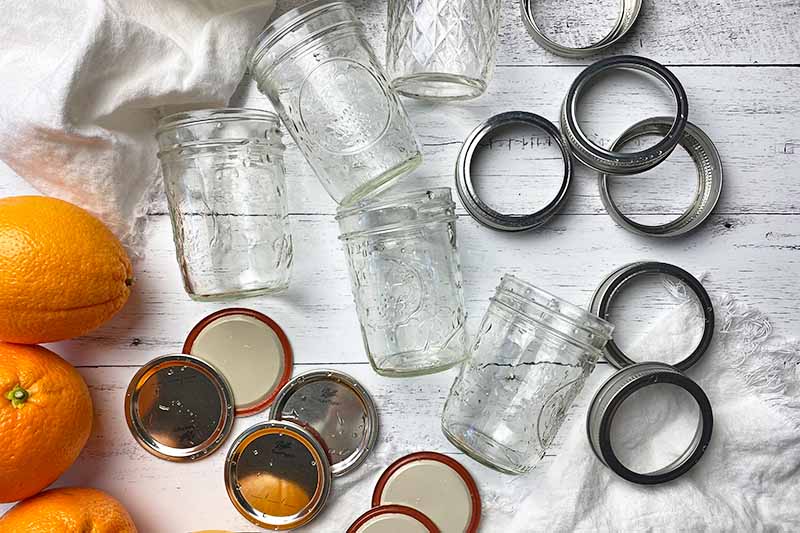
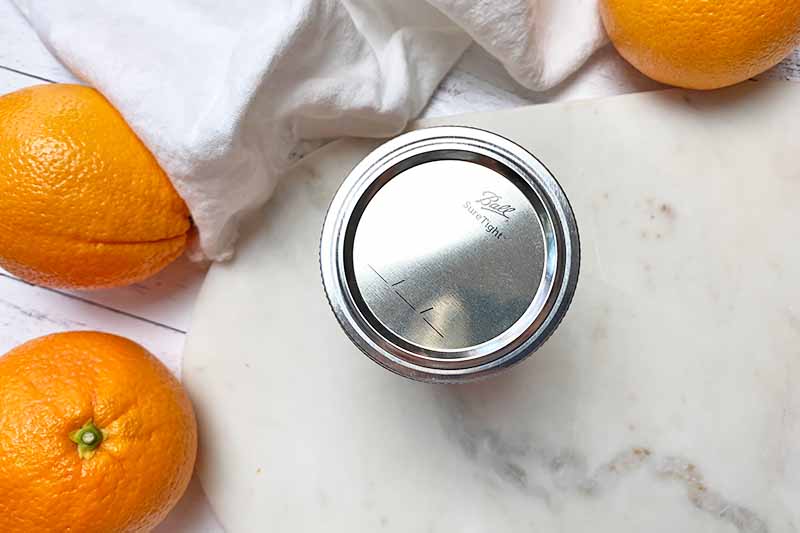
Now is also the best time to check your jars, lids, and rings. Make sure they are all in good condition! If the jars are chipped or cracked, the rings are rusty, or if you haven’t replaced your bands recently, you may need to buy some new canning jars and accessories.
Set out a large pot that’s big and tall enough for processing the jars, like a tall, 12-quart stockpot. Set out a large, 6-quart saucepan for preparing the mixture.
Gather any of your preferred tools for jarring, including clean towels, ladles, sturdy spoons/spatulas, a wide funnel, and tongs or a jar lifter. We also recommend using a thermometer for the most accurate temperature reading.
For this recipe, you’ll need six 8-ounce glass jars with lids and rings – but always have on hand one or two extra sets, just in case!
Alright, now we can move on to the ingredient prep!
Step 2 – Prep and Measure the Ingredients
Thoroughly scrub, rinse, and dry the oranges and lemon. Because we are using the rinds and zest, ensure that the exterior of the fruit is as clean as possible.
Using a sturdy cutting board and sharp knife, remove and discard both ends of each orange. Slice the oranges in half, then carefully cut the halves into thin, even slices about 1/8-inch thick. Remove and discard any seeds.
Reserve any juice to add along with the prepped ingredients in the saucepan.
Prized for their bitterness and naturally high levels of pectin, Seville oranges are the preferred variety for making traditional marmalade, particularly in Great Britain.
However, use whatever sweet orange variety is available to you at your grocery store, such as Navel, Cara Cara, or Valencia – because all oranges are rich in pectin, any of these will still yield successful results!
You can use blood oranges, but note that the final color of the spread will be slightly darker.
Zest the lemon with a Microplane or zester, and juice the whole fruit.
Save any unused fruit pieces for your kitchen compost in order to reduce food waste.
Measure out the granulated sugar and water.
Step 3 – Simmer the Fruit with Water
Place the sliced oranges, orange juice, lemon zest, lemon juice, and water the saucepan. Mix everything together.
Place the saucepan on the stovetop over high heat and bring the water to a boil. Once the water is at a boil, immediately reduce the heat to medium.
Gently simmer the mixture for about 40 minutes, stirring regularly, until the fruit has softened significantly. A fork should be able to easily pierce the rinds with very little resistance.
Step 4 – Add the Sugar and Boil
Once the rinds are soft, stir in the sugar and increase the heat to high in order to bring the mixture back to a boil.
Stirring continuously with a heatproof spoon or spatula, continue boiling the mixture until it reaches 220°F on a thermometer.
This will take about 35-45 minutes, but the time range may be shorter or longer. The mixture will darken, reduce, and thicken slightly. You’ll notice that the temperature will linger around 210-212°F for quite a while – stay patient!
If you don’t own a thermometer, or if you want a second method of checking the marmalade’s consistency for reassurance, use this freezer method:
While you are cooking the mixture, place a small plate in the freezer. After 35 minutes of cooking, pour about one teaspoon of the mixture onto the chilled plate. Allow the mound to sit undisturbed for 30 seconds. After this amount of time, slightly tilt the plate – the mixture should have hardened to a soft gel that moves very slowly. If it is too thin and runs quickly and easily, the mixture is not ready for jarring. Continue boiling it for an additional 5 to 10 minutes, and test again.
Turn off the heat and remove the saucepan from the stovetop.
Step 5 – Sterilize the Jars
While you are cooking the mixture, this is the best time to sterilize the jars.
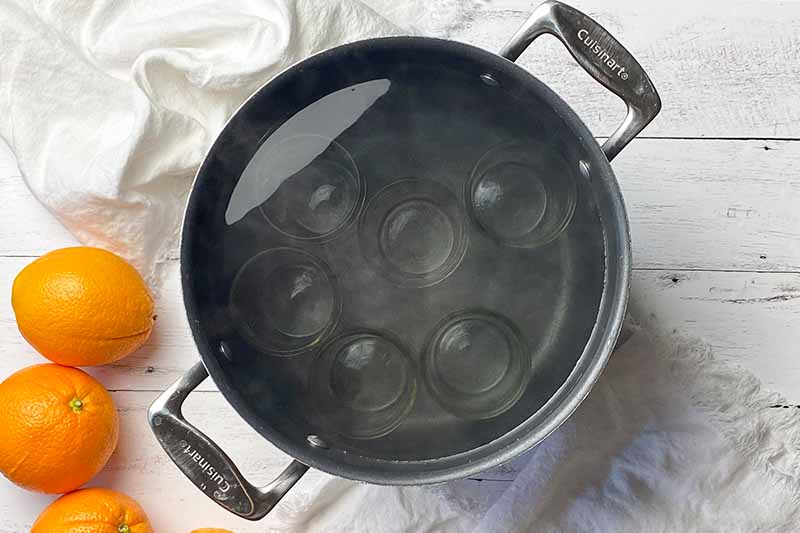
Fill the stockpot about 3/4 of the way full with water.
Submerge the empty jars – without the lids and rings – right side up in the stockpot, making sure the water level is at least 1 inch above the tops of the jars. You may need to fill it with additional water.
Bring the water to a boil to sterilize the jars. Boil for at least 10 minutes.
If you’re running behind schedule, keep the jars in the boiling water as you work through prepping and cooking the recipe. They can stay in the hot water for over an hour.
Because they should be hot and sanitized directly before filling, you don’t want to remove them too early.
I prefer to sanitize the empty jars while I’m cooking the mixture, and then filling them one by one – especially if you are working by yourself, you’ll be creating the most efficient and the most sanitary process this way. Your jars will be prepped and hot in advance, and you can fill the jars immediately when you’re 100% ready to go!
While opinions vary, you can choose whether or not to heat the lids and rings as well – if you don’t want to simply clean them, you can use a separate small pot to gently heat them in slightly simmering water.
Keep in mind that vigorously boiling water will be hot enough to destroy the rubber ring inside the lids.
Step 6 – Fill One Jar
If you’re working by yourself, remove and fill just one jar at a time.
Work quickly but carefully during the next few steps – you want the jars and fruit mixture to be as hot as possible to create the best seal.
Remove and drain one jar from the boiling liquid, and set it on a clean surface next to your marmalade. Keep the water at a steady simmer, since you’ll be using the same water that’s in the pot to process the filled jars.
At this point, you may need to add more water, as some will have evaporated throughout the past few steps.
Working quickly and cleanly, using a wide-mouth canning funnel if you own one, carefully ladle the marmalade into one jar. Leave about 1/2 inch of headspace at the top.
If you have helpers like your children in the kitchen, and you’d prefer to fill multiple jars at once, you can go ahead and do so.
Step 7 – Assemble Lid and Band and Repeat
Wipe the rim of the jar completely clean, center a lid on top, and tightly screw on a ring. Set aside for processing as you fill the remaining jars.
Repeat Steps 5 and 6.
Step 8 – Process
Immediately and carefully place all of the filled jars in the pot of simmering water – this is another instance when a jar lifter is the supreme tool to use! Ensure that they are not touching.
You may need to refill with more water as needed to maintain at least 1 inch of water above the lids.
Bring the water back to a boil, and process the jars in the boiling water for 10 minutes.
Step 9 – Cool Completely and Store
After 10 minutes, immediately remove the jars from the pot. Set them aside on a heatproof surface to cool completely without disturbing them, for at least 8 hours or up to 24 hours.
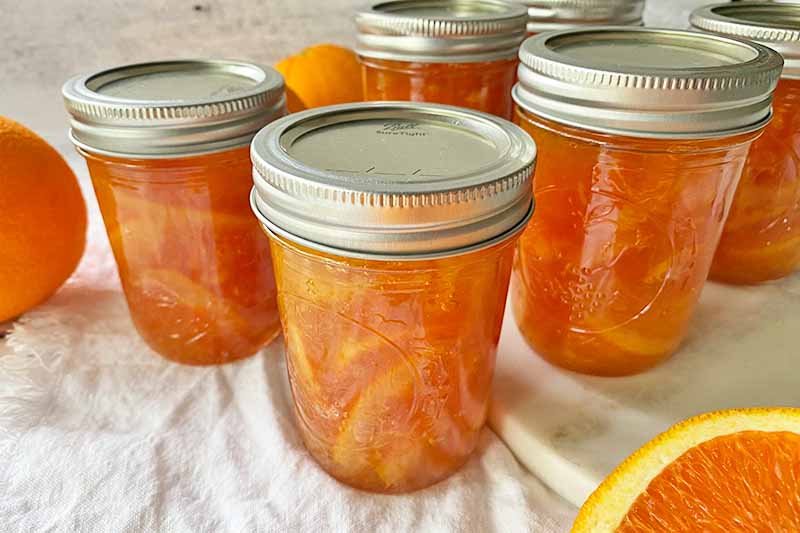
Don’t rush this step! They need this undisturbed time for the lids to properly seal. Once you have placed them in their dedicated space, don’t touch them.
That means…
No moving, shaking, rubbing, rolling, tapping, or twirling!
Once they have fully cooled, and if the lids have created a seal, you’re good to go for long-term storage! Label and store them in a cool, dry place for up to 1 year.
If the lids are not sealed, you can choose to repeat the jarring process again with clean equipment.
But I think you’ve already worked hard enough – simply refrigerate the unsealed containers and enjoy your spread within a week, or gift a jar to your friend as an impromptu surprise.
You Made It – Now Use It!
You can use your expertly crafted homemade marmalade in both sweet and savory applications.
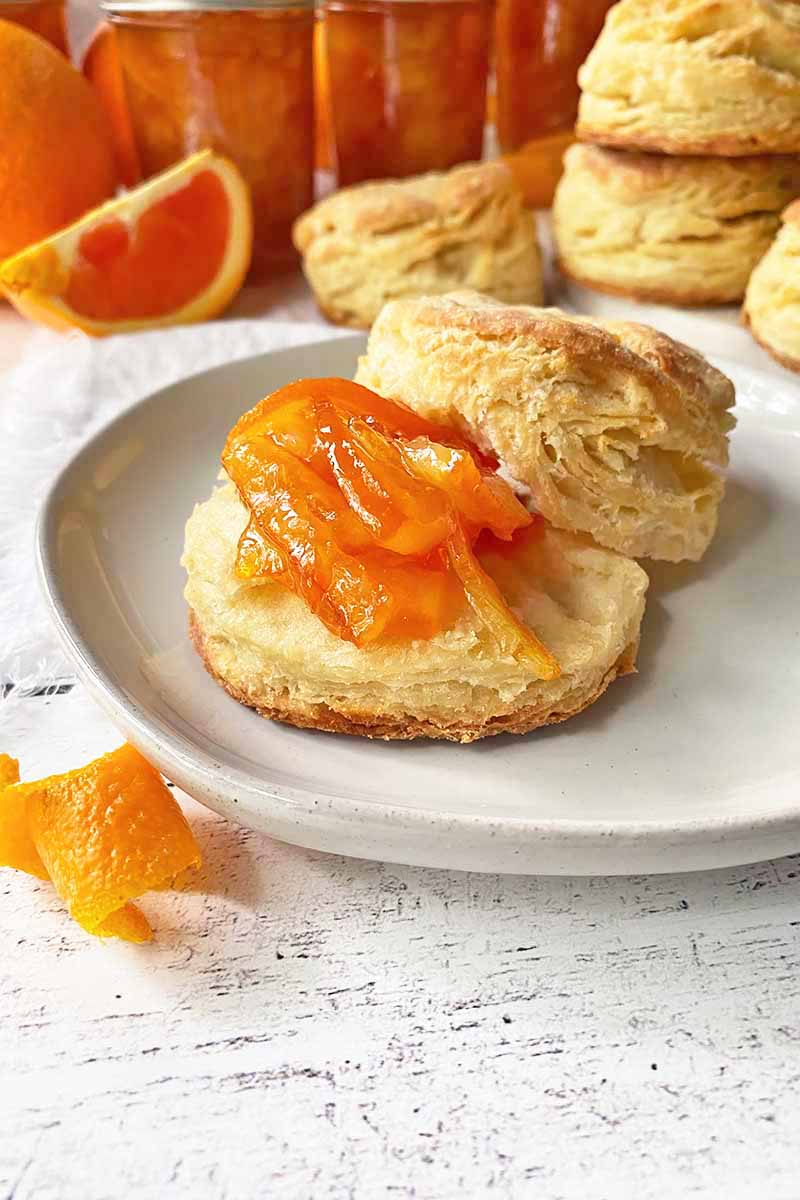
While Paddington Bear proudly stands by his sandwiches, it’s an ideal accompaniment for spreading on other carb-y bases like English muffins, buttermilk biscuits, toast, and blackberry scones.
It also pairs well with many different flavors of muffins like blueberry, cardamom pistachio, and Spanish magdalenas.
While you can use the spread in a glaze for yogurt cakes, don’t limit yourself to dessert and breakfast – the dinner territory will also benefit from a generous dollop or two!
Our juicy, 20-minute marmalade chicken is a quick entree made with a sweet-and-savory sauce.
What’s your favorite way to use marmalade? Have you ever tried making it from scratch before? The comment section is open – let’s have a chat!
“Orange” you glad you read this article? I’ll keep any more cliched jokes to myself, but I’m happy to share other recipes that bask in the sunny vibrancy of fresh oranges! Here are three for you now:
About Nikki Cervone
Nikki Cervone is an ACS Certified Cheese Professional and cheesemonger living in Pittsburgh. Nikki holds an AAS in baking/pastry from Westmoreland County Community College, a BA in Communications from Duquesne University, and an MLA in Gastronomy from Boston University. When she's not nibbling on her favorite cheeses or testing a batch of cupcakes, Nikki enjoys a healthy dose of yoga, wine, hiking, singing in the shower, and chocolate. Lots of chocolate.
I’ve never had this before let alone a homemade version. This recipe looks really cool to try. Is this just a type of jam?
This is by far my favorite thing to put on toast or bagels or muffins. Yum. The picture was sitting there, looking so pretty and delicious, and then I noticed a chicken picture right next to it. This would be so good on chicken! See, you give me ideas when you’re not even trying to, haha.
I don’t think I’ve ever had this homemade. I never even thought about making it myself. This page is definitely a keeper.
A neighbor has an orange tree that she says was planted by the former owner, who was a chef. The oranges are too sour to eat, but apparently are perfect for marmalade, so I might have to get some from her, and try making this recipe. I love marmalade on toast with peanut butter, as well as on hard boiled eggs with butter.
I have sort of gotten used to the American PB & J custom, but wouldn’t marmalade be a bit sour for that to work? I do think it goes pretty well with cream cheese (another combo I learned since moving to the US) so I guess anything is possible (and of course a matter of taste).
It is good with peanut butter, although that’s not my preferred way to eat it. I generally like grape or strawberry jam with peanut butter.
You nailed it. It is fantastic with cream cheese, thus why I like it on bagels. This combination would also be really good for stuffed French toast. I think there is a recipe here for that.
Ah, yes, here you go: https://foodal.com/recipes/strawberry-marscarpone-stuffed-french-toast/
This sounds like a pretty cool idea to try, especially for my little cousins who love all types of jam. Would this work for other types of marmalade (I’m sure though with a slight tweak to the recipe)? I think I’ll probably take a day off and see if I can come up with similar recipes for other fruits. 😀 Thank you for this recipe!
I haven’t had marmalade in the longest time, and I’ve never tried a homemade kind before! I’ve made a few types of jams however, and this looks like it shouldn’t be too difficult of a recipe to give a shot, so I’ll have to try it out when I get my hands on some nice oranges. I used to have this tasty spread on toast almost every morning when I was living on my own, but now that I’m back home with the parents I have had to hold back because my father had some bad experiences with it.
Funny story actually;
When he was a child, my dad asked his mother for 5 slices of bread with jelly on it. She misunderstood, made him 5 sandwiches instead, and because they were the type of family that didn’t want anything to go to waste my father ate himself sick on them. That was nearly 55 years ago and he still dreads it to this day!
I love it though, so when I make some I’ll have to hide it from him. 😉
Next time I go home I must make sure to get my Mom to teach me how to make it. This post brought back so many memories. Her favorite recipe also includes ginger.
When I was a kid I had no interest in all there things, but now I realize what I was missing out on–not learning skills like making jelly and canning preserves.
This recipe looks perfect, much more simple than the recipe I used earlier this year.
It is amazing on homemade bread, my 1 year old can’t get enough of it!
I’ve also used it as a substitute for orange juice in an orange chicken and stir fry recipes, it was so delicious.
I’ve always heard of orange marmalade but never had it before. This looks like a pretty easy enough recipe to try.
I do so wish I liked marmalade!
Making it was one of my late father’s favourite pastimes and the smell of the sliced oranges, then the warm sweet smelll of them bubbling away gently in the pan was one of my strongest childhood memories. When he turned seventy he decided it was a better idea to make smaller batches in the microwave and keep the resultant marmalade in the fridge. Perhaps I should try it with a mix of sweet and sharp oranges. Now there’s an idea…
Orange marmalade is my favourite topping for toast. I really enjoy the tang against the creamy butter (always butter and always unsalted). My preference is for fine shred ad I’m not a huge lover of big lumps, but I don’t really understand the idea of shredles – that seems to completely defeat the purpose. I definitely want to have a go at this recipe!
I used to think that marmalade were simply made with two simple ingredients like the fruit and sugar. I suppose I can make a mango version with your recipe. I’ve never had it before and had always thought of it as similar to jam. I’m sure it would taste great with the local bread that we have and it’s high time I make my son have something fruity on his bread.
I love marmalade and made a strawberry version before. I will make this with my kids on the weekend when we love to try out new things to make, cook and bake.
This looks like an amazing recipe. Thanks for posting it. I really love making food but never had the guts to try making marmalade. I usually buy it in the store but with this recipe I am definitely going to try to make it at home. My kids love jams and I think this will make it even more special.
When I first read the title of this post I thought that it would be a really difficult thing, but it seems actually extremely easy to do. I also have never heard about orange marmalade except for one day when I was looking for a TV show to watch and it has the orange marmalade title, lol! And since I love orange (and marmalades in all their presentations) this seems a really good idea for breakfast or even for some snacks.
Thank you so much for sharing! 🙂
My mom is a big fan of marmalades, I will copy this down and give ti to her so she can try it out for the first time. I do not really know if she will like the orange marmalade, but I really believe she will love it instead. Thank you for sharing this!
This marmalade is simply divine! It has a beautiful glossy look and the taste is out of this world. I have this with toast every morning and it brightens up my day.
After a couple of jams, I tried to make this marmalade, which was a bit difficult because things are a lil different here in the Netherlands. I used an orange which is made for its juice, hope I had the right kind. The sugar too was a guessing game. I used a kind of sugar especially made for making jams, which is supposed to give the jam or jelly its thickness. I couldn’t get this marmalade to thicken though. It is still cooling but I am afraid it might stay liquid. So I was wondering, how long do you cook it after you add the sugar??
Thanks for your question, Rinske! We’re hoping to post an update to this recipe soon, with more finely tuned directions.
Yes, juicing oranges should be absolutely fine. The type of sugar that I think you’re referring to has pectin added, which isn’t necessary for this recipe. And you’re right- thickening should continue as the jam cools. The timing may vary, but for this recipe you should add the sugar and continue stirring as it dissolves. Then, allow it to continue to boil without stirring. Watch it as it boils to determine when it’s reached the set point- the boiling will slow and mellow a bit, after about 30 minutes or so.
I had the same problem. I made this recipe and it had not jelled yet. I thought after it cooled it would jell, and I put them in the refrigerator to see if that would work. I have made other jams and had no problem. What can I do if it doesn’t get like jam? Can I pour it back to boil it again? I am disappointed! Please advise.
Carol Erickson
Wow, this marmalade recipe is a game changer! I’ve tried so many recipes before but none of them came out as perfect as this one. The balance of sweet and tangy is just right. Can’t wait to make another batch!
Never thought I could make such a delicious marmalade at home. This recipe is easy to follow and the results are amazing. It’s so flavorful and fresh. Highly recommended!
My daughter made orange marmalade that did not thicken , it was perfect syrup for waffles . I love orange marmalade on my crepes , nothing better !
I made this marmalade for a family gathering and it was a hit! Everyone kept asking for the recipe. It’s definitely a keeper. Thank you for sharing such a wonderful recipe.
I’ve been making marmalade for years and this recipe is by far the best I’ve tried. The texture is perfect, not too thick or thin, and the flavor is just incredible. I’ll be making this again and again.