Searching for a way to customize the WooCommerce shop page? In this step-by-step guide, you’ll learn three 100% code-free methods to customize your store’s shop page.
Your store’s shop page, also called the catalog page, is the page that lists multiple products. That could be all of your products (on the “main” shop page) or products with a specific product category or tag.
In more technical terms, it’s the archive design for the Products post type in a WooCommerce store.
Because your shop page is what helps visitors browse and discover your products, it’s important to get it right. This post will teach you how!
Below, you’ll learn three different ways to customize the WooCommerce shop page without code, using our Botiga theme as an example:
- Built-in options in the native WordPress theme Customizer
- The native WordPress block editor
- The Elementor page builder plugin (this method will let you use the free version of Elementor)
Note — If you haven’t created your WooCommerce store yet, you can head over to our guide on how to create a WooCommerce store. Once you have a working store, come back here to start customizing the shop page!
Table of Contents
- A Quick Introduction to Customizing the WooCommerce Shop Page
- Method 1 – Shop Page Customization with the WordPress Customizer
- Method 2 – Shop Page Customization with the WordPress Block Editor
- Method 3 – Shop Page Customization with the Elementor Plugin
- Conclusion: Create a Custom WooCommerce Shop Page Today
A Quick Introduction to Customizing the WooCommerce Shop Page
If you want to fully customize your WooCommerce shop page, you’ll want to choose a WooCommerce theme that’s built to give you flexibility.
While the general principles that you learn in this tutorial can apply to any WooCommerce theme, we’re going to use the Botiga theme for a few reasons:
- It includes detailed options in the WordPress Customizer to let you customize the shop page without requiring you to design everything from scratch.
- If you do want to design everything from scratch, Botiga Pro has a built-in feature to let you customize everything using the native WordPress block editor or the free version of Elementor.

Beyond its many customization options, Botiga is also one of the fastest WooCommerce themes, so it will set your store up for success in other areas too.
With that being said, you’ll still find this tutorial useful if you’re using a different WooCommerce theme.
For example, most WooCommerce themes give you at least some options in the Customizer.
Similarly, the general Elementor method that we showcase will work with any theme. The only difference is that you’ll need to purchase Elementor Pro if you’re not using Botiga, whereas Botiga lets you do everything using the free version of Elementor.
If you want to learn more about Botiga, you can go to the Botiga theme page.
Method 1 – Shop Page Customization with the WordPress Customizer
For most people, the easiest way to edit the WooCommerce shop page is by using your theme’s options in the WordPress Customizer.
With Botiga, you get a detailed array of options to help you customize the layout, style, and content of your store’s shop page.
A different theme might not offer quite as many options, but you should be able to find at least some in the Customizer.
Here’s how to use the Botiga theme’s options to customize the WooCommerce shop page.
1. Choose What to Display on Your Shop Page
To kick things off, you’ll want to choose what content to display on your shop page. The default is to just display products, but Botiga also gives you the option to showcase categories as well.
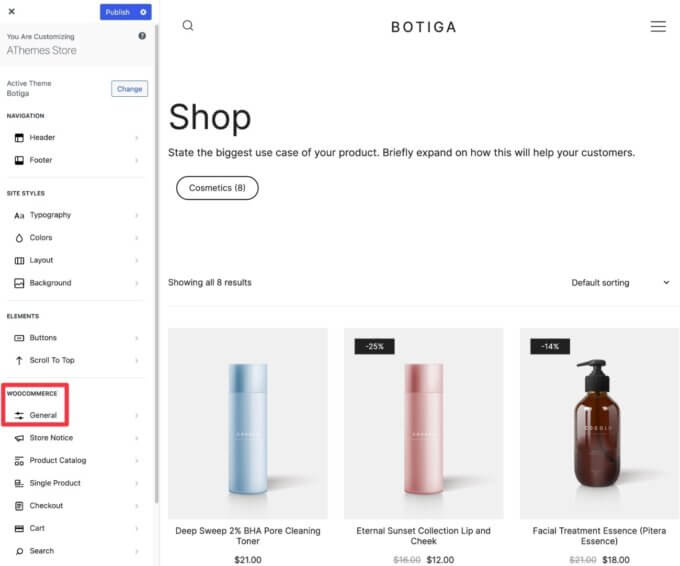
To access these settings, open the WordPress Customizer by going to Appearance → Customize in your WordPress dashboard.
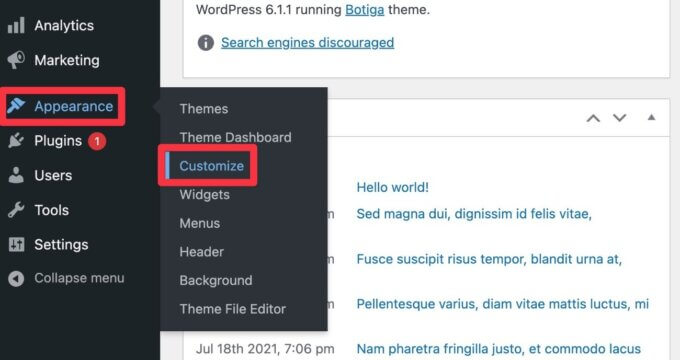
Then, select General under WooCommerce:
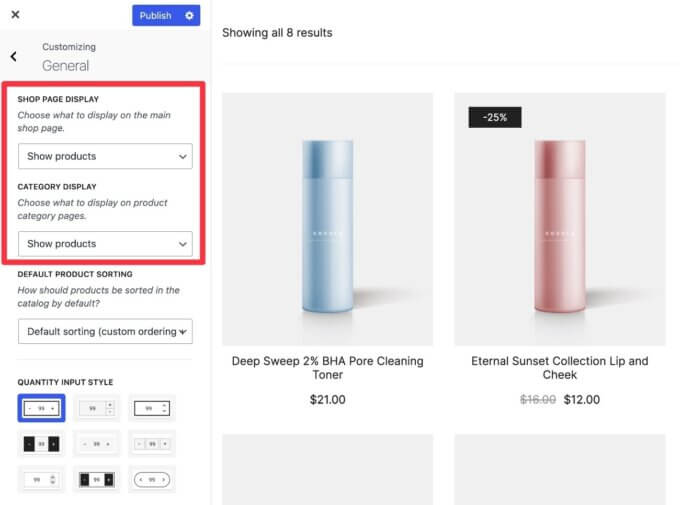
Now, use the Shop Page Display drop-down to choose whether to show just products, just categories, or both.
You can also make a similar choice for your category archive pages using the Category Display drop-down. In this case, you’re choosing whether to display sub-categories.
2. Open the Shop Page Settings in the WordPress Customizer
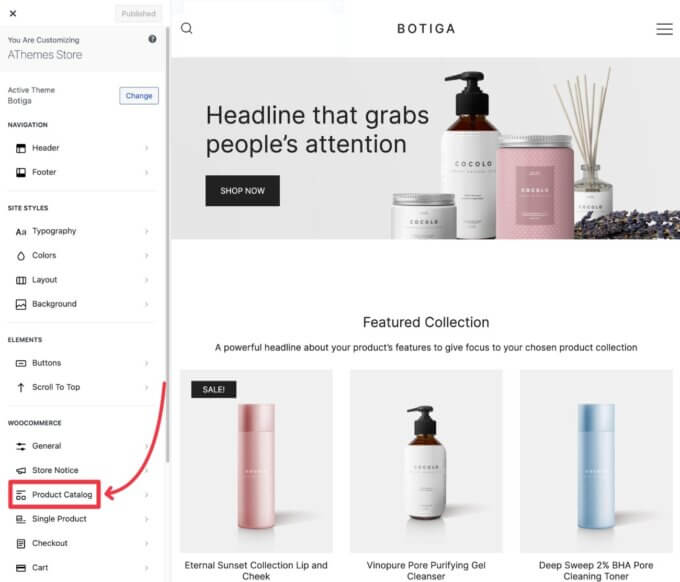
Next, go back to the main menu list in the Customizer, and select the Product Catalog options to more fully customize your shop page.
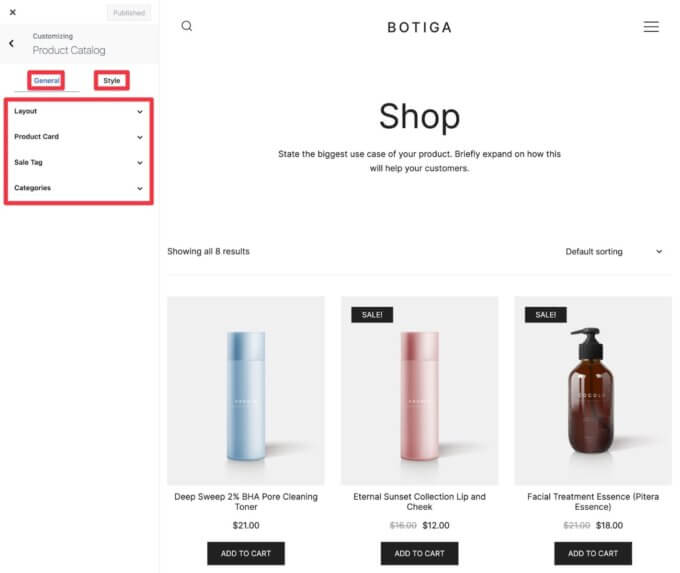
You’ll now see a bunch of options in the sidebar, divided into two tabs — General and Style:
- General – Control the layout and content of elements on your shop page.
- Style – Adjust the design of elements on your shop page, such as changing colors/fonts or adding borders.
3. Customize the General Layout
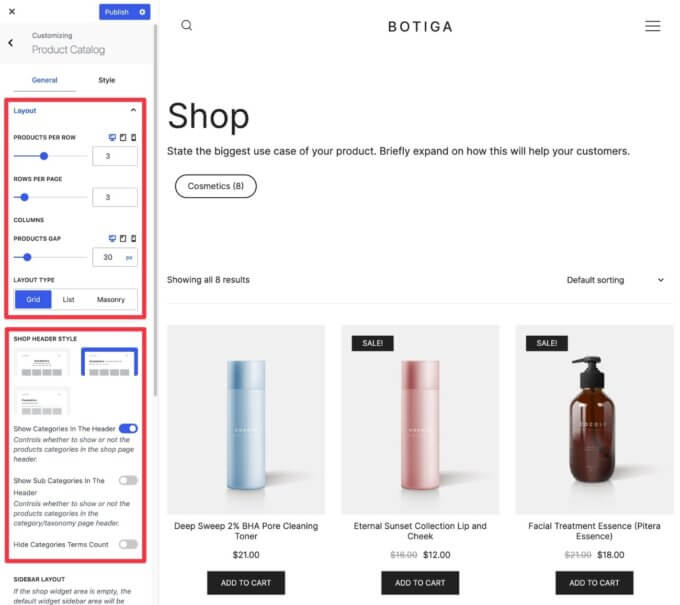
To start, expand the Layout settings to adjust the general layout of your shop page.
First, you’ll want to choose the layout type, which offers three general options:
- Grid
- List
- Masonry
You can also control general layout options, such as how many rows and columns to use.
Below that, you can choose what header style to use on your shop page and what content to include in the header, such as whether or not to show product categories.
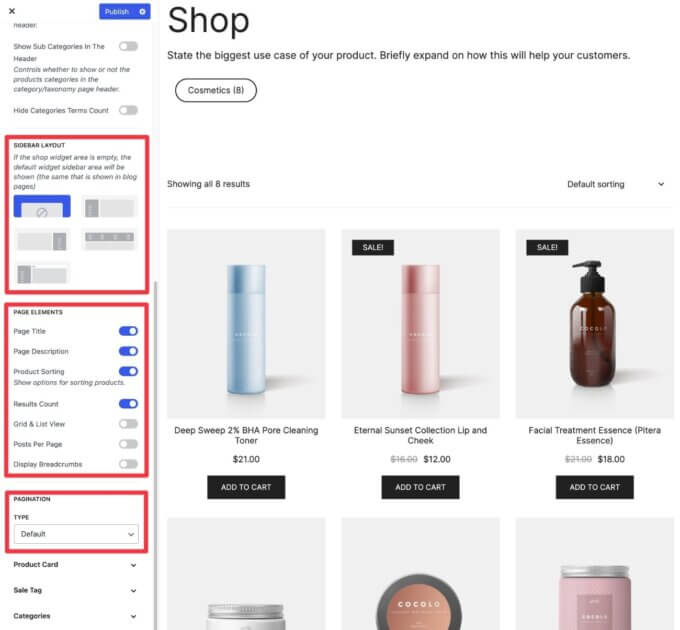
Further down in the Customizer menu, you get options to control the sidebar layout, page elements, and pagination:
- Sidebar Layout – You can add a vertical or horizontal sidebar. You can then control the sidebar’s content using widgets. This can be really great for adding product filters to help visitors browse your products.
- Page Elements – You can show/hide different elements on the page.
- Pagination – You can use normal pagination, infinite scroll, or an Ajax-powered ‘Load more’ button that loads new products without reloading the page.
4. Customize the Product Card
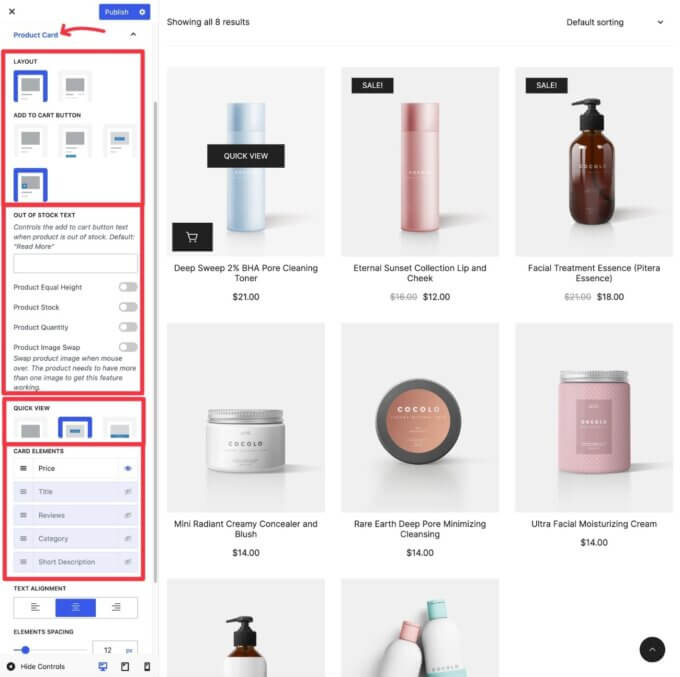
Next, you can open the Product Card section to customize how individual products appear on the shop page.
First, you can choose different card layouts and add-to-cart button placements.
For example, in the screenshot below, you can see that we moved the add-to-cart button to float over the product image in the bottom-left corner.
Further down in the settings, you can make some other important choices:
- Customize or disable product quick view behavior.
- Enable/disable specific content elements — for example, whether or not to show review counts on the shop page.
- Adjust alignment and spacing.
5. Customize Sale Tag and Categories
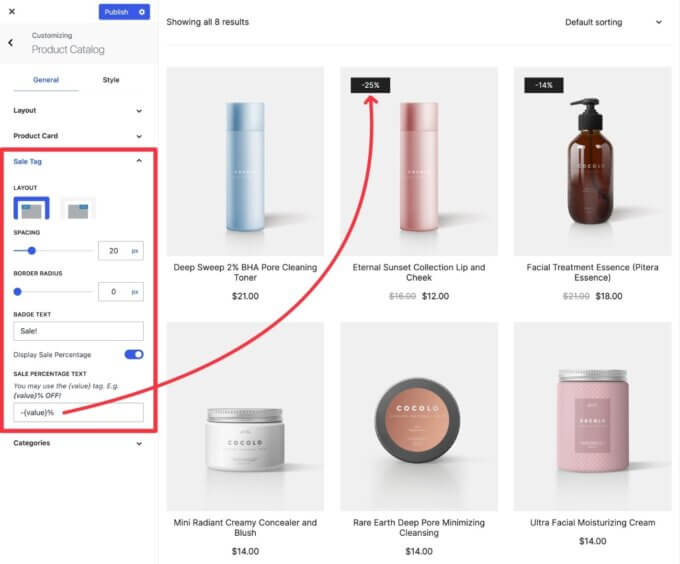
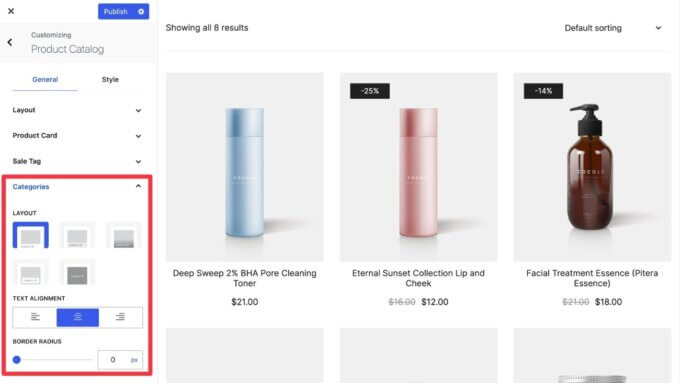
Next, you can expand the Sale Tag and Categories sections to configure those areas of your shop page.
The Sale Tag settings let you control the placement and text of the sale badge. There’s also an option to show the sale percentage instead, which will dynamically insert the proper discount for each product.
The Categories settings let you control the layout of category cards if you opted to display categories in Step 1 of this guide:
6. Adjust Style Options as Needed
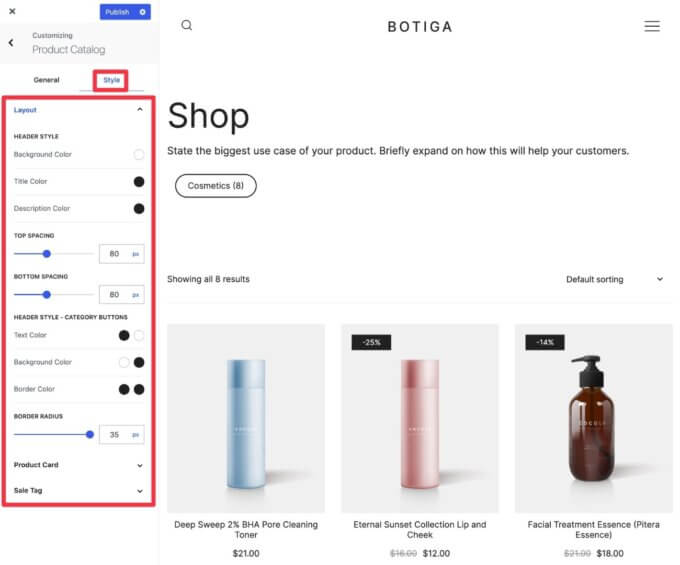
Once you’re happy with the layout and content of your shop page, you can jump over to the Style tab to adjust the style of everything as needed.
Again, this is where you can change colors, adjust fonts, add borders, and so on.
You don’t need to change anything here. But if you do want to make some tweaks, it’s a good area to explore.
7. Explore Other Customizer Options
In addition to the dedicated Product Catalog area in the Customizer, Botiga also offers some other options that might affect your shop page.
For example, you can adjust the color of the add-to-cart and quick view buttons (as well as all other buttons on your site) by opening the Buttons settings.
If there’s a specific detail you want to change, it’s worth exploring these other options. But if you already like how your shop page looks, there’s no need to dig any deeper.
8. Publish Your Shop Page Layout
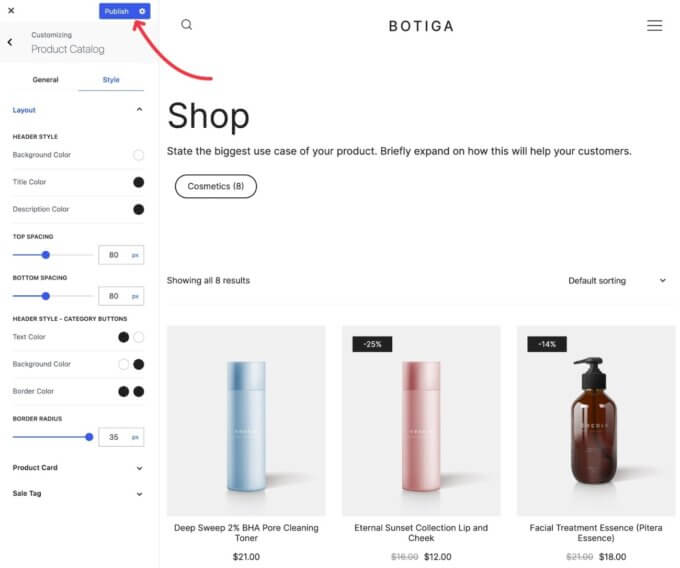
Once you’re happy with how your shop page looks, all you need to do is click the Publish button to make it live on your store.
Method 2 – Shop Page Customization with the WordPress Block Editor
For most stores, Botiga’s built-in Customizer options offer enough flexibility when it comes to creating a custom shop page in WooCommerce.
However, you might have some situations where you want to build a truly custom design from scratch.
To help you achieve this without code, you can use the Templates Builder feature in Botiga Pro to customize the shop page using the native WordPress block editor or Elementor (even the free version).
In this section, we’ll show you how it works with the block editor. Then, we’ll show you how it works with Elementor in the next section. If you already know that you want to use Elementor, click this link to skip to that section.
1. Enable the Botiga Pro Template Builder Module
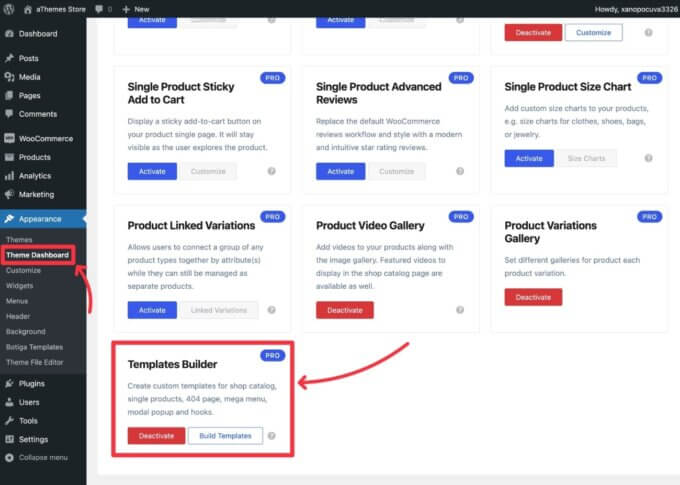
To enable the template builder, go to Appearance → Theme Dashboard → Theme Features.
Then, scroll down and enable the Templates Builder module.
You will need Botiga Pro to activate this module — if you don’t already have it, you can purchase it by clicking here.
2. Create a New Shop Page Layout
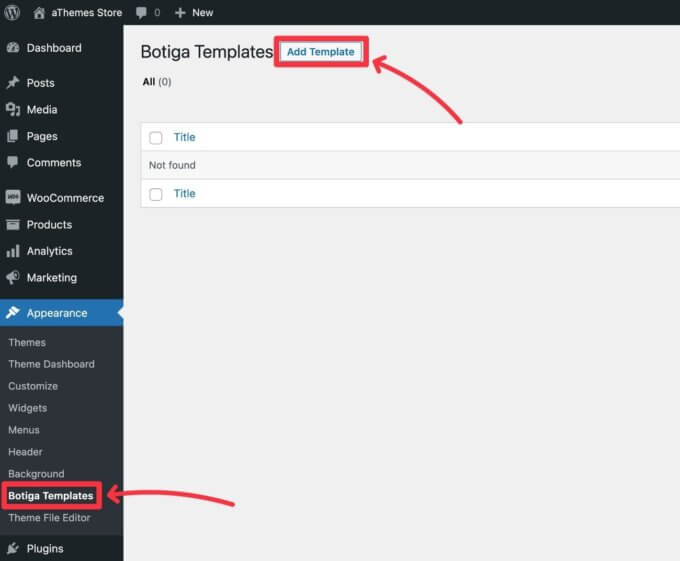
Next, go to Appearance → Botiga Templates → Add Template to create a new shop page template.
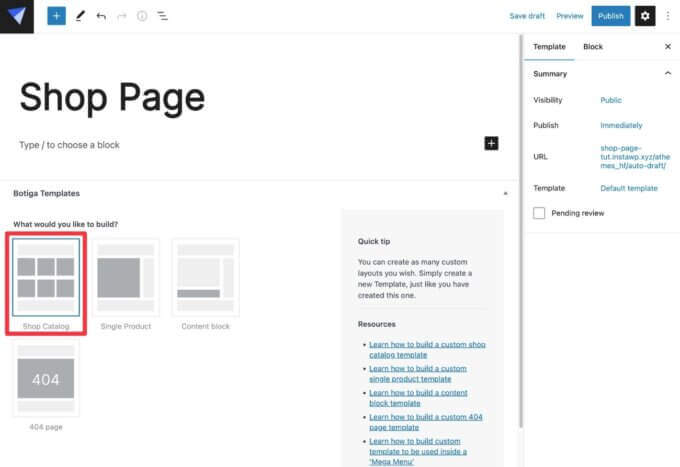
In the template interface, give it a name (e.g. “Shop Page”) and choose Shop Catalog as the template type.
3. Design Your Shop Page Using Blocks
Now, you can use the editor to design your shop page layout using blocks.
You can use any of the existing WordPress blocks (or blocks from other plugins).
Botiga also adds a bunch of its own WooCommerce blocks for important dynamic content such as the shop archive details and product details.
To actually list certain types of products, you can use the Product Query block.
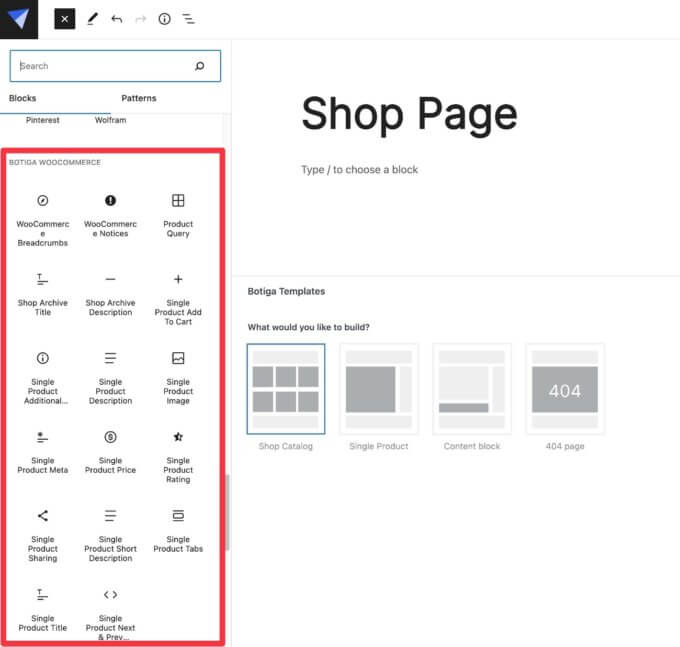
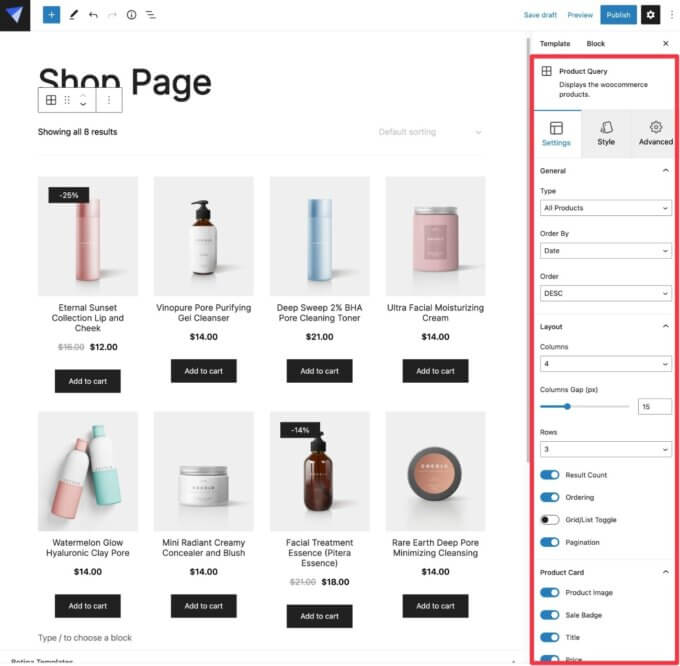
At first, adding the Product Query block will show a grid of your products.
You can then use the block’s settings to filter different types of products, customize the layout, adjust the product card, change styles, and more.
For a more detailed look, check out this video too:
4. Publish Your Template
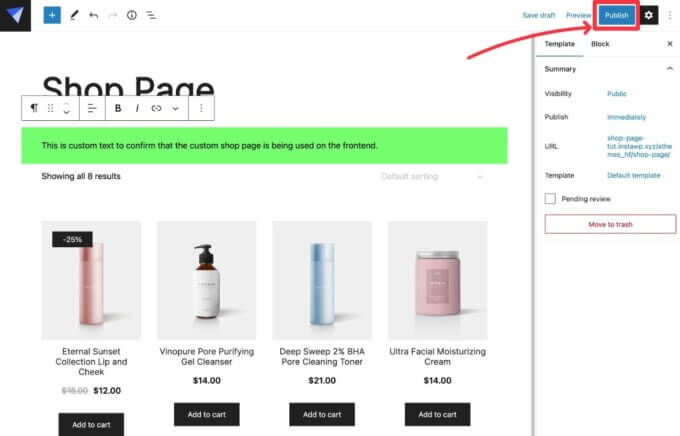
Once you’re happy with the design of your shop page, all you need to do is click the Publish button.
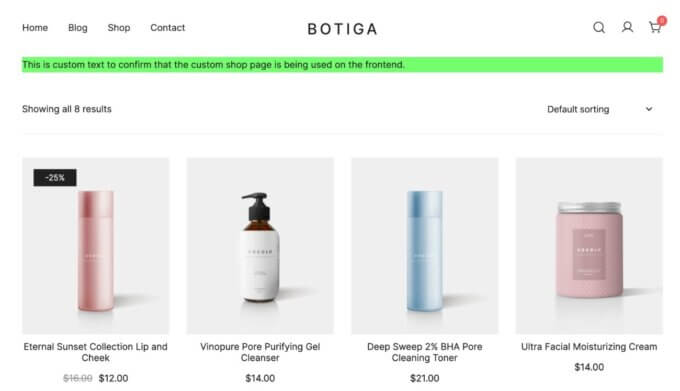
When you open your store’s shop page on the frontend, you should see your custom shop page template.
Method 3 – Shop Page Customization with the Elementor Plugin
If you prefer using Elementor instead of the block editor, you can also follow a similar approach to customize the WooCommerce shop page.
Normally, you would need Elementor Pro to customize your store’s shop page. However with Botiga Pro, you can fully customize your shop page using the free version of Elementor.
You’re able to achieve this because Botiga Pro adds its own custom Elementor widgets to let you set up your store page.
With that being said, Botiga Pro is still fully compatible with Elementor Pro. So if you already have an Elementor Pro license, you can still benefit from all the extra design functionality that it adds.
Here’s how to edit the WooCommerce shop page with Elementor and Botiga.
1. Enable the Botiga Pro Template Builder Module
To enable the template builder, go to Appearance → Theme Dashboard → Theme Features.
Then, scroll down and enable the Templates Builder module.
You will need Botiga Pro to activate this module — if you don’t already have it, you can purchase it by clicking here.

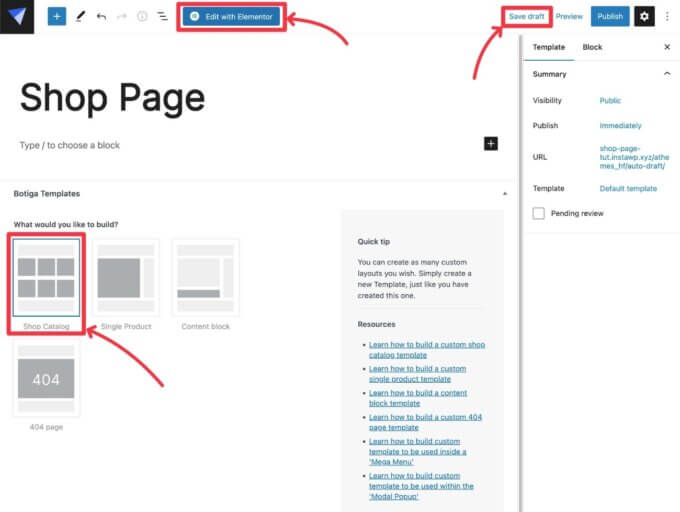
2. Create a New Shop Page Layout and Launch Elementor
Next, go to Appearance → Botiga Templates → Add Template to create a new shop page template.

In the template interface:
- Give it an internal name — e.g. “Shop Page”.
- Choose Shop Catalog as the template type.
- Click the Save Draft button to save it in the database (this is helpful for using Elementor).
Once you’ve done that, you can click the Edit with Elementor button to launch the Elementor interface.
3. Use the Botiga Widgets to Create Your Shop Page Design
Now, you can use the regular Elementor interface to design your shop page.
To help you set up the design with the free version of Elementor, Botiga adds a bunch of its own widgets in the Botiga WooCommerce section.
For the shop page, the most important widget is the Product Query widget, which lets you display a list of some/all of your products.
There are also other useful widgets, such as the Archive Title, Archive Description, and other Archive-labeled widgets.
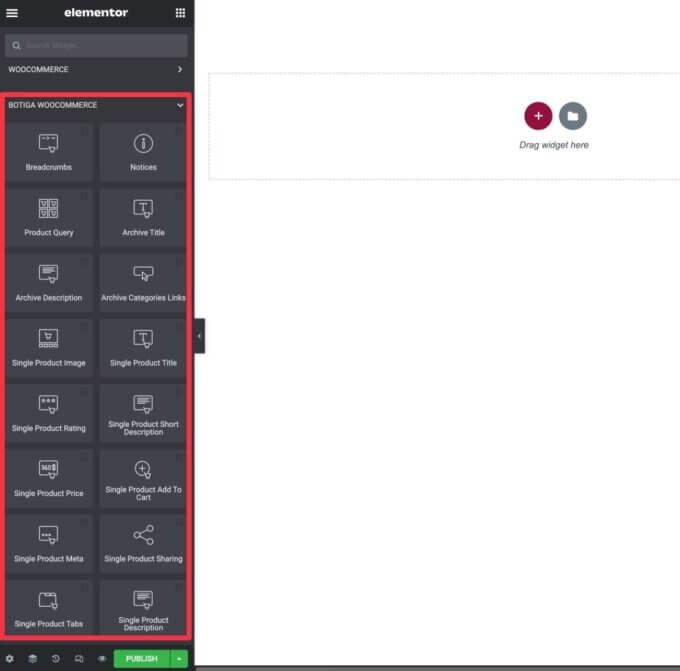
In the Product Query widget’s settings, you can choose which products to display, customize the layout, change the product card, and more.
You can also take advantage of all of the normal style and advanced options that Elementor offers.
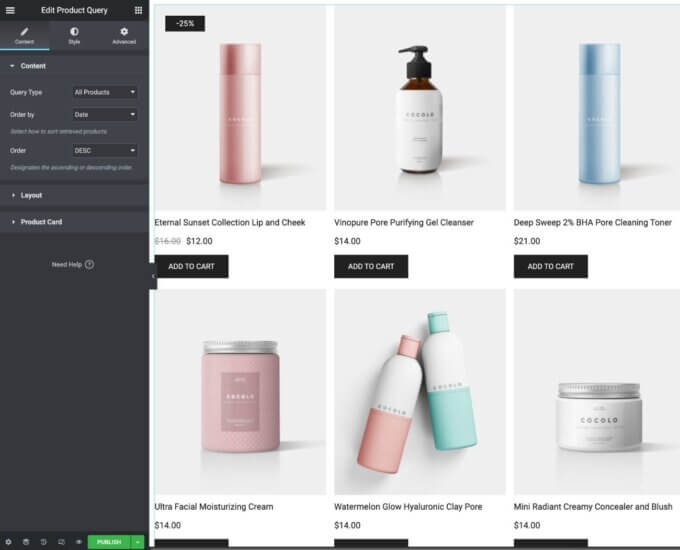
In addition to using the Botiga WooCommerce widgets to design your shop page, you’re also free to use any other Elementor widgets, including widgets from third-party Elementor add-ons.
4. Publish Your Shop Page
Once you’re happy with the design of your shop page, click the Publish button in Elementor to make it live.
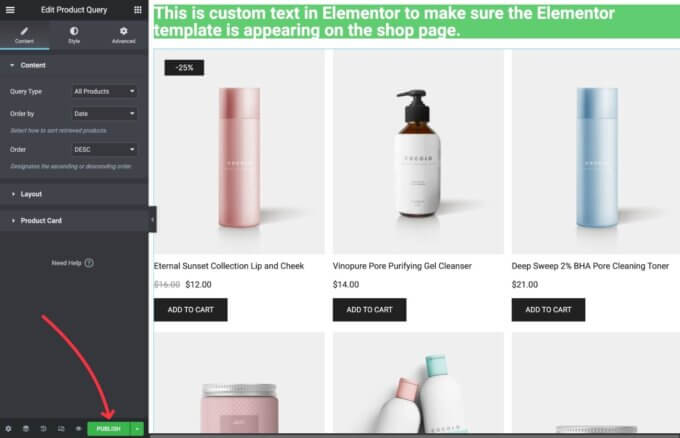
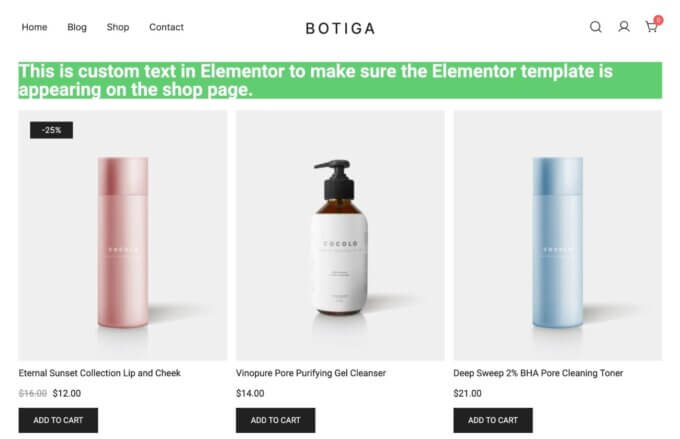
Once you publish it, you can open your shop page on the frontend, and you should see the custom design that you created with Elementor.
Conclusion: Create a Custom WooCommerce Shop Page Today
That wraps up our guide on how to customize the WooCommerce shop page without needing any code.
For most people, Botiga’s built-in options in the Customizer already offer enough flexibility for creating a custom WooCommerce shop page.
If you want even more control, the Template Builder feature in Botiga Pro lets you fully customize every part of your shop page using the native WordPress block editor or Elementor (even the free version).
If you’re not already using Botiga, consider switching to Botiga today to be able to access all of these customization options — plus a whole lot more!
Do you still have any questions about how to customize the WooCommerce shop page? Let us know in the comments.
