Want to make it easier for your customers to learn more about your products and add them quickly to their shopping carts? A product quick view modal helps you do just that.
It shows visitors key information such as the product price, a short description, customer ratings, color and size variants, complete with an add-to-cart button.
Even though WooCommerce doesn’t offer a native quick view option, you can add it by using third-party tools.
Technically, you could use a plugin to add the quick view functionality to your WooCommerce store, but installing too many plugins can lead to performance issues, not to mention extra work in maintaining them.
So in this tutorial, I’ll show you how to add a quick view modal to your WooCommerce products without using a plugin.
1. Install the Botiga WooCommerce Theme
The easiest way to add the quick view functionality to your store is by using a WooCommerce theme that includes this feature, such as our free Botiga theme.
In addition to enabling you to add a quick view box to your products, Botiga comes with tons of design and eCommerce features — for instance, you can create your own color palette, customize the layout of your shopping cart and product galleries, add product filters and badges, and more.
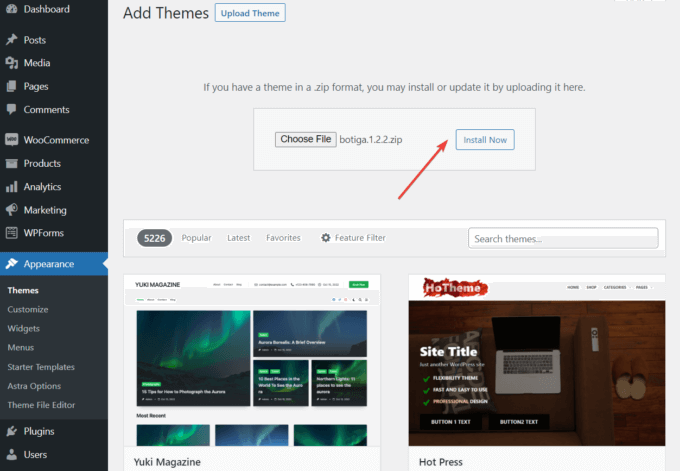
To get started, download the theme, and install it from the Appearance > Themes > Add New > Upload Theme menu:
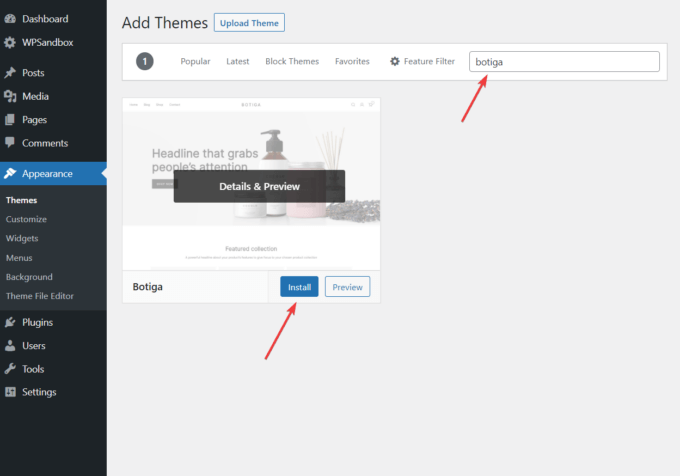
Alternatively, you can also go to Appearance > Themes > Add New, and type ‘botiga’ into the search bar.
When the theme appears, click the Install button:
After installing the theme on your site, click the Activate button.
2. Import a Starter Site (optional)
A starter site is a pre-built demo that you can import to your own website in just a few clicks.
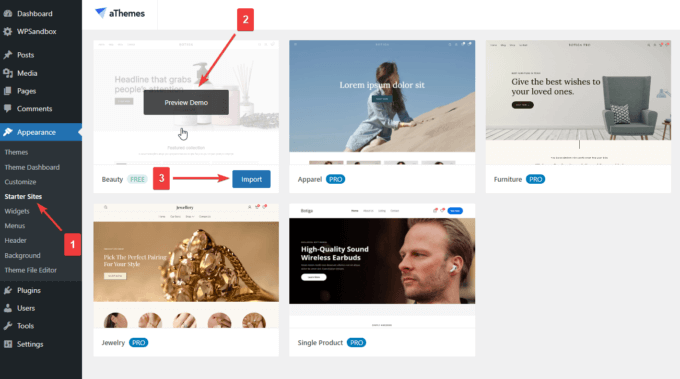
Botiga currently has one free and eight premium starter sites. In this tutorial, I’ll use the free Beauty demo — you can check out all the starter sites here.
If you don’t want to use any of the pre-built demos, you can also add your own content from scratch to your Botiga store.
To find the starter sites, click the Appearance > Starter Sites menu in your WordPress dashboard.
Hover your cursor over the demo you want to install and click the Preview Demo button to preview it.
If you like it, click Import to install the pre-built content and design settings on your website:
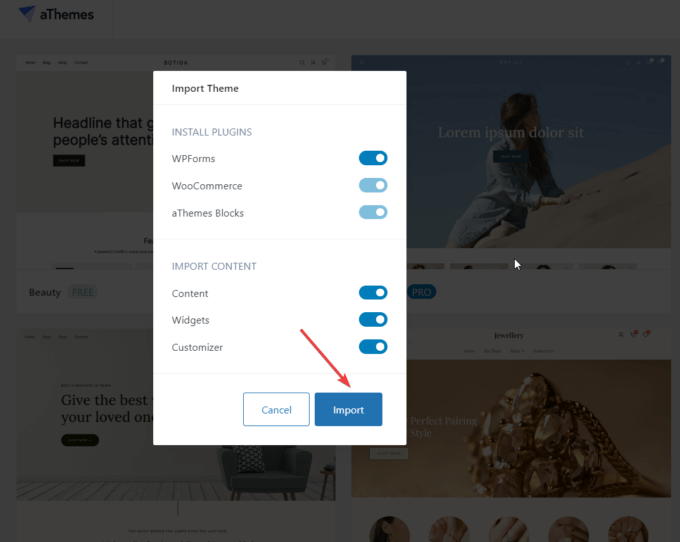
The Import Theme modal will show you the plugins and content that will be imported to your website.
You have the option to decline to import any of the plugins and content, but I recommend importing everything:
3. Open the Customizer
The preliminary steps are over. Now, I’ll show you how to add the WooCommerce quick view feature to your store.
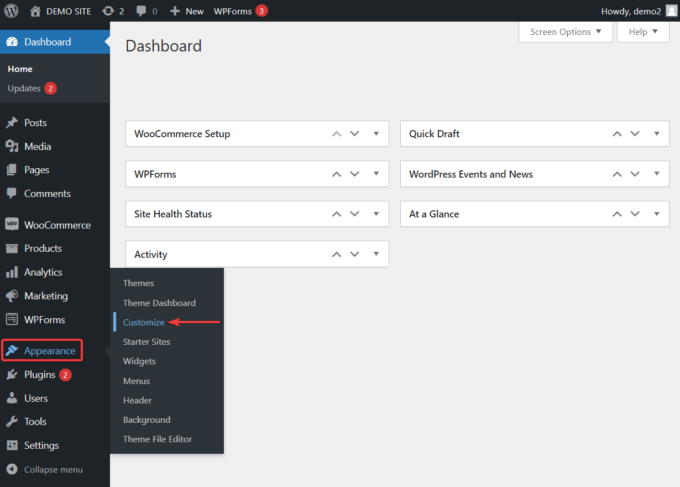
In your WordPress admin area, go to Appearance > Customize to open the Customizer where you can access the quick view functionality:
4. Enable the Quick View Button for Your Products
The Customizer opens on the left side of the screen. Botiga has tons of options here you can choose from.
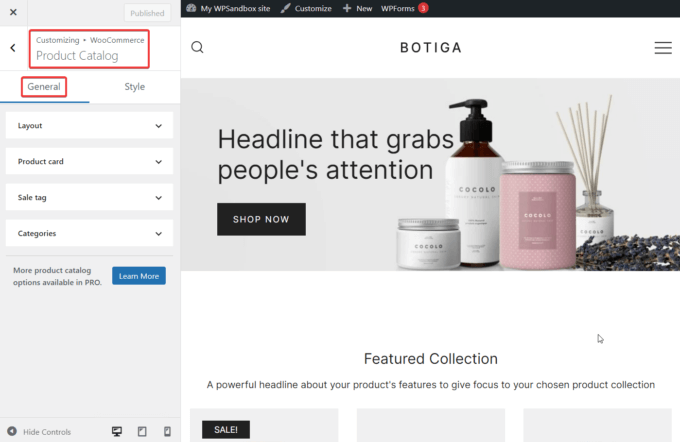
To access the quick view feature, go to WooCommerce > Product Catalog > General:
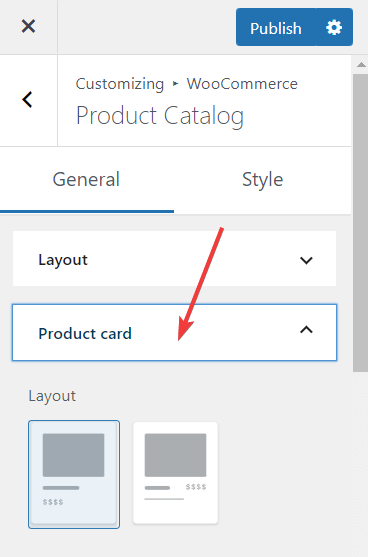
In the General tab, you should see a Product card option. Select it, and the item will expand:
Now, scroll down to the Quick View option.
As you can see in the screenshot below, the Quick View button is already enabled on your site:
To check what the button looks like on the frontend of your website, open your Shop page. If you imported the Beauty demo, you’ll find a link to the shop in the top menu.
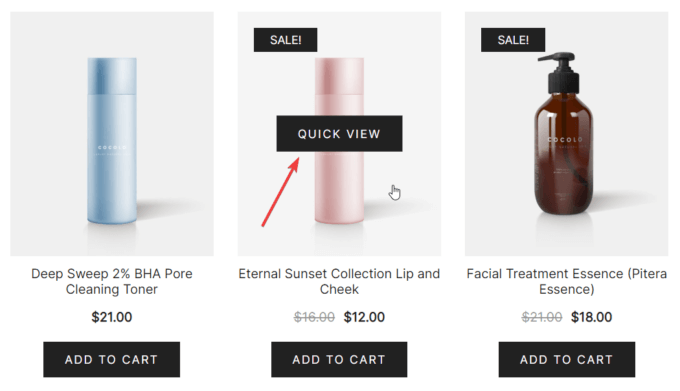
Hover your cursor over any of the product images, and the Quick View button will appear:
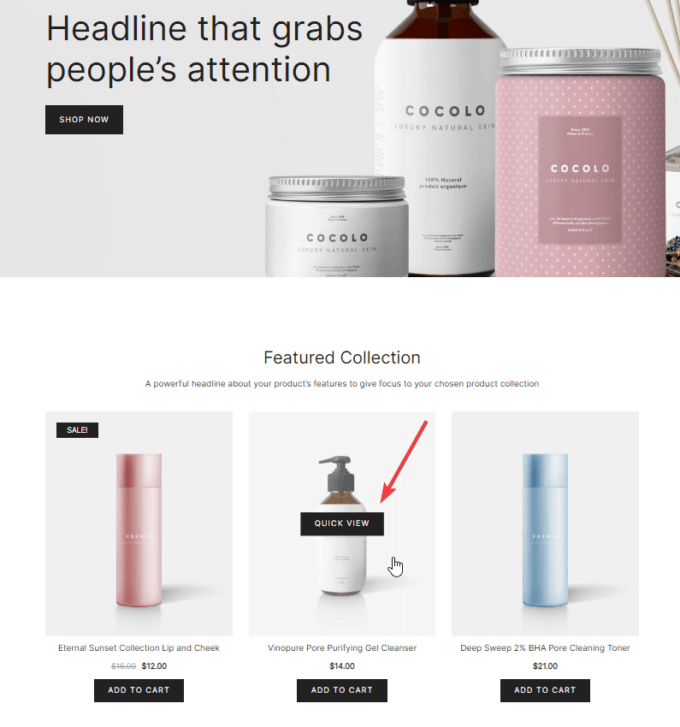
The Quick View button appears whenever a group of products is shown on the same page.
For example, in the Beauty demo, the Featured Collection section also shows the Quick View button for every product:
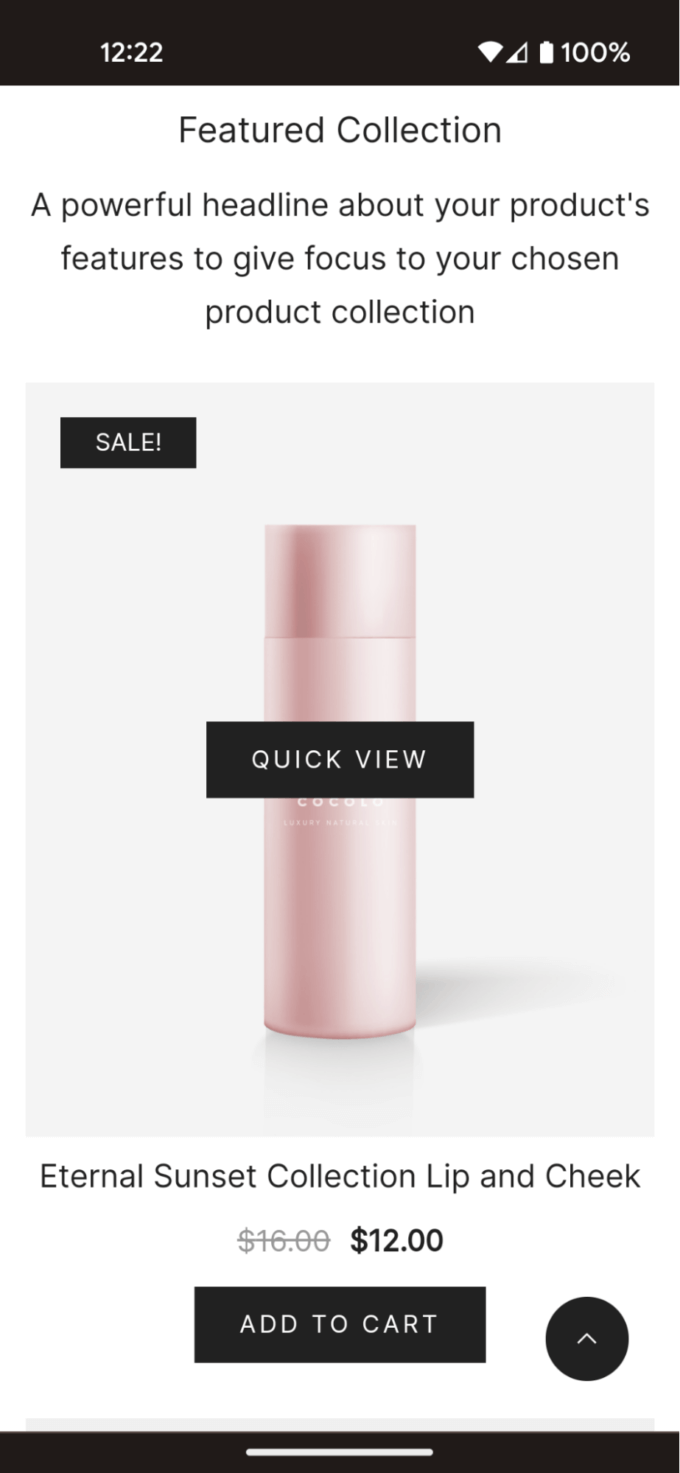
As Botiga is a responsive theme, the Quick View button also works on mobile — a light tap on the product image will show it:
5. Choose a Layout for Your Quick View Buttons
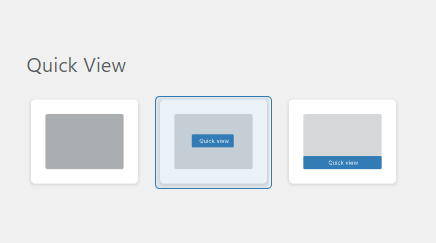
You must have noticed that there are three Quick View layout options:
The first one completely removes the Quick View buttons from your site.
The second option shows the button in the middle of the product image (this is the default setting):
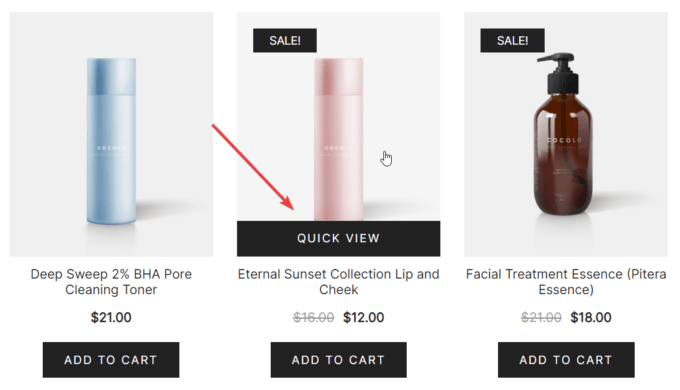
And the third option displays the Quick View button at the bottom of the product image:
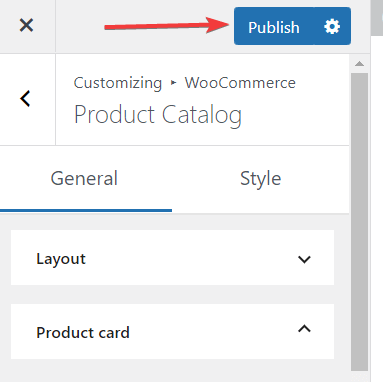
If you want to switch between the layouts, select the option you want to use, and hit the Publish button at the top of the Customizer:
6. Add or Remove Elements in the Quick View Box
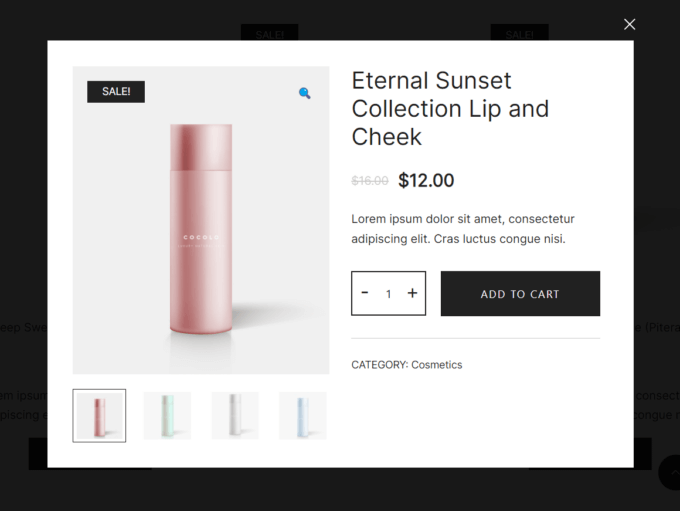
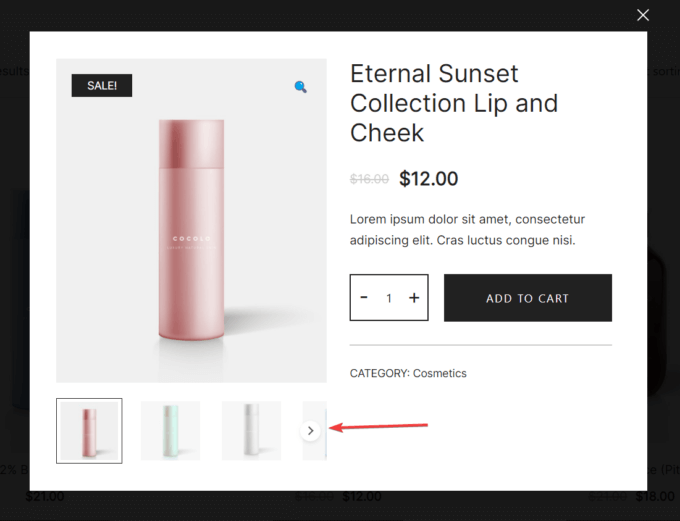
The Quick View modal contains the name of the product, the price, a short description, a quantity counter, a stylish add-to-cart button, the product images, and the product category:
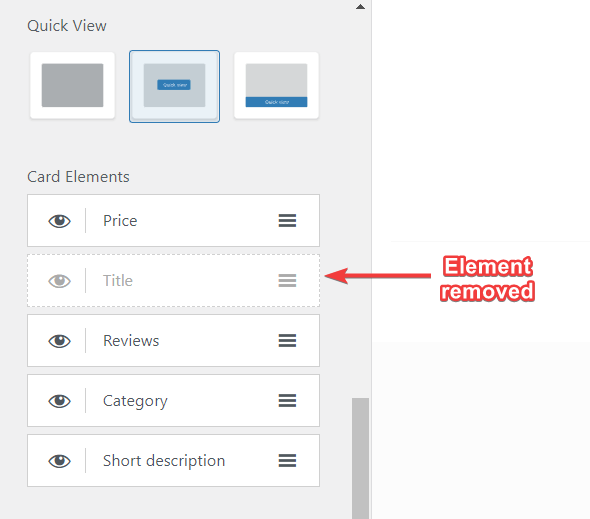
If you don’t see some of these elements in your quick view box, you can add them from the Card Elements option, which can be found right below the Quick View setting.
Click on the eye icon next to the element you want to add, and it will appear inside the quick view box.
Removing elements works the same way. Click on the eye icon to disable an element, and it will disappear from the quick view box:
7. Add More Products to Your Store
You can add more products to your store from the Products > Add New admin menu. This option is not located in the Customizer — to access it, you need to go back to your WordPress dashboard.
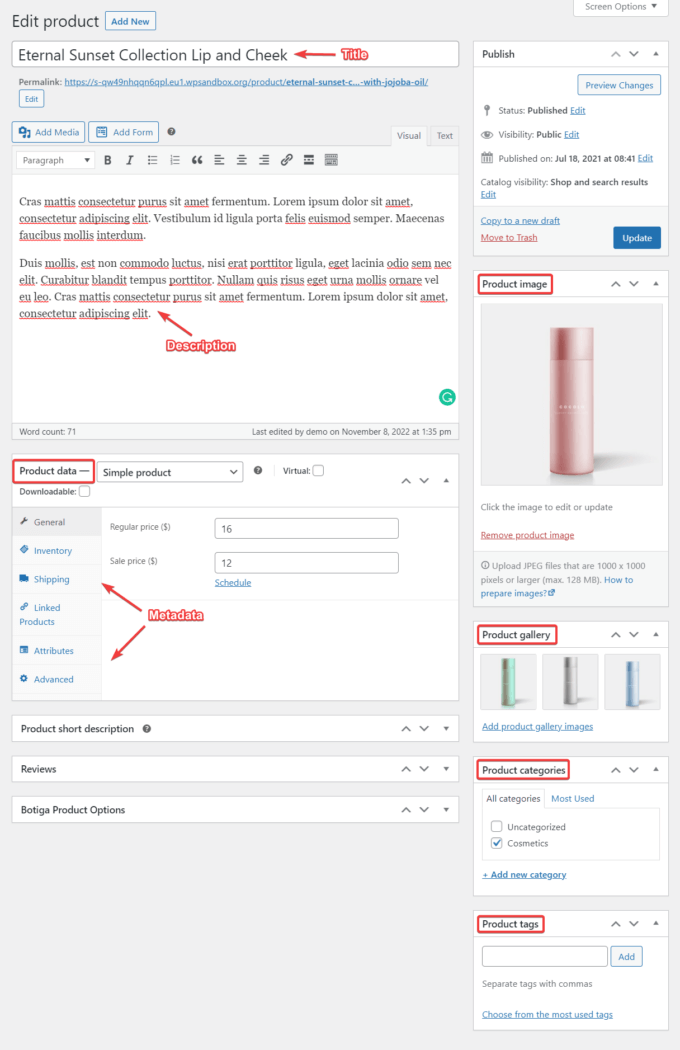
Close the Customizer, and click Products > Add New in the left sidebar of your admin area. The product editor will appear on your screen.
Fill in the title, description, product image, product gallery, product categories, product tags, and product data/metadata fields:
Note that if you add more than three images to the product gallery, only the first three images will be shown in the quick view box by default.
However, users can access the rest of the images by clicking the arrow icon:
I recommend previewing the page as you are filling up the product details using the Preview Changes button. Don’t worry about making mistakes — you can always come back and modify the product details.
When you are ready, hit the Publish button, and the new product will appear on your Shop page.
Conclusion
WooCommerce is a fantastic plugin for setting up an online store with WordPress. However, there are some features, e.g. product quick view, that it doesn’t offer out of the box.
Luckily, a complete WooCommerce theme such as Botiga can fill that gap. All you need to do is install and activate the theme, go to the Customizer, and choose a quick view layout.
In addition to the quick view functionality, Botiga includes lots of other useful eCommerce features.
For example, you can add a hover effect to your product images, enhance your product galleries with videos, create your own color palette, and more.
To see what Botiga can do for you, download the theme for free or check out the demos.
I hope you found this tutorial helpful. If you have any questions or suggestions about adding the quick view functionality to your WooCommerce store, leave us a comment below.
