
We occasionally link to goods offered by vendors to help the reader find relevant products. Some of these may be affiliate based, meaning we earn small commissions (at no additional cost to you) if items are purchased. Here is more about what we do.
Even though we are months upon months away from the colder seasons, there’s always that chilling thought clinging in the back of our minds when we gaze upon our beautifully lush herb gardens:
This won’t last forever.
Sigh…
Although we can pick as many fresh herbs as we want now, it won’t always be that way!
We may be spoiled currently with big leaves of mint for cocktails, aromatic basil for fresh pesto, and soothing lavender for cookies and tonics – but summer’s herbal bounty won’t be as readily available when the seasons start to change.
It’s best to start planning ahead immediately, even when the sun is shining and we’re blissfully enjoying the warm weather while we pretend as if fall and winter don’t exist.
Get your heads out of the chamomile, and let’s talk.
Learning how to stretch the life of your precious garden herbs won’t be difficult at all – they can actually be preserved in a variety of different ways!
This guide will teach you everything you need to know to preserve your own at the end of the gardening season. And these tips can come in handy when you bring home a big bunch from the grocery store or farmers market too, and it’s more than you need for a recipe.
The method that you use to preserve your aromatic plants will depend on what type you are trying to preserve, and how you are planning to use it. Otherwise, the choice comes down to personal preference.
How to Preserve Fresh Herbs
Harvesting
The first step in preserving leafy aromatics from your garden is to harvest them when they are ready. Most varieties are best harvested before or just as they start to flower, picking continuously throughout the growing season to encourage bushy growth and flushes of new leaves.
Harvesting can be done by using scissors, pruning or kitchen shears, or a sharp paring knife, to snip the stems.
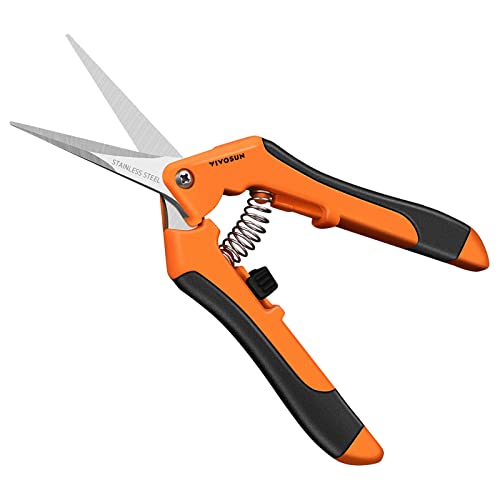
Vivosun 6.5-inch Gardening Scissors, available on Amazon
These 6.5-inch gardening scissors from Vivosun will be a fundamental tool for removing even your most delicate plants. You can check prices and read customer reviews now on Amazon.
At the end of the season, if you know certain plants you’re growing are able to survive the winter – and you can review all of these cold-hardy varieties on our sister site, Gardener’s Path – you will want to cut the stems close to the base of the plant rather than pulling them entirely out from the dirt.
Tender varieties that definitely cannot power through freezing temps may be pulled out with your last harvest. Roots and any leafless stems that you won’t be able to use can be composted.
Depending on how you will be preserving them, you may remove the leaves from the stems prior to cleaning, or you may want to keep the leaves on the stems for easy rinsing – teeny-tiny thyme or oregano leaves are much easier to clean when they remain on the stems!
If you are cutting herbs specifically to hang and dry them, they should be snipped with long stems intact.
Cleaning
Once you have harvested all of your plants properly, the next step in the preservation process is cleaning.
As much as we love that nutrient-rich soil for growing our garden, we want none of it to remain when we’re preserving them!
All freshly harvested plants should be rinsed carefully under gently running cold water to remove any dirt or other residue.
Remember to apply a very gentle touch! You don’t want to damage or totally remove delicate, leafy parts during this process.
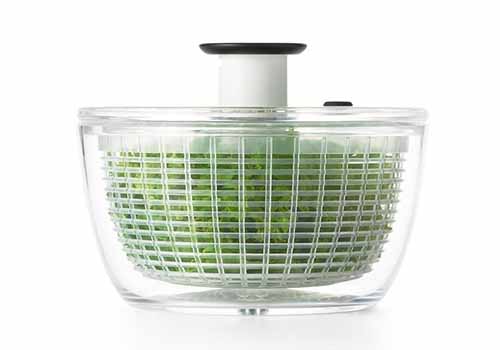
OXO Good Grips Little Salad and Herb Spinner, available from OXO
To dry, shake them lightly after the rinse and then gently lay them out on a towel to air dry, or pat them with a clean kitchen or paper towel.
For another safe and effective method, you can also use a mini herb spinner, which is like a small version of a salad spinner, to dry them.
You’ll use this OXO Good Grips Little Salad and Herb Spinner all the time! Buy it directly from OXO, or purchase one from Sur la Table.
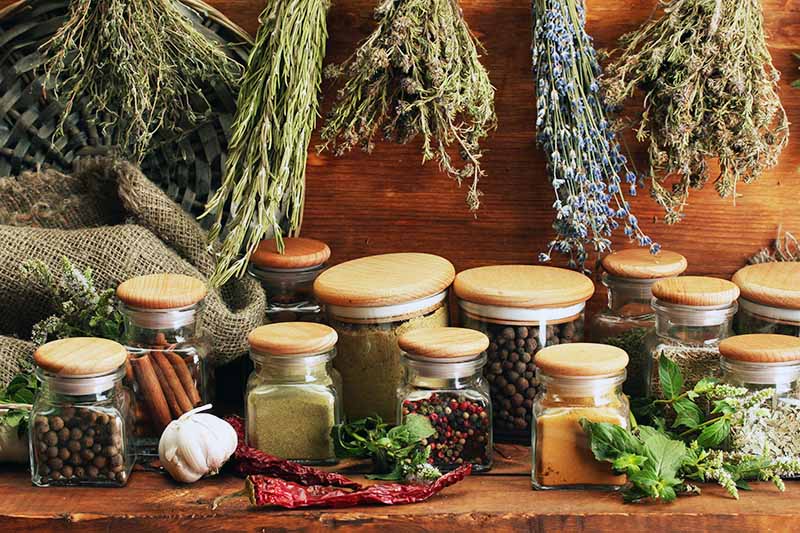
Methods for Preserving
We have four easy and popular techniques to share for preserving your freshly harvested, cleaned, and dried fresh herbs.
All have their advantages in the home kitchen and elsewhere in your household, depending on your intended culinary applications and other uses.
Read through each one, and see if you have a favorite method or two to try for the herbs you are currently growing.
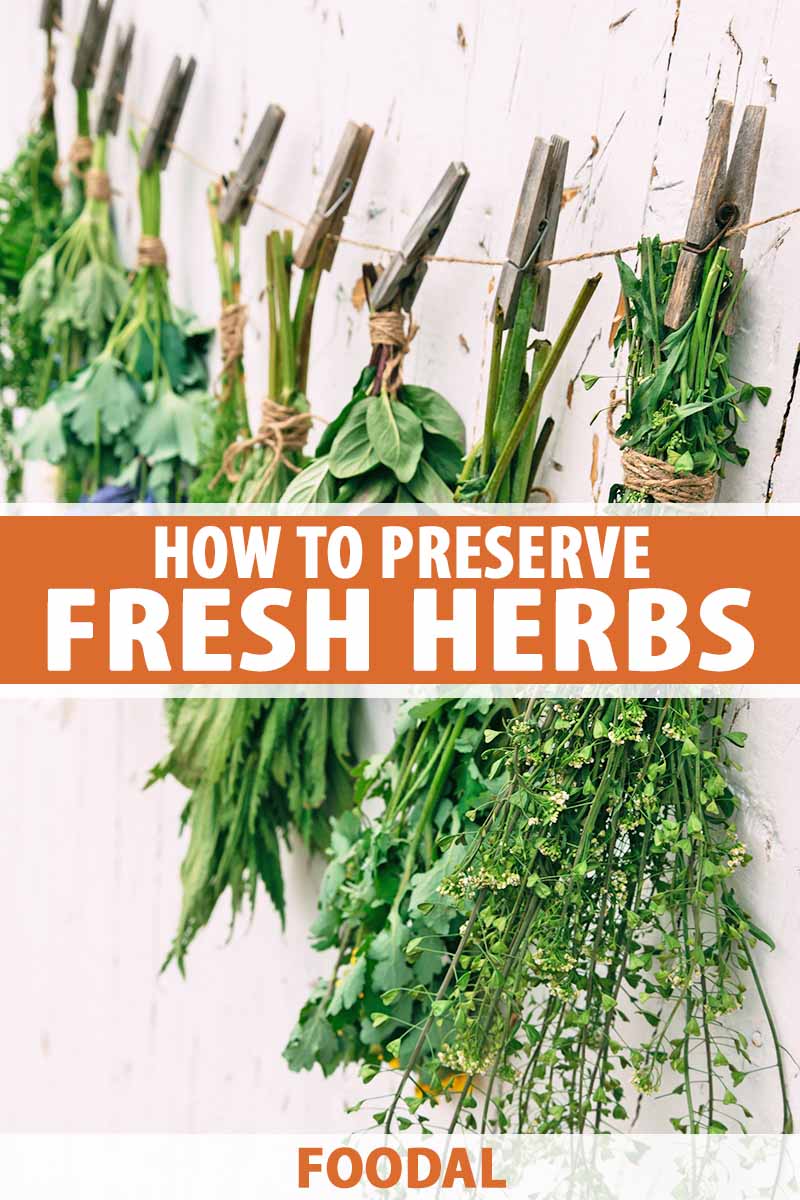
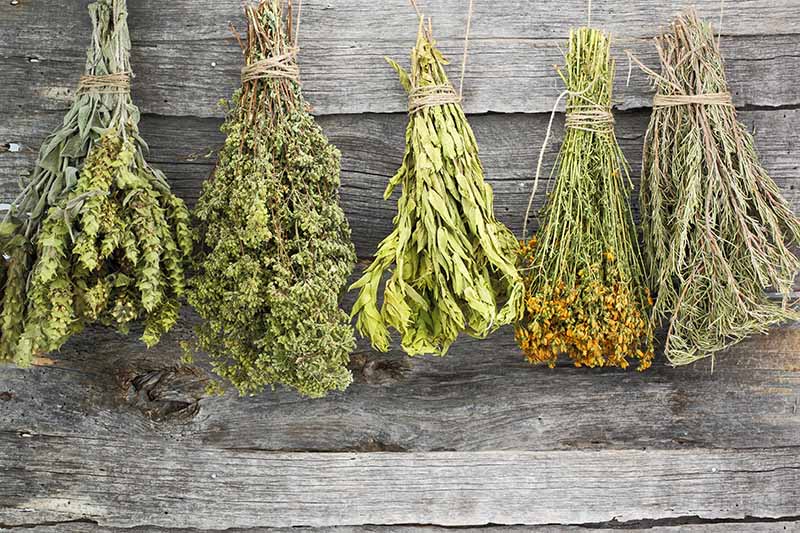
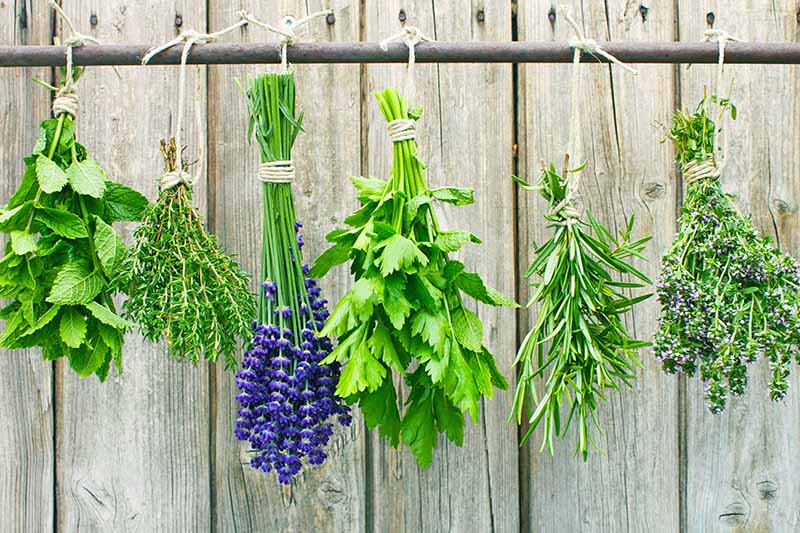
Hanging to Dry
One all-time favorite method for preserving these flavorful plants is hanging them upside down until they have completely dehydrated, while still maintaining all of their natural oils.
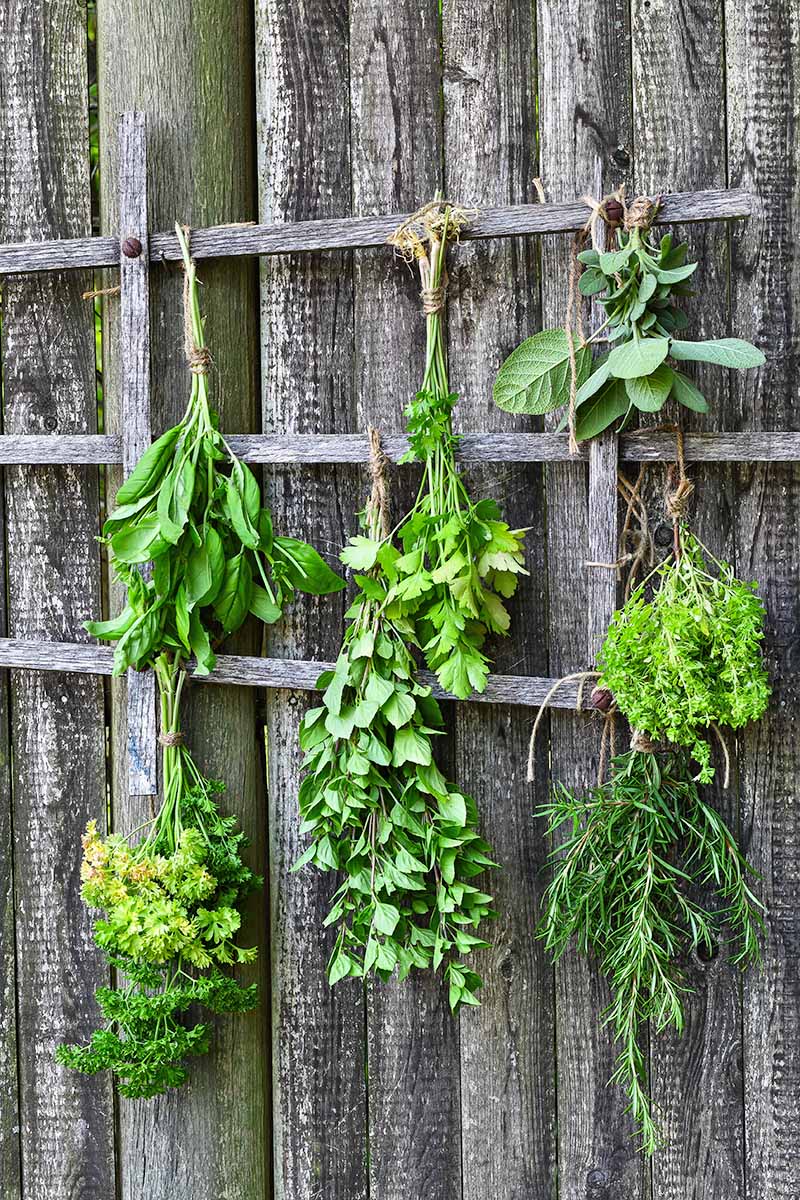
This technique will work best on plants that have woody or firm stems such as rosemary, thyme, sage, and lemon verbena.
Lavender is one of many fresh garden flowers used as an herb that also dries beautifully. And it’s not uncommon to see bouquets of dried lavender at events like weddings!
Hanging bundles does not require much effort, and it offers a simple way to allow the foliage to dry out safely and effectively.
In order to properly hang what you’ve picked to dehydrate, follow these steps:
Step 1 – Remove Lower Leaves and Tie
Remove any lower leaves and stragglers from the stems, as well as any damaged or discolored leaves.
Loosely grip a bunch of herbs together, ensuring the bottom of the stems are all evenly stacked.
They should not be too tightly pushed together, as they need to have enough space for air to circulate around each one without the risk of mold forming.
For that same reason, do not to include more than 10 to 15 stems to a bunch to ensure proper ventilation.
Using a piece of kitchen twine or string, tie the bundle together close to the bottom third of the stems. Use a long enough piece of twine so that you can tightly tie the twine around something for the suspending process.
Step 2 – Hang in the Proper Location
Find a dry and well-ventilated space in your house that is away from any direct sunlight.
The space should be slightly warm, but not excessively humid. The ideal temperature you want to aim for is around 70°F.
Tie and suspend the bundles upside down, using the excess twine for tying, on a hanger, clothesline, or hook on a wall, or over a doorway.
Esschert Herb Drier, available on Amazon
You can also buy a hanger specifically designed for this application. Esschert’s Herb Drier allows you to effortlessly hang bundles. It’s available to purchase now on Amazon.
Make sure there are a few inches of space in between each bundle to maintain proper airflow.
Step 3 – Fully Dry
Leave the bundles to dehydrate for one to two weeks. Don’t be surprised by this long period – it can take some time!
Check them every now and then to see how they are doing. Keep in mind that thicker-stemmed varieties may take a bit longer to dehydrate.
Once the consistency of the foliage is dry and crumbly, they are ready to be taken down.
You can see if they are crumbly by rubbing a couple leaves between two of your fingers – if they feel dry and immediately crumble, then you know the bundles have dried successfully.
Step 4 – Remove and Store
If you’re drying the bundles purely to be displayed as decor, they are ready for their debut in a beautiful vase!
For edible or medicinal use, remove all of the leaves from the stems, working on a large and flat surface like a clean countertop or a large cutting board to collect any that fall.
It’s up to you whether you want to keep the leaves or flowers whole, or crush them into smaller pieces or into a powder.
Ask yourself how you plan on using them…
Whole leaves and flowers are great for teas, garnishes, and soups, whereas powders are practical for creating spice blends and more evenly seasoning dishes. But remember that ground herbs tend to lose their flavor more quickly than those stored whole. You can always grind them with your mortar and pestle just before use.
Place them in labeled and dated airtight jars or containers.
These dried products can be stored for up to one year when kept in ideal conditions. Treat them as you would your other dried food products, and place them in your spice rack or another area of the house that is cool, dry, and away from direct sunlight.
For an even more thorough explanation of dehydrating herbs, and to discover other methods, read this amazing tutorial on how to dry fresh garden herbs from our sister site, Gardener’s Path!
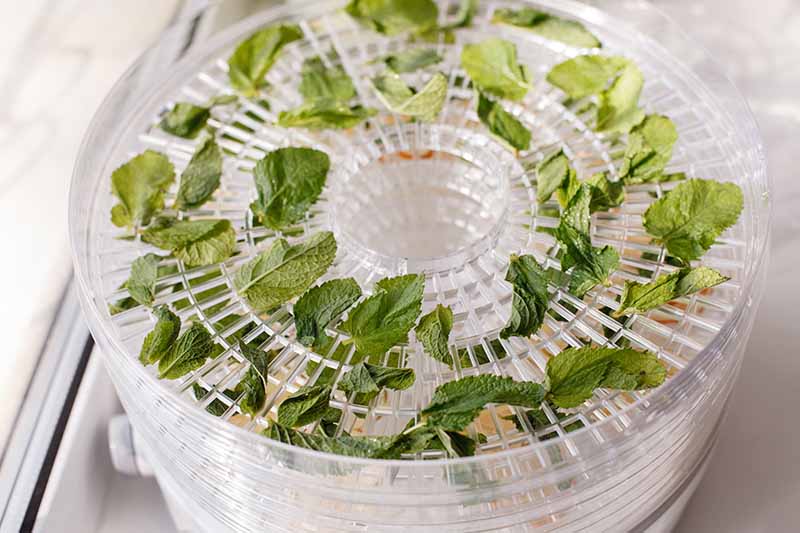
Laying Flat to Dry
Dehydrating the herbs while they’re flat, rather than suspended, is another easy way to preserve them for long-term use at home.
This is a helpful, no-fuss method when you don’t have the appropriate space, time, or all the tools for hanging.
Step 1 – Prep the Herbs
Once you have harvested, cleaned, and dried your fresh herbs, you have two options for prepping them:
You can choose to keep the leaves on the stems if you want, especially if you don’t have a lot of time in the moment and want to find ways to minimize kitchen prep work.
Or, you can choose to strip the leaves from the stem. While it takes more prep time, the overall drying process will go faster if the individual leaves are removed.
Step 2 – Arrange in a Single Layer
Place the prepped items in a single layer, without them touching each other, on a flat surface that provides enough airflow.
A screen, mesh, or wire surface area will be ideal, since these will have plenty of small holes for ventilation.
However, if none of these are available to you, you can use a clean baking sheet with a couple layers of paper towels on top.
A baking sheet with a metal rack placed on top can also be used for quick oven drying. Or you may wish to arrange the leaves on racks to dry in your electric dehydrator.
Step 3 – Fully Dry
As with hanging, if you wish to air dry on a screen, choose a dry, slightly warm, and well-ventilated space in your house that is away from any direct sunlight.
Leave your harvest out to dry uncovered for one to two weeks. Keep in mind that the thicker the leaves are, the longer it will take for them to dry out.
Typically, air drying while flat will take a little longer than hanging. You will know when your cuttings are ready by crumbling some leaves between two fingers to test their moisture content. Be sure to allow them to dry fully, to avoid mold growth in storage.
Alternatively, a dehydrator can be used to speed up and streamline the process! And what an essential tool for a raw food kitchen! As long as you follow the manufacturer’s directions, you should be able to create perfectly dried products. This tends to be an hours-long process, but it’s quicker than air drying.
If you wish to use your oven, please keep in mind that many herbs will scorch quickly. Even the lowest setting on your home oven will not go as low as that of a dehydrator intended for this purpose. But if you are willing to experiment and able to check your herbs every few minutes as needed, it may be worth a shot!
Some gardeners even lay out fresh herbs in a single layer on paper towels to dry in the microwave. Top with another paper towel, and place on a plate.
Use the lowest power setting in 30-second increments, checking the moisture content at the end of each interval. Again, be sure to adjust accordingly as microwave wattage can vary, and fresh leaves may burn quickly.
Step 4 – Store
Once the herbs are dry, you may leave them whole or grind them. Transfer them to dated and labeled airtight containers.
The same storage method applies here for all home-dried herbs – keep them in a cool, dry location with no exposure to direct sunlight for up to one year.
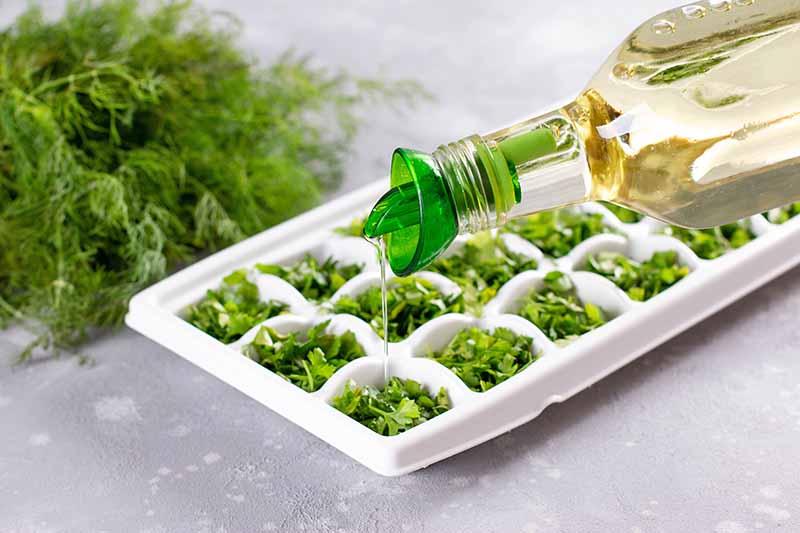
Freezing
Freezing fresh herbs is another easy way to preserve these aromatic plants, and it’s ideal to add the bright and vibrant flavors of summer into your everyday cooking!

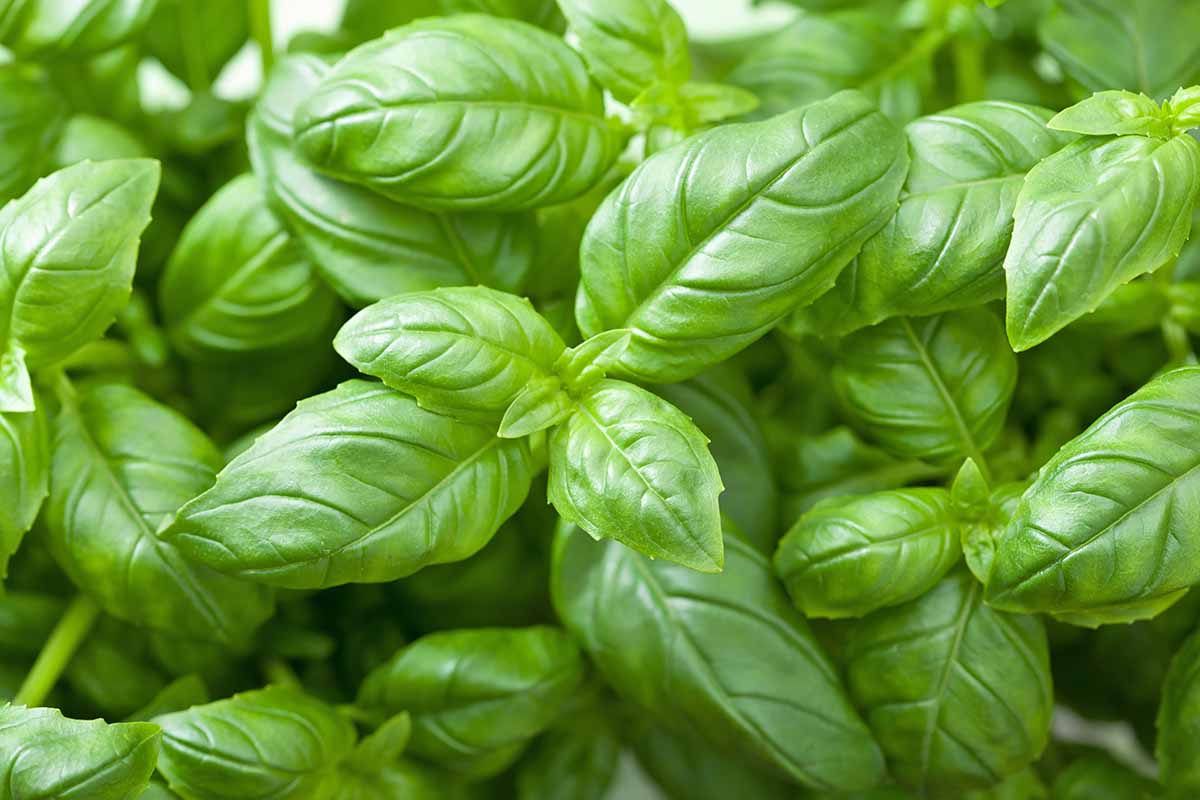
Some recommended varieties for freezing include herbs with more delicate leaves that may not hold up well to hanging to air dry, like basil, chives, parsley, and tarragon.
Our favorite way of freezing is by using ice cube trays to freeze individual portions in water or oil – toss a few cubes in soups, stews, sauces, sautes, and more as bold flavor boosters!
Follow these steps for our tried-and-true freezing technique:
Step 1 – Prep
First, set out one or two ice cube trays, as well as your preferred cooking oil.
Olive oil is a full-bodied choice of fat for this technique, but you might want to use a more neutrally flavored oil, like canola.
Plain water is another neutral option available to you, if you are monitoring the amount of fat you consume in your diet, or wish to use the herbs in things like lemonade, smoothies, soups, or cocktails that don’t need added oil.
With a sharp knife and sturdy cutting board, mince or coarsely chop the clean and dry fresh herbs.
Step 2 – Pack
Using a small amount of the herbs, no more than one slightly heaping tablespoon if you are using a standard ice cube tray, gently pack this amount into each compartment.
Spread it across the full length and width of the space, and repeat.
Step 3 – Pour in the Oil or Water
Pour your preferred oil or cool water over the chopped herbs in each compartment, leaving about 1/8 inch of headspace at the top of each to allow for expansion during freezing.
A liquid measuring cup with a spout will help you control the flow.
Step 4 – Freeze
Carefully transfer the trays to the freezer and freeze until completely firm, for about two hours.
Once frozen, tightly wrap or place lids on top to prevent freezer burn, or remove them from the trays and pack them in labeled and dated airtight containers or freezer bags.
And don’t skip packaging and labeling them – this organizational strategy will help keep your freezer neat and tidy, and will help you to better locate and identify your items when you need them!
They will keep in the freezer for up to six months.
You can add the cubes directly to whatever you are cooking without the need to defrost. The cubes will melt quickly into whatever hot dish you are preparing, given a few stirs. Water-based cubes will chill drinks, or blend easily into smoothies.
Infusing
Another approach to preservation is infusing fresh herbs in olive oil. This method will not be as long-lasting as others, but infused oils will be a big hit in your kitchen!
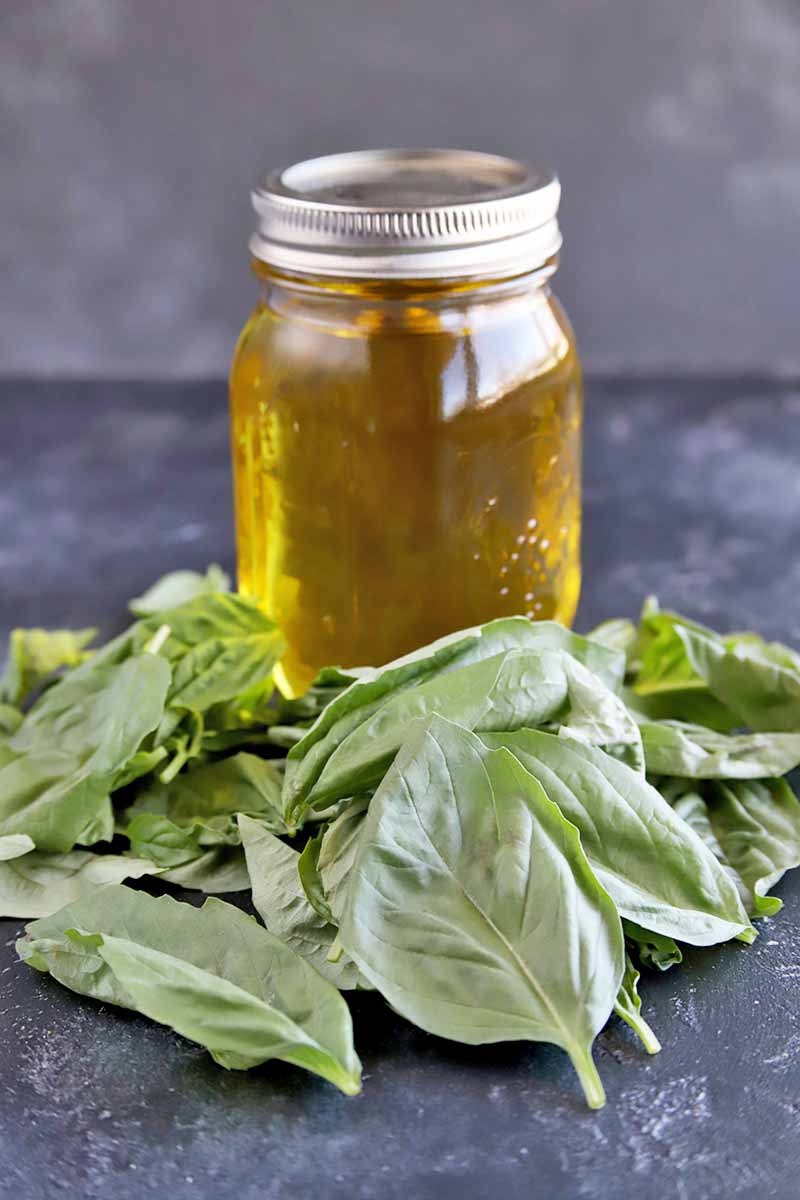
Herb-Infused Olive Oil – Get the Recipe Now
In our recipe for easy herb-infused olive oil, we teach you the right way to infuse olive oil with herbs, and how to safely store this homemade product.
After reading our expert advice with detailed step-by-step instructions and photos, you’ll be inspired to make your own blends with all the green and aromatic goodies you have growing in your yard, or on your porch, windowsill, or deck.
You can infuse olive oil with both soft and woody herbs – we provide separate instructions for both types.
While we explain the process more thoroughly in the article, we want to caution you that infused oils should be stored in an airtight container in the refrigerator and used within one week for food safety.
As with all storage methods described here, be sure to date and label your containers!
Because they are made with low-acid ingredients, infused oils are highly perishable, and may cause potential food safety risks if they are not stored properly or used within a limited time frame.
But with so many potential culinary applications, we don’t think this will be a problem for any foodie household!
Here are some quick ideas to try:
You can whisk some into homemade salad dressings, add a spoonful to pasta dishes, drizzle it on top of pizzas, incorporate it in a marinade for grilled kebabs, and use it as a dipping sauce for freshly baked breads.
Delicious!
How Will You Use the Harvest?
Congratulations – by applying any of our suggested preservation methods to your garden’s bounty, you will have home-grown herbs at the ready all year long!
But there is one remaining question to answer…
How will you use your perfectly preserved aromatics?
Will you toss roasted baby potatoes in a rosemary-infused olive oil?
Or will you make a DIY chicken dry rub or pork dry rub with assorted dried and ground herbs and spices for a fall barbecue party?
Or perhaps you will melt some cubes of frozen lemon thyme into your next batch of wedding soup?
If you have delicious ideas to share, we want to hear them! Leave a comment below with your dreamiest, most aromatic recipes.
If you think basil is an absolute requirement to have around 365 days a year, we couldn’t agree with you more! You can use basil in all its floral glory with the following recipes that feature it, fresh or dried:
- Creamy Parmesan Chicken Bake
- Savory Granola with Oats, Nuts, Herbs, and Spices
- Easy 20-Minute Creamy Tomato Basil Soup (Dairy Free)
Photo by Meghan Yager, © Ask the Experts, LLC. ALL RIGHTS RESERVED. See our TOS for more details. Uncredited photos via Shutterstock. Product photos provided by OXO and Amazon. Originally published on October 11, 2018. Last updated on May 24, 2023.
About Nikki Cervone
Nikki Cervone is an ACS Certified Cheese Professional and cheesemonger living in Pittsburgh. Nikki holds an AAS in baking/pastry from Westmoreland County Community College, a BA in Communications from Duquesne University, and an MLA in Gastronomy from Boston University. When she's not nibbling on her favorite cheeses or testing a batch of cupcakes, Nikki enjoys a healthy dose of yoga, wine, hiking, singing in the shower, and chocolate. Lots of chocolate.

Thanks for posting this, I learnt a couple of new methods that I will surely try!
Usually I stick with using freshly plucked herbs in my cooking, as the weather where I live is too humid to dry them well. The freezer method seems like a viable technique for any climate though, this is a great way to have herbs ready for any season!
Perfect timing! I’m just about to do my fall garden clean-up, and I have basil, rosemary, and oregano that need trimming back. Thanks for reminding me not to just stuff the clippings into the compost bin.
I was wondering: are there some herbs that work better dried than frozen? Or should I just choose the method that works best for the way I’ll use them later?
Thanks for posting this article. I’ve heard about freezing herbs to keep them, but I’ve never done it before. It really is a great idea. I didn’t know that they would freeze for a year. I guess since they are frozen it wouldn’t make much of a difference. I really like the ice cube method. That seems like it would be the easiest to use for future use. Thanks for the tips.
Would freezing also work for herbs bought from the grocery store? I always buy parsley and basil in bunches but rarely use it all before it goes bad.
I love fresh herbs and sometimes the dried version just doesn’t compare in terms of taste, particularly when bought from the store. I haven’t tried drying my own yet, as I haven’t had a very good crop on my garden herbs in the last few years. I have frozen herbs, though, immersed in a little water, and that works great because you just put the herb cubes straight from the freezer into whatever you’re cooking and stir through until it’s metled. I’ve even frozen mixes of herbs this way, when I’ve chopped them for a recipe but not needed the whole batch.
Meteredlines – the freezer method does work on store bought herbs, though I find you have to pick through the bunch carefully and pull out any leaves/sprigs that are bad quality.
I tried the ice cube trick last night and it worked well. Not as pretty as your photo though. I’m glad I got to freeze them before they went bad. Thanks for the tip!
I have some herbs in the garden. I think I’ll try the freezing method with my dill and see how it goes. I tried to have a drying rack once, but bird, mice and other small animals got to it first. The ice cube method seems to be more convenient for me. Thanks for the post.
I love the ice cube method – that would be so handy to have ready when you’re cooking something and want to quickly add flavor. I usually dry some of my herbs in the dehydrator, but dried herbs are far more pungent in cooking than fresh, hence the frozen ones being a better option for quick meals as dried herbs are better in slow cooked dishes.
This has inspired me to get freezing some of my herbs that need cutting.
The ice cube method is amazing! My sister and I tried this new method and loved it, when taking it out of the freezer they looked very cool and unique. When I usually preserve my herbs they turn out ok but this way keeps them fresher a lot longer. Discovering this makes me want to try to see if any other methods/ recipes would work some other foods Thanks!
I’m glad I read this, as I had no idea of ways to preserve herbs, other than hang drying. My favorite is the ice cube method, and I think I might try this with mint, for iced tea and other hot and cold beverages. It’s pretty humid where I live, so I’ll have to investigate the other methods, but my eyes have been opened to the possibilities.
I read your other article about herb oil and was kind of stumped because of the chance of food poisoning. But finding this one was super helpful because now I have many more options. I think the ice cube tray is a great method of preserving herbs and it is definitely going to be one of the ways I am going to preserve my herbs this fall. Would this method work with spearmint, too? Thank you!
I think it’s really important to harvest herbs at the right time, otherwise you’re going to lose out on “life expectancy”. I never really considered steeping them, but it may actually be a good idea depending on the plant. I mostly just leave them hanging in a cold room.
This article will be very useful for me. We grow mint in our yard all summer and fall, and I love using it to make tea. However, I never had any idea how to preserve it so that I could use it during the winter and early spring as well as when it’s in full swing. Thank you for these detailed methods. I plan on trying both the drying and the freezing soon.
I never knew that there are more ways to preserve herbs than just drying them out. I feel silly now.
I really like freezing and steeping. Leaving them to hang seems too inconvenient – I have no idea where they could be safe from people throwing them down!
Why didn’t I find this post sooner! It could of saved me a LOT of grief and hassle!
I remember one time cooking a curry that contained a myriad of herbs and spices that formed most of the sustenance of the flavor. Instead of going to the supermarket and buying the herbs fresh, I thought I should use the ones I’ve kept in the plastic bags in the back of the pantry. “It will be fine,” I remember reassuring myself.
It wasn’t The curry had that definite “off” taste to it, so I ended up scrapping the meal and having to face the embarrassment of serving a ready meal at a house party. Being such a fan of herbs and spices, and their health benefits, I wanted to share their lovely taste and effects.
Oh well…
I preserve my own herbs from time to time but it’s mostly just lavender. I grow lavender like it’s nobody’s business and there’s a bunch of it in almost every room of the house. I also have a potted lavender plant growing in my restroom for added freshness. The only method I use to dry them would be the hanging method. I live in Texas so it’s really easy to find a nice dry and warm space for them to chill out until they lose moisture. I might start using the ice cube method for things that take longer to dry. Rosemary is notorious for taking a long time to dry in my house. If I end up freezing anything it’ll probably be that.
This spring we will be growing a lot of herbs (I hope) and I love using them fresh from the garden. I always miss fresh herbs in winter and usually buy dried herbs in the shop. I will try drying my herbs by hanging them upside down. I didn’t know you could freeze them, this is a great tip! A few mint leaves in an ice cube will be great for my drink on a hot summer day 🙂
I have a big garden and every year I grow several plants of basil, parsley, oregano, rosemary and mint. I love their flavor, they add that little something missing in a recipe. I’ve always dried mine to preserve them but I feel like they tend to lose some of their flavor so I’ve been looking for different methods to preserve them. I like the idea of freezing them and the ice tray trick is brilliant, I’ll definitely do it next fall. I’ll also steep some of them, I think they will mantain their properties and they will make a nice decoration on my kitchen counter. Thank you for sharing those great tips with us!
Very nice article, I never thought about actually making ice cubs out of them. How easy to then just toss the ice cub into your tomato sauce! I have tried dry hanging without much success, it is too hot where I live and if I keep them indoors they grow fungus, very humid environment. Plus the ice cubes are such a novel idea.