Editor’s Rating
- Ease of Use 4
- Functionality 5
- Value for Money 5
- Documentation & Support 5
Summary
LearnDash is one of the most popular WordPress LMS plugins. Its deep functionality makes it a great option for creating truly custom courses. The only downside is that casual users might struggle to figure out all of that deep functionality.
Pros
- Deep functionality gives you lots of control in most areas.
- Drag-and-drop course builder makes organizing courses easy.
- Built-in video progression support is great for video courses.
- The email/Zapier trigger functionality opens up automation.
Cons
- The deep functionality can be a little overwhelming for casual users.
- You’ll need to integrate with third-party plugins for deeper membership/payment functionality.
Looking for an in-depth LearnDash review to help you decide whether or not this is the right WordPress LMS plugin to build your online courses with?
To help you make your choice, I went hands-on with LearnDash to give you a real look at how it works and what it does well (or poorly!).
By the end, my goal is that you’ll feel confident with whether or not LearnDash is the right tool for your needs.
There’s a lot to cover, so let’s dig in.
Table of Contents
- LearnDash Review: A Quick Introduction to the Plugin
- Two Ways to Create a Course with LearnDash
- Hands-on with LearnDash: Building a Course
- Seven Things You’ll Like about LearnDash
- Three Things You Might Not Like about LearnDash
- LearnDash Pricing
- LearnDash Alternatives Worth Considering
- LearnDash FAQ
- Final Thoughts on LearnDash as an LMS Plugin
LearnDash Review: A Quick Introduction to the Plugin
If you’re already familiar with the LearnDash feature list and want a more hands-on look, you can probably skip straight to the next section.
But, in case you haven’t spent a few hours perusing the LearnDash website yet, I want to start with a quick introduction to the plugin’s functionality to get you up to speed.
LearnDash has a deep feature list, which is one of the reasons why it’s so popular.
Using its drag-and-drop course builder, LearnDash lets you create complex courses complete with:
- Separate lessons and topics
- Videos, including optional auto-playing videos that skip straight to the next topic
- Quizzes
- Assignments
- Lesson timers
- Prerequisites
- Drip-fed content
- Certificates and badges
- Course forums
If you’re planning to monetize your courses, it includes a simple native payment integration with PayPal. Or, you can connect to third-party eCommerce or membership plugins for more flexibility for things such as subscriptions, memberships, discounts, etc.
To manage your courses, you can:
- View detailed reports in the backend
- Create user groups, complete with special users assigned to manage each group
- Send email notifications, including automatic triggers based on user activity
- Connect to Zapier for even more automation flexibility
On the higher tiers, you also get access to something called ProPanel, which gives you even more detailed reports, including real-time activity.
Who’s Actually Using LearnDash?
LearnDash is used by both major educational institutions and enterprises, as well as plenty of smaller websites and instructors.
On the enterprise/institution side, you have big players such as the University of Michigan, Keap (Infusionsoft), and others — see more LearnDash case studies.
And on the smaller end, you have sites such as Mindful Life, RealEstateU, GradeHacks, and more — check out the LearnDash showcase.
Two Ways to Create a Course with LearnDash
In the past, LearnDash used the same principle as every other WordPress plugin.
You purchased the plugin from LearnDash, and then you installed it on your WordPress website. This means that, in order to use the plugin, you need to already have an existing WordPress site on your own web hosting.
While you certainly still have that option, LearnDash added a new option in July 2022 that’s pretty unique in the WordPress space.
In addition to the option of installing the plugin on your own WordPress website, you now also have the option to use an all-in-one service called LearnDash Cloud.

LearnDash Cloud includes built-in hosting and an optimized setup experience, which eliminates the need to purchase your own hosting and install the WordPress software.
This offers a simpler way to set up everything, especially if you don’t already have your own WordPress site and/or feel overwhelmed by the idea of creating and maintaining it.
Here’s a quick comparison of what the experience is like between the LearnDash plugin vs LearnDash Cloud.
LearnDash Plugin vs LearnDash Cloud
With the LearnDash plugin, LearnDash works just like any other WordPress plugin:
- Purchase your own web hosting (if you haven’t done so already). We have a post with some of the best WordPress hosting providers.
- Install the WordPress software on that hosting.
- Choose and install your WordPress theme.
- Install the LearnDash plugin (along with any other plugins that you want to use).
- Start adding course content.
With LearnDash Cloud, you basically don’t have to think about the hosting part of the equation and all of the tools that you need are pre-installed. Instead, the setup process goes like this:
- Sign up for a LearnDash Cloud account.
- Choose the design of your site from 15 pre-built templates (or, you can still install your own theme).
- Start adding course content (because the LearnDash plugin is pre-installed).
LearnDash Cloud is still a full-featured WordPress site, so you’re still able to install your own plugins and themes.
The two main benefits of LearnDash Cloud are as follows:
- It offers predictable pricing because you pay just one price for all the core features that you need. For $29 per month, you get the built-in hosting and all LearnDash features.
- Both the setup and maintenance are simpler, especially if you don’t already have a WordPress site or don’t feel comfortable self-hosting the WordPress software.
With that being said, I think that a lot of people will want to keep just using the plugin on their own hosting because it gives you more ownership and flexibility. For example, you can choose your own hosting provider, get full access to your underlying hosting setup, customize your site’s performance optimization infrastructure, and so on.
Either way, the actual experience of using the LearnDash interface will be the same on both platforms. So — let’s take a look at that next!
Hands-on with LearnDash: Building a Course
Ok, this is the part of the LearnDash review where I actually go hands-on with the plugin and show you how it works. This isn’t an in-depth tutorial — my goal is to just give you a good feel for how LearnDash functions on the backend.
Then, in the next section, I’ll share some more specific thoughts on some of the things I like about LearnDash…and some of the things I don’t.
To go hands-on, I set up a test site using the Astra theme, which has dedicated integration for LearnDash. If you choose a different theme, your courses may not look as polished right away unless you have another theme with a dedicated LearnDash integration.
After installing LearnDash, you’ll get a big new LearnDash LMS section in your WordPress admin menu. If you go to the Overview area, you’ll get some useful onboarding tips:
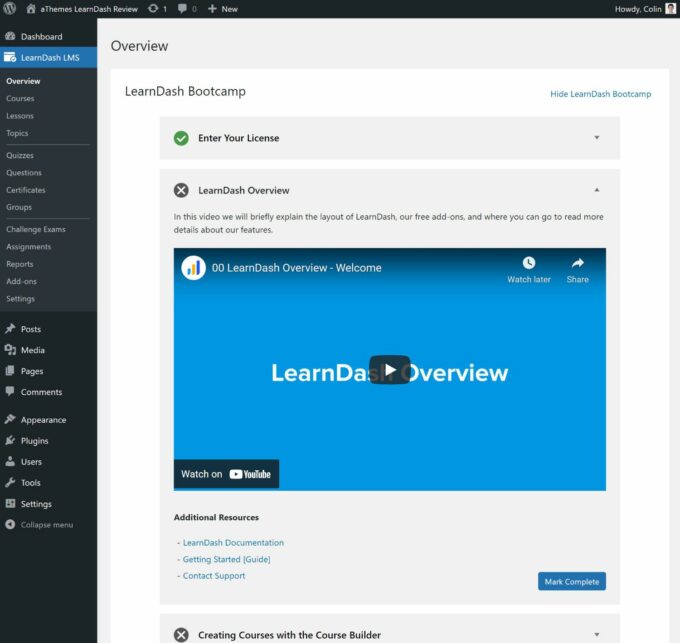
This is where you’ll do most of your work.
Creating a New Course
LearnDash uses straightforward custom post types, so navigating the LearnDash interface is easy to pick up.
For example, to create your first course, you need to go to Courses → Add New. There’s also an option to create a course from a video playlist:
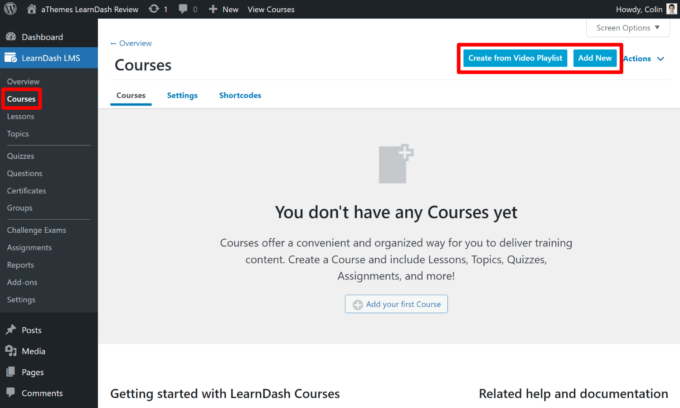
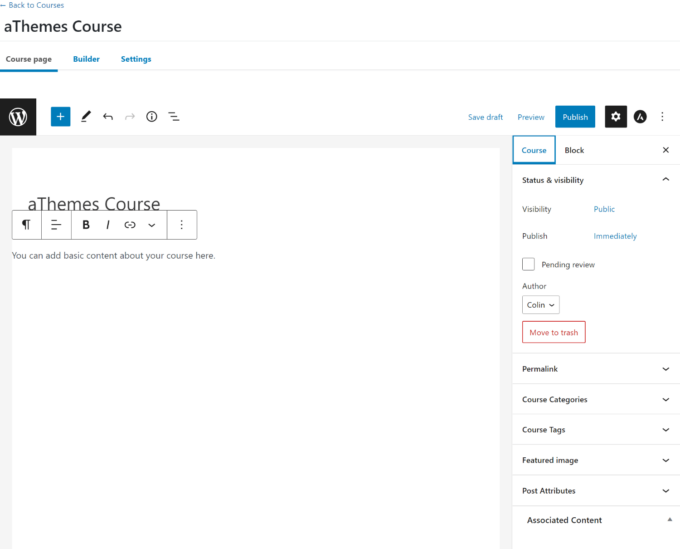
The top of the Add New Course interface looks exactly like the regular WordPress editor (you should feel right at home):
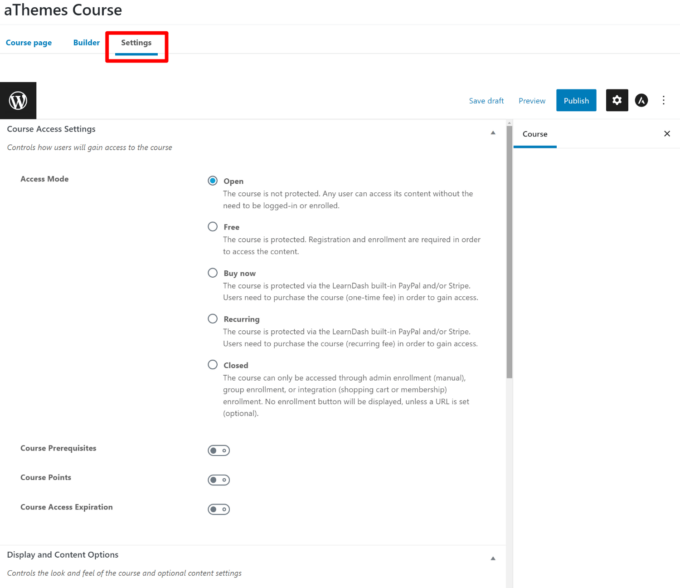
If you go to the Settings tab, you’ll get a bunch of options to configure your course, including its pricing model, prerequisites, certificates, and lots more:
To set up your course content, you need to go to the Builder tab of the interface.
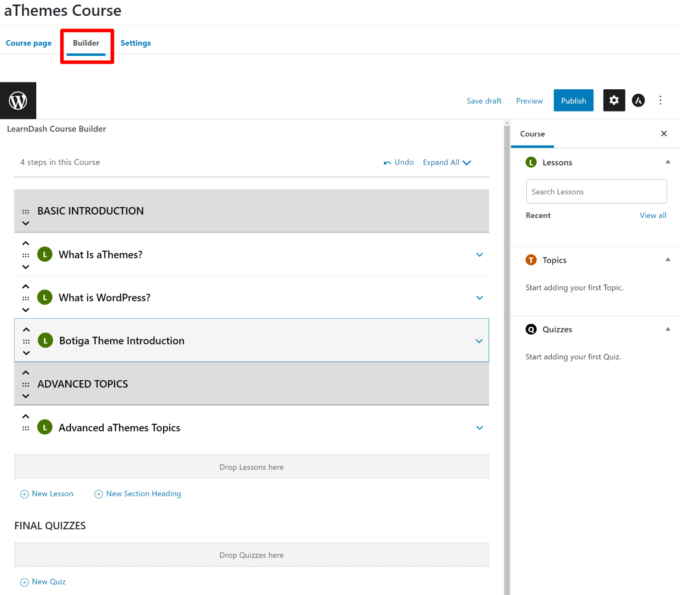
Here, you’ll get an easy-to-use visual, drag-and-drop interface that lets you set up all of your lessons and quizzes. There are a few different levels/content that you can add:
- Section headings – these are high-level organization tools
- Lessons – these are the main building blocks of courses
- Topics – these let you further divide a lesson
- Quizzes – you can add quizzes inside lessons, and you also have the option to set up final quizzes for the end of the course
Here’s what it looks like to set up lessons with the LearnDash Course Builder:
If you expand a lesson, you can further see its topics and quizzes:
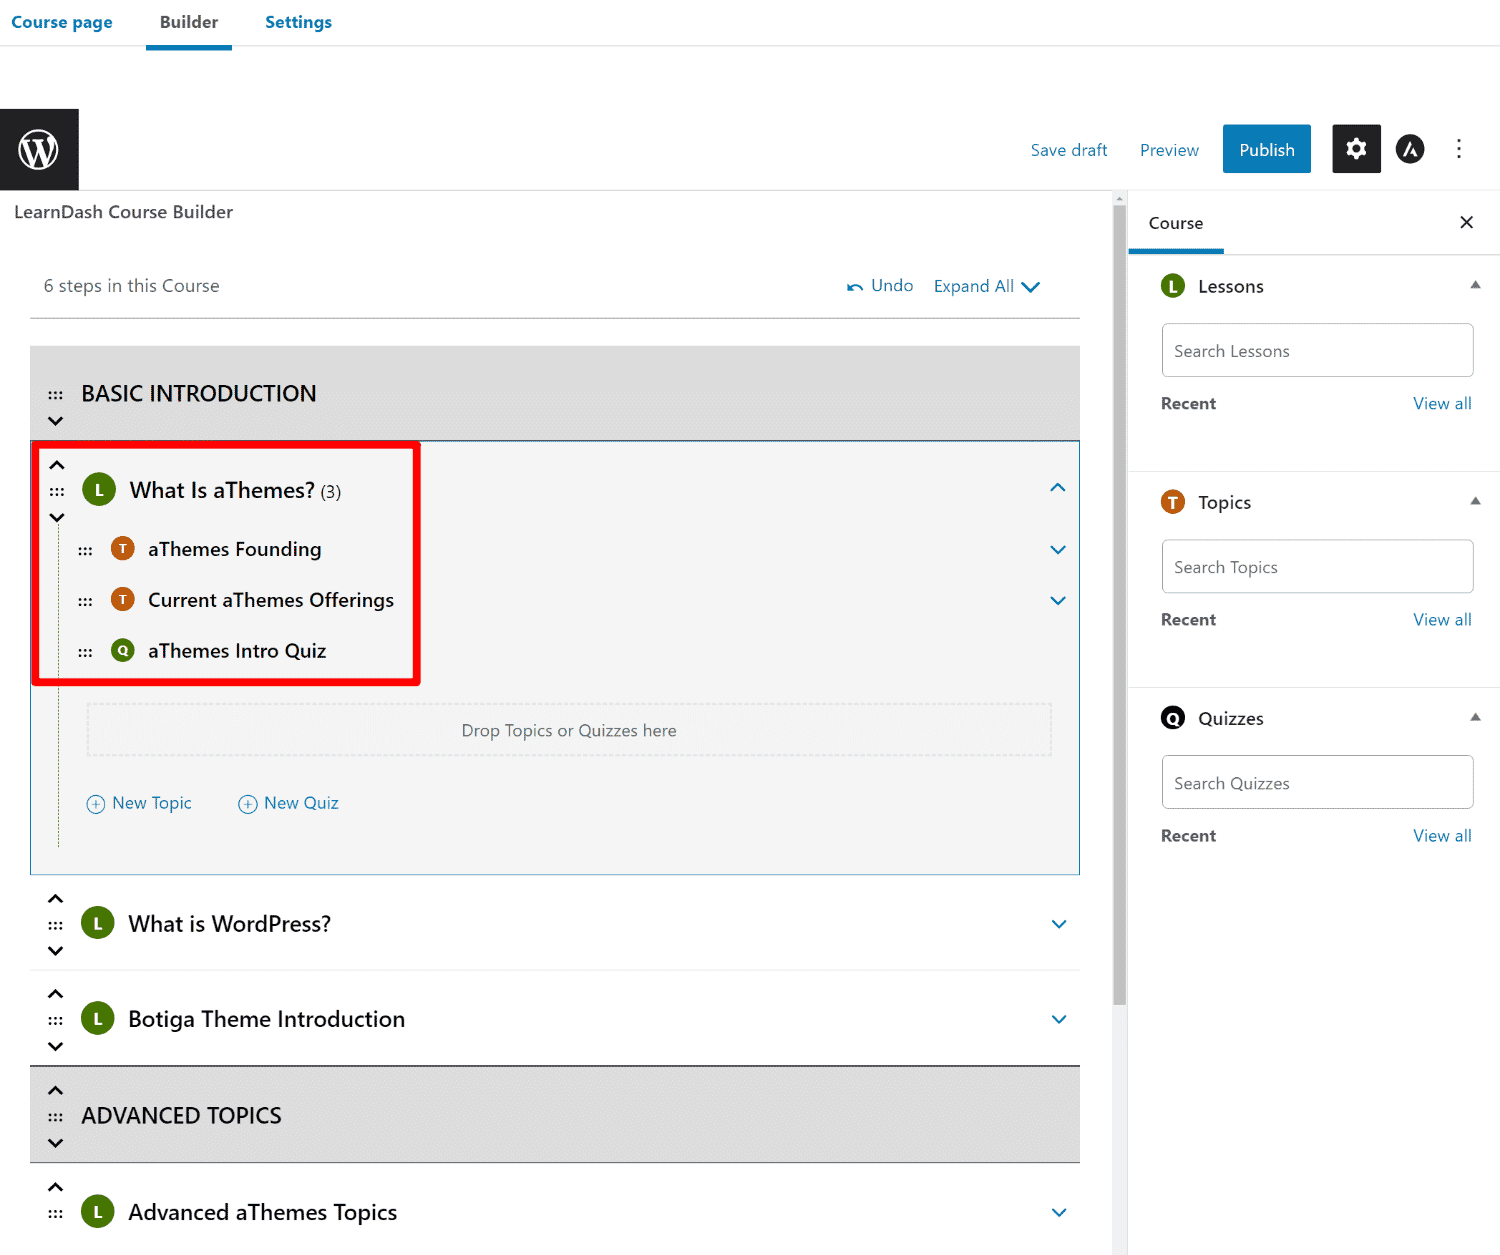
Overall, this visual builder is really helpful for setting up the high-level structure of your course. You can add as many lessons, topics, and quizzes as needed and organize them using the visual interface and drag-and-drop.
However, to actually edit the content of those lessons, topics, and quizzes, you’ll need to open a separate interface. The plugin makes this easy to do by giving you an Edit option next to each item.
Setting Up Content for Course Lessons and Topics
As I mentioned above, lessons are the building blocks of your courses. Each lesson can be further broken up into separate topics.
So the hierarchy goes:
Course > Lesson > Topic
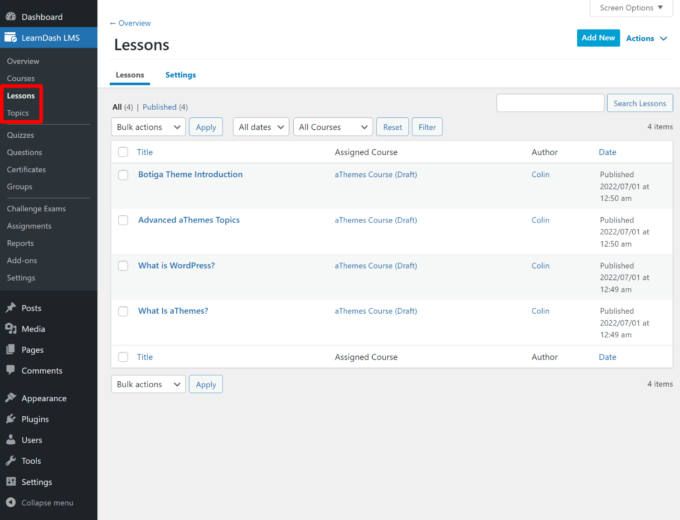
In addition to viewing lessons and topics in the course builder, you’ll also get dedicated Lessons and Topics menus that list those items in a more traditional category view:
When you edit a lesson, you can add its content using the WordPress block editor.
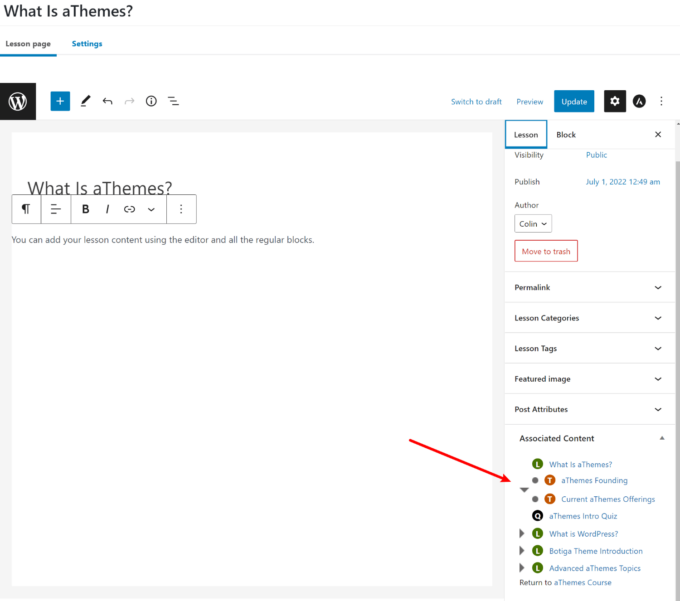
One nice thing is that LearnDash gives you an Associated Content widget in the sidebar that lets you see how that lesson fits into your overall course:
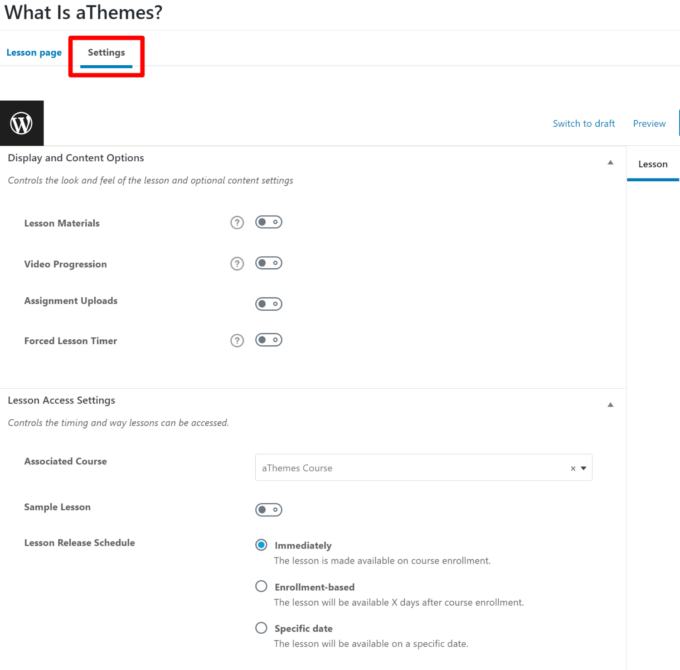
If you go to the Settings tab, you can access additional settings for that lesson, including the following:
- Uploading an assignment for that lesson
- Drip-feeding the lesson
- Enabling video progression (makes it easy to embed video content as part of your lesson)
Similarly, when you edit an individual topic, you can add content using the block editor and then access a bunch of settings from the Settings tab:
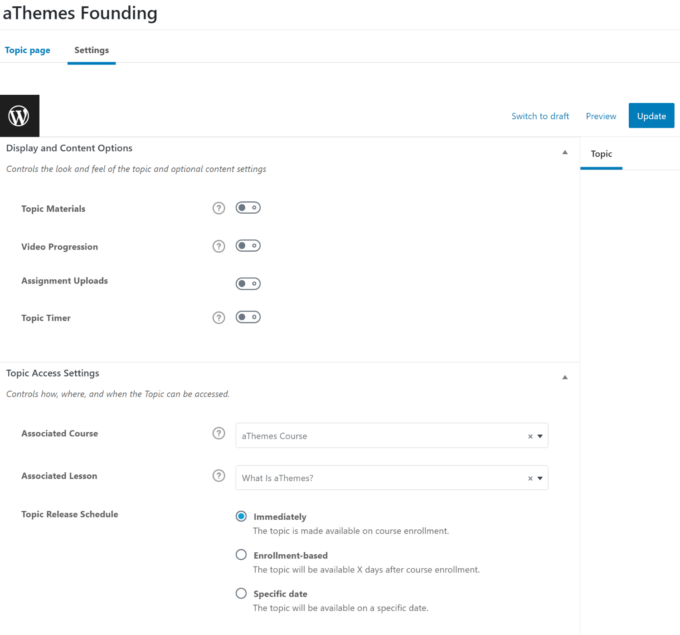
Any changes that you make in these separate interfaces will automatically sync to the visual course builder, which makes it easy to switch back and forth as needed.
Embedding Course Content with Blocks or Shortcodes
I still have a few things to show you…But at this point, I have a working, albeit barebones, course.
So, let’s take a quick detour and explore how you can display LearnDash content on your WordPress site.
That answer? Well, it depends on the editor.
If you’re using the WordPress block editor, LearnDash gives you a bunch of blocks to set up your frontend content.
If you’re still using the classic TinyMCE editor, you’ll set everything up using shortcodes instead.
I like the block approach because it gives you a very native feel. Here, you can see an example of the many blocks that LearnDash adds:
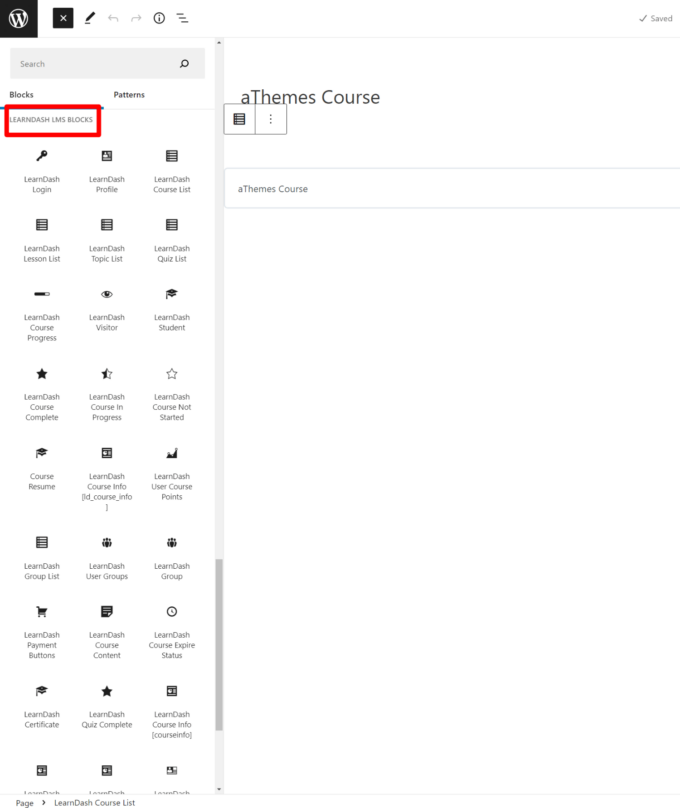
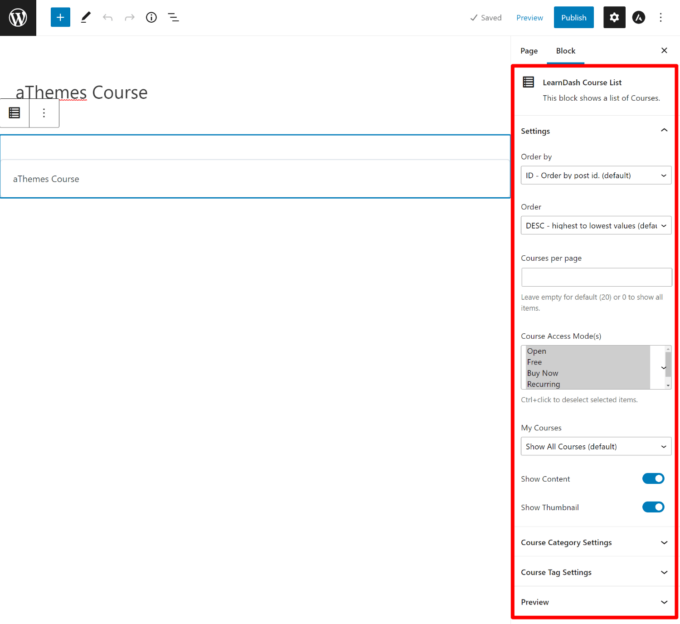
Let’s say that you want to list some or all of the courses that you offer. You could add the LearnDash Course List block, which would then give you a bunch of settings to control which courses to display.
For example, you could only list free courses in this block or target certain categories of courses:
Creating Quizzes and Assignments
Ok, back into the WordPress dashboard to show you a few more things that you can do with LearnDash.
If you like to torture your course-takers by making them, gasp, actually do work, you have a couple of options at your command:
- Quizzes
- Assignments
Let’s start with quizzes. There are a ridiculous number of options here. You have a ton of control over how your quizzes function (though I do know some people complain about the limited number of question types):
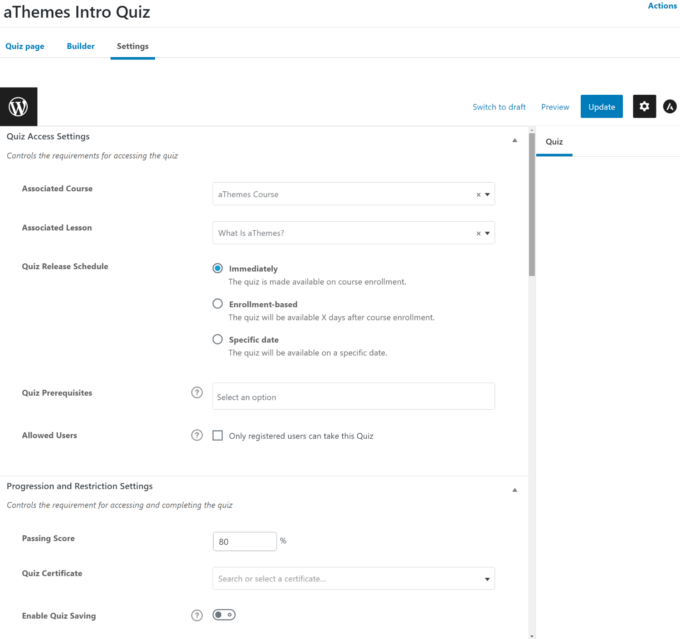
Configuring all of these options for every single quiz would be a pain. However, LearnDash thought of that and included a handy feature that lets you save a set of settings as a template, which allows you to quickly spin up already-configured quizzes and save a ton of time.
To actually create your questions, you’ll pop over to the Builder tab, which works a lot like the course builder.
You can add questions and then expand their settings to add the answers, as well as configure other settings:
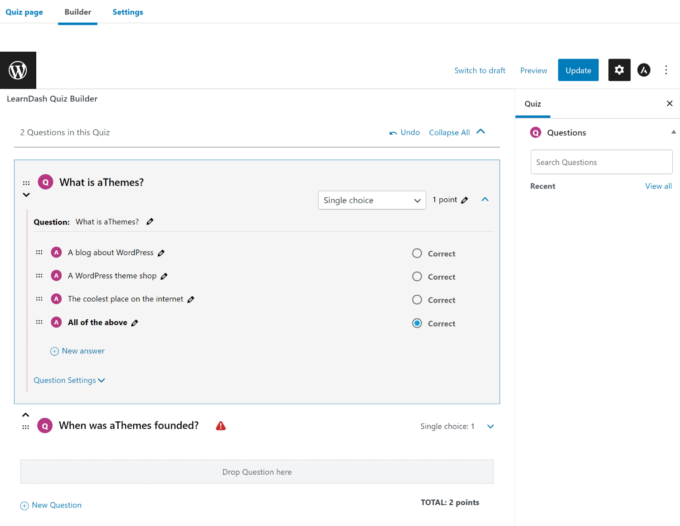
In total, you can choose from the following question types:
- Single choice
- Multiple choice
- “Free” choice
- “Sorting” choice
- “Matrix Sorting” choice
- Fill in the blank
- Assessment
- Essay/Open Answer
As for assignments, you add them in the Lessons or Topics interface (you already saw those above). You can then manage submitted assignments in the Assignments area:
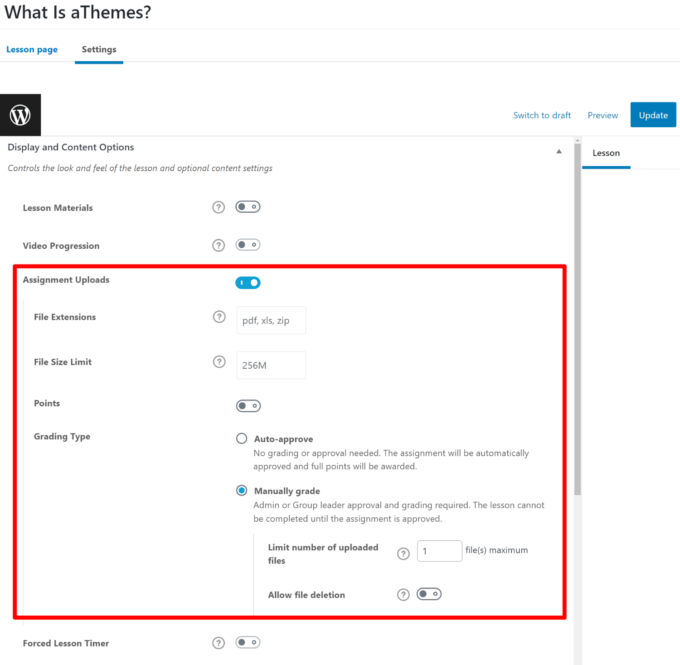
Groups, Reports, and Settings
To round things out, there are three more options available in the LearnDash LMS sidebar area:
- Groups – lets you assign group leaders to a group of users
- Reports – lets you monitor stats about your courses and students
- Settings – lets you configure basic settings such as translations, PayPal settings, and others
Seven Things You’ll Like about LearnDash
Hopefully the above gave you a solid understanding of how you’ll use LearnDash on the backend at a high level. Now, I want to single out some specific things I think you’ll like about LearnDash.
1. The Visual Course Builder Is Super Helpful
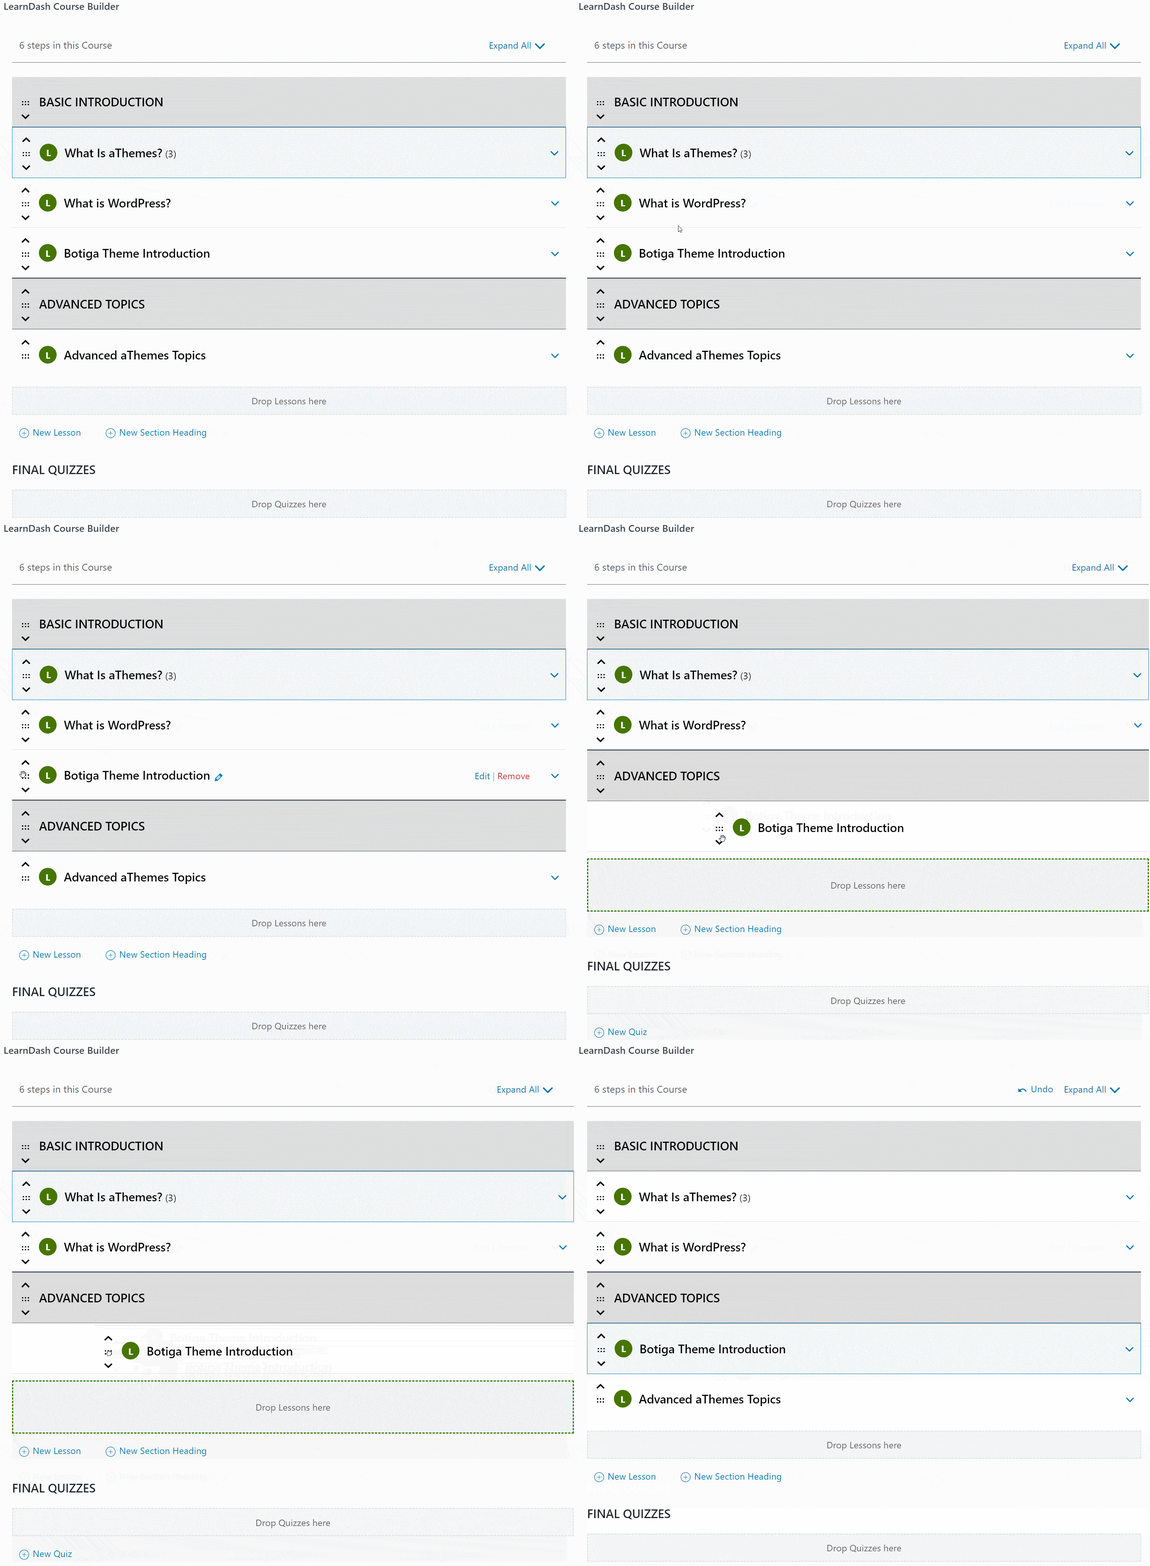
The Visual Course Builder makes it a lot easier to lay out your course and visualize how everything connects. I don’t think I could imagine using an LMS plugin that doesn’t have a drag-and-drop builder.
Plus, the option to quick-add new lessons, topics, and quizzes right from the course builder makes it easy to lay out everything at once and then just go back and edit as needed.
2. Drip-Fed Content and Prereqs Are Convenient
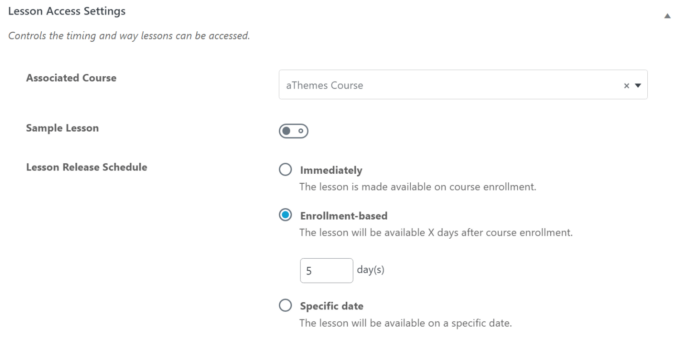
If you want to keep people coming back to your course (or just stop them from binging it in one sitting), the built-in drip content option for lessons is really helpful.
LearnDash lets you either:
- Make the content available X days after signup
- Make the content available on a specific date
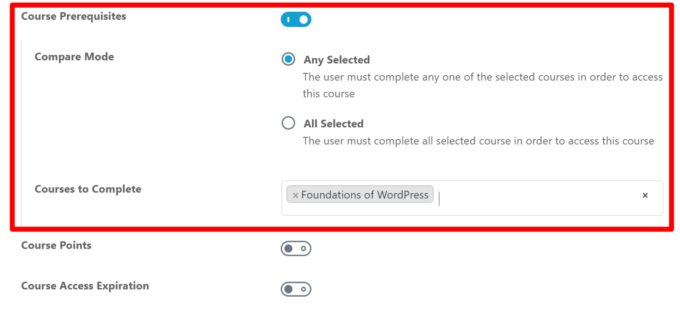
Similarly, if you want to make sure people have the relevant foundational knowledge before taking an advanced course, the Course Prerequisites functionality is also helpful.
With prerequisites, you can create a group of courses to act as prerequisites. Then, you can decide whether a potential course-taker must have:
- Completed all of those courses
- Completed at least one of those courses
3. Unique Video Progression Feature
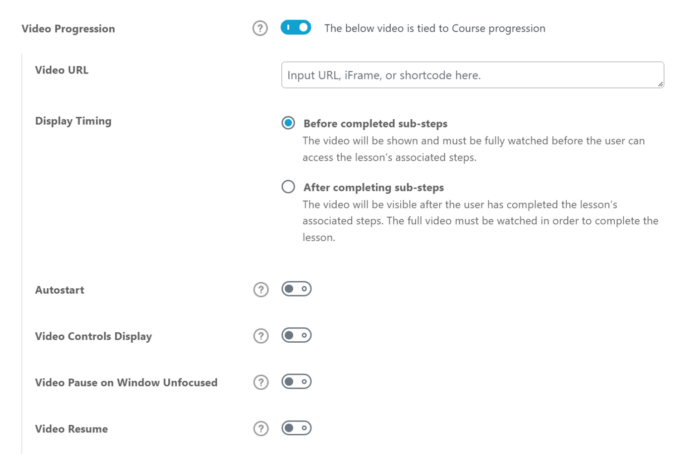
If you use videos in your courses, LearnDash’s Video Progression feature makes it really easy to embed either self-hosted or externally hosted videos.
You can even get creative and:
- Automatically mark lessons/topics as complete after the viewer finishes the video
- Send learners straight to the next video once it finishes
- Hide the play bar (to avoid skipping), autoplay videos, and lots more
4. Engagement Triggers for Automation
Engagement triggers are a powerful feature that let you automatically do “something” based on the specific action a learner just took:
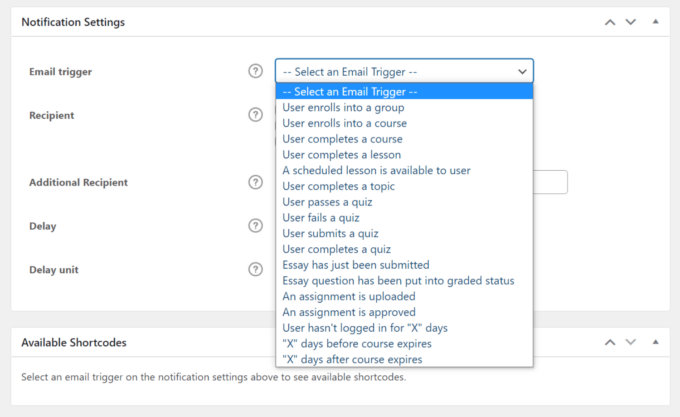
Now, that’s pretty vague…but it has to be vague because the tool is so flexible. You can choose from a ton of different triggers like when a user:
- Enrolls in a course
- Completes a lesson
- Fails a quiz
- Uploads an assignment
- Hasn’t logged in for a certain number of days
- Etc.
Once you trigger an event, you have a few options for what you do on your side. First, you can send a specific email to the user. That alone is already helpful.
But what’s really cool is LearnDash’s Zapier integration. If you’re not familiar, Zapier is a tool that helps you connect to a range of other apps.
Through LearnDash’s triggers and Zapier, you can automatically do stuff such as:
- Add a user to a specific segment in your email marketing service as soon as they enroll in a course
- Generate a help desk ticket or open a live chat when someone fails a quiz
- Send yourself a text whenever someone enrolls in a course
- Lots, lots more
5. Lots Of Official and Third-Party Add-ons for More Functionality
If you need more functionality than the core LearnDash plugin can offer, there’s a huge marketplace of both official and third-party add-ons that can help you:
- Integrate with other plugins
- Send email notifications
- Use badges in your courses
- Create better-designed courses
- Lots more
Honestly, I would say the number and quality of these integrations are one of the strongest things about LearnDash because it opens up so much power.
For example, let’s say you want to set up simple or advanced marketing automation (or other types of automation) that goes beyond LearnDash’s built-in system.
You could install a plugin such as Uncanny Automator or WP Webhooks to automatically perform actions based on what users are doing in LearnDash. Here are some examples of things that you can automate with these tools:
- When a user enrolls in a new course, apply a certain tag to that user in your CRM (customer relationship manager)
- If a user passes a certain quiz, automatically complete the course and enroll them in a new course (this lets people “test out” of lower-level courses)
- Add a user to a course when they complete a form (e.g. Gravity Forms or another form plugin)
- If a user registers for an event in The Events Calendar (or another events plugin), enroll them in a certain LearnDash course
Beyond automations, you can find tons of other LearnDash extensions to enhance other areas of your course, such as adding private messaging, scheduling courses to run during certain times, cloning content, and lots, lots more.
The possibilities are pretty endless with these automation tools and other extension plugins, which gives you so much flexibility for customizing your LearnDash course. Super cool!
6. Native WordPress Approach
Whenever possible, LearnDash tries to use the native WordPress approach to things. For example, you can set up your lesson content using the regular post editor, customize your course pages with blocks, and so on.
If you’re already a WordPress user, this makes it very easy to get started with since there’s no need to learn a new interface like you might have to do with a different tool.
7. Far Cheaper Than SaaS Alternatives
Finally, we come to the price. I’ll talk about this more in the pricing section, but one of the huge benefits of LearnDash is how much money you can save compared to SaaS (Software-as-a-Service) tools such as Teachable.
For example, Teachable’s cheapest plan already costs $39 per month, plus a 5% transaction fee on top! And if you want to ditch the transaction fees, you’re looking at $119 per month.
LearnDash, on the other hand, starts at $199 all-in for a year of support and updates (for a single site license). That’s a huge price difference.
Three Things You Might Not Like about LearnDash
When I originally wrote this LearnDash review, I listed some other cons here. However, as of our 2022 update, I’m happy to say that LearnDash has fixed many of the issues that I complained about.
However, there are still a few disadvantages that are worth noting about LearnDash. None of these are dealbreakers, but they are things you might want to consider before finalizing your choice.
1. LearnDash Doesn’t Offer a Free Version
Unlike a lot of other WordPress LMS plugins, LearnDash does not offer a free version. I’ll talk more about pricing in a second, but LearnDash obviously won’t be an option if you’re looking for a free plugin.
For serious courses, I don’t think this should matter because it’s a small price to pay for the features that you get.
2. There’s No Official Mobile App
This isn’t a criticism of LearnDash when compared to other WordPress LMS plugins as it’s rare for a WordPress plugin to offer an official mobile app experience.
However, I think that a lot of people looking at LearnDash are also considering SaaS tools such as Teachable, which does make this a criticism worth noting.
While there are ways to create a mobile app for your course, such as using the third-party AppPresser tool, LearnDash doesn’t offer its own native mobile app.
In contrast, if you use something like Teachable, all of your students can access your course content using the official Teachable app. Not only does this save you time and effort, but it also creates a nicer mobile experience for your students (though you miss out on the branding opportunities of having your own app).
3. All Of the Settings Can Still Feel Overwhelming
While I really like how LearnDash has upgraded its interfaces and embraced the native WordPress block editor over the past few years, it’s still a pretty feature-rich plugin, which can feel overwhelming when you’re just getting started and confronted with all the different settings options.
If you want all of that flexibility, then it’s worth investing the time into the learning curve.
However, if you’re just looking for the simplest way to make a nice, user-friendly online course, you might prefer using one of the SaaS alternatives such as Teachable.
This is especially true if you’ve never used WordPress before, as choosing LearnDash would require you to learn both WordPress and LearnDash.
LearnDash Pricing
Unlike some other LMS plugins (more on those next), LearnDash only comes in a premium version.
While it is a little more expensive than the average WordPress plugin, it still offers excellent value, especially when compared to other similarly feature-rich LMS plugins and SaaS tools.
In fact, for the features that it offers, LearnDash is one of the most affordable solutions that you’ll find for launching online courses.
That doesn’t mean you can’t find free or cheaper options — however, most tools that are cheaper will not be nearly as functional as LearnDash.
So — how much does it cost?
Well, that depends on if you’re purchasing just the plugin or the all-in-one LearnDash Cloud service.
LearnDash Plugin Pricing
There are three different pricing plans to purchase the plugin and install it on your own WordPress site.
All three plans offer the same features — the only difference is the number of sites upon which you can use the plugin:
- 1 site – $199
- 10 sites – $399
- Unlimited sites – $799
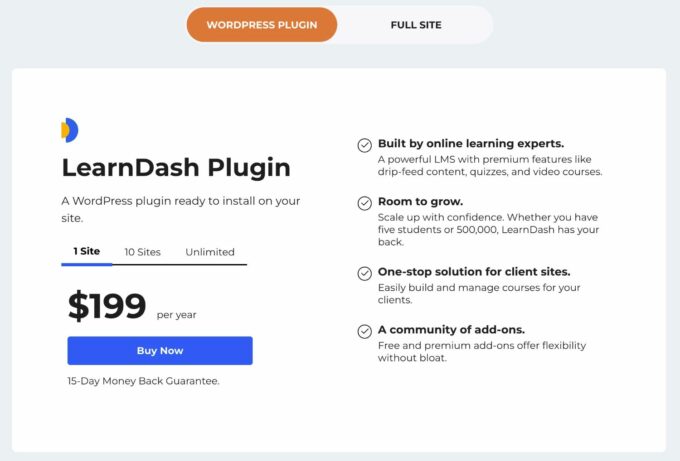
Those prices are for almost every single feature with one exception — the ProPanel reporting dashboard.
ProPanel is really only needed for serious academic courses where you need the ability to view student activity in real time.
If you’re just creating courses to sell to your audience, you probably don’t need ProPanel.
However, if you’re an academic institution using LearnDash to deliver online courses, or if you want to offer business-focused certification courses, then you might want to purchase ProPanel.
Here’s what ProPanel costs:
- 1 site – $49
- 10 sites – $99
- Unlimited sites – $199
All plans come with one year of support and updates. If you want to continue receiving support and updates after the first year, you’ll need to renew your license.
The current version of LearnDash that you have will keep working even if you don’t renew — you just won’t get new updates, which might mean you miss out on new features or important compatibility fixes.
Generally, if you’re serious about your course, you should budget for renewals every year so that you can continue receiving updates.
Additionally, all plans come with a 15-day money-back guarantee, so you aren’t risking anything by making a purchase.
LearnDash Cloud Pricing
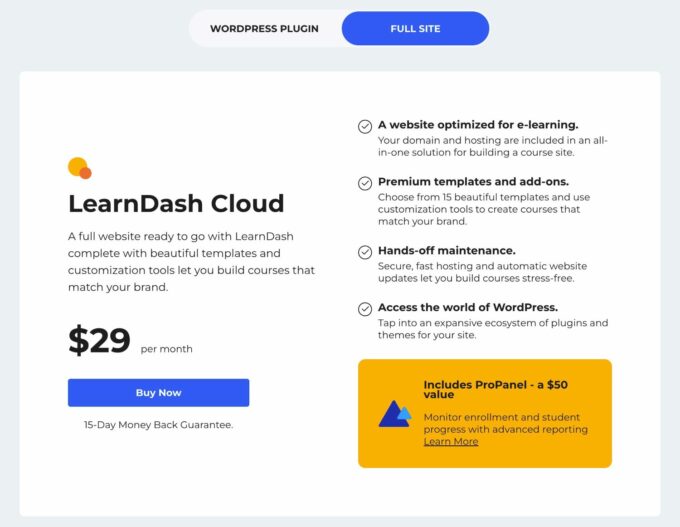
If you want to use the all-in-one LearnDash Cloud service, it costs $29 per month for everything.
That $29 per month fee includes:
- Built-in hosting
- 15+ pre-built templates
- All LearnDash features, including ProPanel
- Other helpful tools such as Kadence Blocks
That would come out to $348 per year, which means the premium over just the plugin is $149 for a year of hosting. Or, if you’ll make use of ProPanel, it’s only a $99 premium for a year of hosting.
That’s pretty good value as most quality WordPress hosts will cost more than ~$8-12 per month.
LearnDash Alternatives Worth Considering
While LearnDash is definitely one of the best WordPress LMS plugins, it’s not the only high-quality option to create and deliver online courses.
Let’s run through the best LearnDash alternatives that you might want to consider before making your final decision. I’ve already mentioned some of these tools above, but they’re worth a deeper look.
LifterLMS
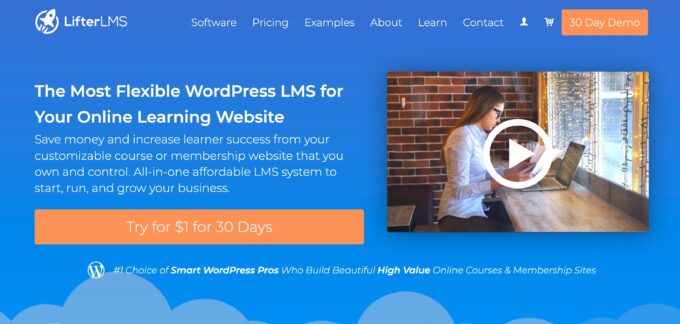
LifterLMS is another one of the most popular WordPress LMS plugins and probably one of the most direct competitors to LearnDash in terms of native WordPress plugins.
It offers a lot of the same features and benefits as LearnDash. While there are certainly smaller feature differences here and there, one of the biggest differences between LearnDash and LifterLMS is in the pricing structure.
If you want to learn more about everything, check out my full LifterLMS vs LearnDash comparison. But here’s the basic breakdown:
- LifterLMS has a functioning free version and can be a little more affordable for straightforward courses that don’t need quizzes, certificates, achievements, email marketing, and so on.
- LearnDash will be a lot more affordable for courses that do want those added features.
Overall, I would say that LearnDash’s all-in-one pricing makes it a better value for most people that want to sell paid courses, but it’s worth reading the full comparison to see where you stand.
Teachable

Teachable is not a native WordPress plugin. Instead, it’s a SaaS tool that helps you create free or paid online courses.
However, if you already have a WordPress site, there are ways to integrate Teachable with WordPress using webhooks or Zapier. Or, you could always just have a standalone site for just your courses — there’s nothing wrong with that!
As a SaaS tool, Teachable excels at giving you a simple, hands-off way to manage your courses. You never need to mess around with security or maintenance — you just sign up and start creating content for your students.
Teachable also makes it super easy to accept and manage payments, including letting you sell private coaching services in addition to your courses.
However, Teachable has two main downsides when compared to LearnDash:
- It’s more expensive, primarily because of its hosted SaaS approach. For example, the cheapest tier costs $348 per year plus an extra 5% transaction fee. The next tier removes the transaction fee, but it’ll cost you a cool $1,188 per year. There is a limited free plan, but it won’t work for serious courses.
- Because it’s not open-source such as LearnDash, you don’t have as much flexibility as LearnDash offers. You only get access to the specific features and integrations that Teachable allows — you can’t do anything beyond that.
Still, for people looking for the simplest, most hands-off way to create an online course, Teachable can be a great LearnDash alternative.
If you like this SaaS approach, you also might want to check out other tools such as Podia or Kajabi. You can also check out our post on the best Kajabi alternatives.
Tutor LMS
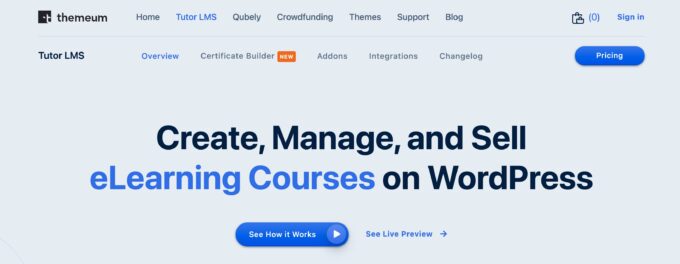
Tutor LMS is a newer LMS plugin that offers a really slick user experience for your students.
Beyond that, one advantage that Tutor LMS has over LearnDash is that it also lets you create your own online course marketplace, where individual instructors can create their own courses and sell them through your marketplace. You can then charge a commission on all of the sales that each course generates.
It’s pretty much how Udemy works, though you can also use Tutor LMS to just deliver your own courses.
If you find that type of functionality intriguing, that might be one reason to consider Tutor LMS over LearnDash.
Tutor LMS also has a functioning, albeit limited, free version. Even with the free version, you can still sell paid courses with one-time payments, which is pretty nice. You need the paid version for recurring payments, though.
So if you are on a budget and can’t afford LearnDash right now, that might be another reason to consider Tutor LMS.
However, overall, I don’t think Tutor LMS can match the power and functionality of LearnDash, so if you want the most features, flexibility, and integrations, LearnDash still might be a better option.
If you want to learn more, check out my full Tutor LMS review or our collection of the best Tutor LMS WordPress themes.
LearnDash FAQ
Let’s finish things out with a few common questions about LearnDash.
Should You Use the LearnDash Plugin or LearnDash Cloud?
LearnDash Cloud can be a great option for beginners who don’t feel comfortable creating and maintaining their own WordPress sites.
For experienced WordPress users, however, I would recommend the standalone plugin version because it gives you more flexibility and control over your site’s environment.
Can You Install Other Plugins on LearnDash Cloud?
Yes — even if you create your site with LearnDash Cloud, you’ll still be able to install other plugins as needed.
Is LearnDash Free?
LearnDash is not free. It only comes in a premium version, though there is a 15-day money-back guarantee.
Can I Use LearnDash without a License?
Yes — you can continue using the LearnDash plugin even if your license expires. However, you need an active license to continue receiving support and updates.
Over the long term, your course might run into compatibility issues with future versions of WordPress if you don’t maintain your license to receive updates. You’ll also miss out on any new features that LearnDash adds.
Is LearnDash Hard to Learn?
Because it’s a WordPress-based tool, LearnDash does assume some basic experience with running WordPress sites. It’s still something that non-technical users can handle, but there will be a learning curve if you’ve never used WordPress before.
Can You Use LearnDash without WordPress?
LearnDash is a WordPress plugin which means your site must be using WordPress to run LearnDash. Even if you use LearnDash Cloud, your site is still powered by WordPress.
Does LearnDash Work on WordPress.com?
You can use the LearnDash plugin on WordPress.com as long as you pay for the WordPress.com Business plan, which gives you the ability to install your own plugins.
Where Is LearnDash Data Stored?
With the LearnDash plugin, all of the LearnDash data is stored exclusively on your own server inside the same database used to power the rest of your WordPress site.
However, you do have the option to integrate with external tools if you need to pass your course’s data to another tool (such as your customer relationship management or email marketing service). These integrations are 100% optional and are not enabled by default.
With the LearnDash Cloud service, your data will be stored on the built-in hosting that you get access to as part of the service.
Is LearnDash Open-Source?
LearnDash is fully open-source and licensed using the GPL, just like the core WordPress software. You’re free to run, study, modify, and share the code as you see fit.
Is LearnDash Cloud-Hosted?
It depends on which version you use. If you purchase the plugin and install it on your own self-hosted WordPress site, it’s not cloud-hosted and everything stays on your own hosting server.
However, if you use the all-in-one LearnDash Cloud service, then your site will live on LearnDash’s servers, so it is more of a cloud-hosted service.
Final Thoughts on LearnDash as an LMS Plugin
There’s a reason why LearnDash is one of the, if not the, premier WordPress LMS plugins.
It offers deep functionality that lets you build truly customized courses for your students. As its adoption by major educational institutions shows, it can also scale and won’t buckle under pressure.
That deep functionality does come at a price, though. While the new interface is really nice and built on the block editor, casual users might still have to go through a learning curve to get the most out of the plugin.
But if you’re willing to fight through that learning curve, or if you’re a more advanced user with a few WordPress sites already under your belt, LearnDash is one of the best WordPress LMS plugins that you’ll find.
The addition of the new LearnDash Cloud service also makes it easier than ever for non-technical people to get started with courses powered by LearnDash.
If you want to try it out, click here to go to LearnDash. While there’s no free trial, there is a 15-day money-back guarantee, so you’re not risking anything by signing up.
Still have any questions about LearnDash or our LearnDash review? Let us know in the comments!
