Editor’s Rating
- Ease of Use 5
- Functionality 4.5
- Value for Money 4
- Documentation & Support 4.5
Summary
Tutor LMS is an excellent WordPress LMS plugin that you can use to offer your own free/paid courses or create a course marketplace with third-party instructors. The interfaces on both the frontend and backend are very well-designed, and the developer has put a lot of working into increasing the features that it offers.
Pros
- The frontend and backend interfaces are very user-friendly.
- The free version is very capable.
- You can offer your own courses or create a course marketplace.
- The drag-and-drop certificate builder is best in class.
- It has tight support for video course content.
Cons
- It doesn’t have built-in payment processing — instead, it relies on WooCommerce, EDD, or Paid Memberships Pro.
- The price for Pro has increased, though it still offers solid value.
- It doesn’t have as large of a third-party add-on marketplace as a plugin such as LearnDash.
Interested in launching your own online course? Tutor LMS is a freemium LMS (learning management system) plugin that helps you create and launch your own online courses with the best content management system in the world — WordPress.
In this Tutor LMS review, I’ll give you a hands-on look at how this tool works to help you create and manage your courses.
Launched in March 2019, this WordPress LMS plugin has managed to rack up over 70,000 active installs at WordPress.org and has a really good 4.5-star rating on its almost 500 reviews.
After playing around with it, I can see why. The plugin has convenient features and a well-designed interface. Plus, the fact that you can get started for free is also quite attractive.
Over time, the Tutor LMS developer has also worked hard on adding new features, which can now put it close to plugins such as LearnDash and LifterLMS in terms of functionality.
Keep reading my full Tutor LMS review for a look at the feature list and a hands-on tour of how everything works.
Tutor LMS Review: A Look at the Feature List
At a very high level, Tutor LMS helps you create and sell online courses, complete with:
- A drag-and-drop course builder
- Content restriction
- Quizzes and a quiz creator
- Special integration for videos in courses
- Course certifications
- Integrated monetization via WooCommerce or Easy Digital Downloads
- Support for instructors, including the ability to pay instructors a commission and allow them to withdraw their earnings
- Separate student and instructor dashboards for frontend management
- Course reviews
One of the most unique things about Tutor LMS is its focus on other instructors. Rather than only selling your own courses, you can create an online course marketplace, including course options from third-party instructors. Basically, it lets you create your own Udemy clone with WordPress.
Tutor LMS comes in both a free and premium version, so I’ll break down the more specific features by whether they’re free or premium.
The free version is pretty generous, setting you up with all the basics you’ll need to run courses. Without paying a dime, you’ll still get access to:
- The course builder, along with unlimited lessons and courses
- Video player support
- Most of the quiz functionality, including the ability to limit quiz attempts, set a passing grade, and add a time expiration
- Monetization via WooCommerce or Easy Digital Downloads
If you purchase the premium version, you’ll also get access to other features, such as:
- A frontend course builder — for example, you could let instructors create their own courses without requiring them to use the WordPress dashboard
- More quiz question types
- Detailed reports to see how your courses are doing
- Email notifications
- Assignment submissions
- The ability to require course prerequisites
- Multimedia attachments
- Course previews
- Course bundles
Let’s go hands-on, and I’ll show you how everything works.
Hands-On with Tutor LMS
To start off this hands-on section, I’ll stick with the free version at WordPress.org. Then, I’ll install Tutor LMS Pro and show you some of the premium functionality.
Create a Course
Let’s start at the beginning — creating your first course.
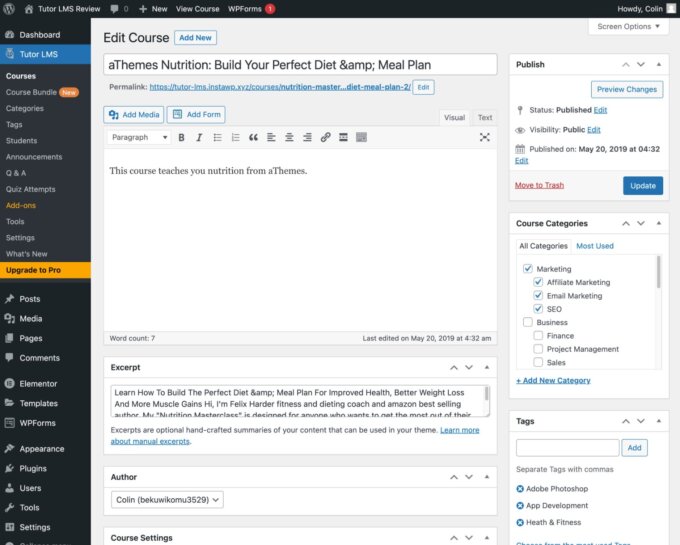
When you go to create a new course, you’ll see the regular WordPress editor at the top, where you can add the course title, description, categories, and tags:
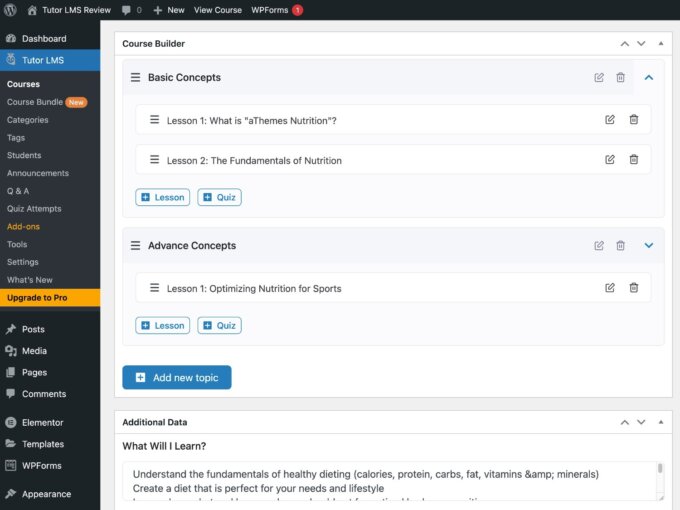
Once you scroll down, though, you’ll see a number of new meta boxes where you can configure the course — most notably, the drag-and-drop course builder, which functions similarly to some other popular WordPress LMS plugins.
First, you can add topics, which are the broadest categories. Then, you can add lessons and quizzes inside each topic:
One convenient feature here is that, when you click Add New Lesson, it will open a pop-up with the editor for that lesson:
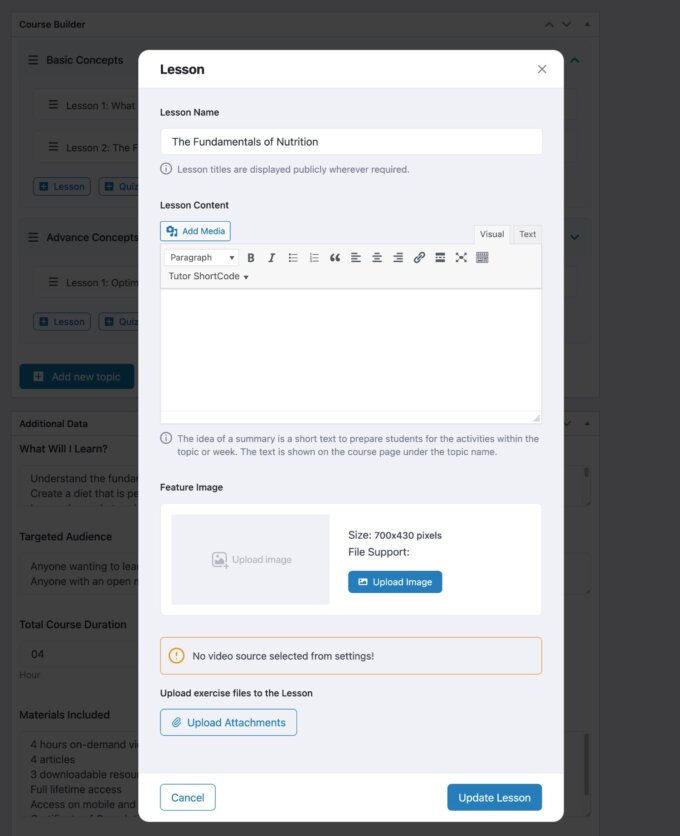
I find this to be more convenient than some of the other LMS plugins that force you to open a new tab for every single lesson. I’ll take a deeper look at the lesson builder and quiz creator in a second.
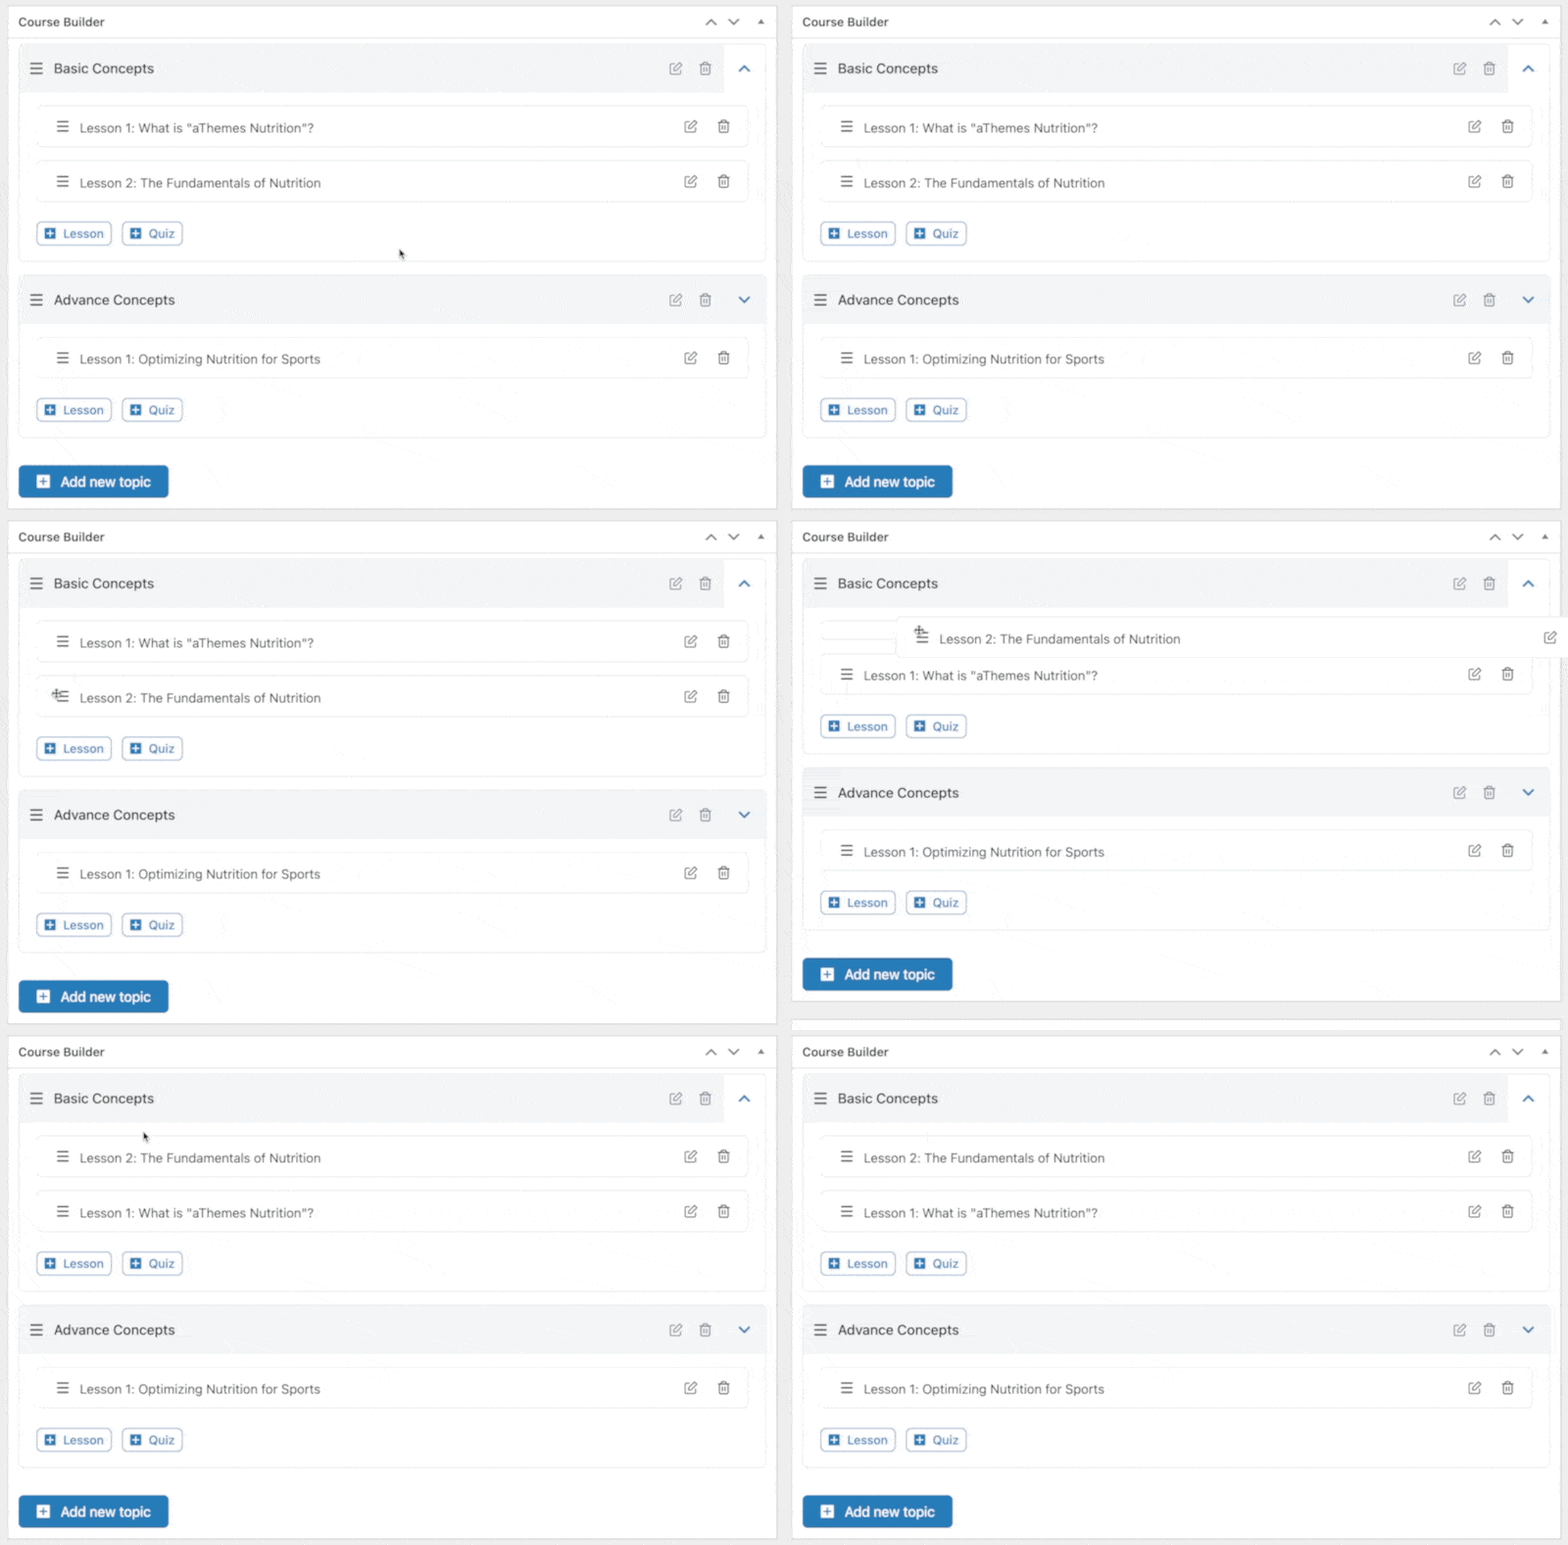
To rearrange any of the course modules, you can use a drag-and-drop interface:
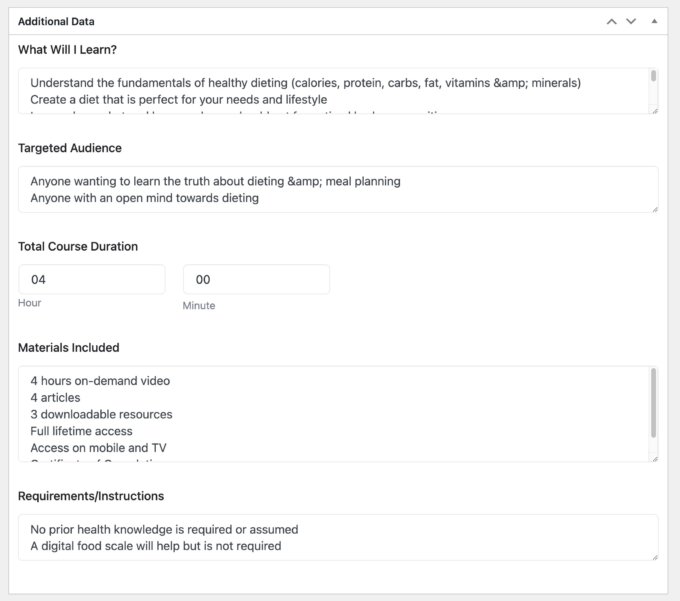
Below the course builder, you can use the Additional Data box to:
- Set an estimate for the duration of the course
- Add extra text for course benefits, requirements, target audience, and included material
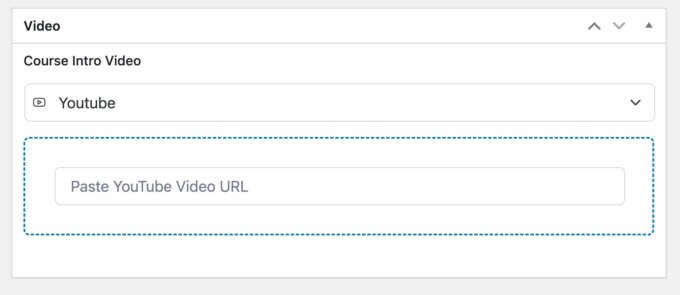
Further down, you can define an introduction video, either by uploading your own video or embedding a video from an external source such as YouTube or Vimeo:
Edit a Lesson
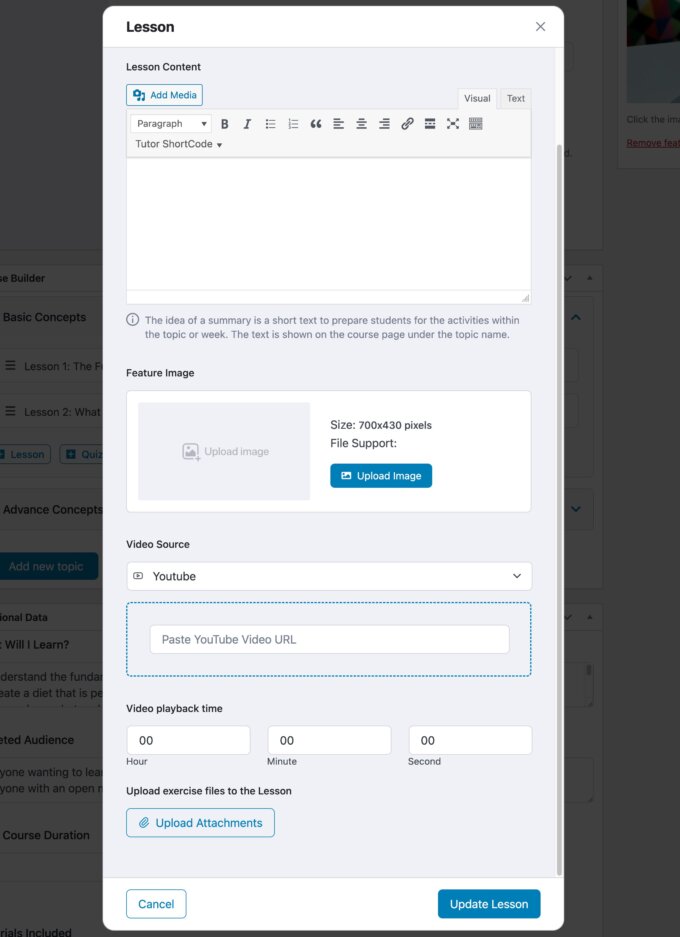
Next, let me give you a little deeper look at the lesson editor because there’s more than just the text editor that I showed you above.
If you scroll down in the pop-up, you’ll also get an option to add a video (including from external sources) and specify the video run time.
A lot of courses use video content, so it’s quite convenient to have a dedicated video lesson feature:
One thing that you may have noticed is missing (so far) is an option to set pricing and configure payment options for your course. Don’t worry! Tutor LMS does indeed let you sell your courses — you just need to connect to an “eCommerce engine” such as WooCommerce, Paid Memberships Pro, or Easy Digital Downloads.
I’ll show you how this works a little later on.
Create a Quiz
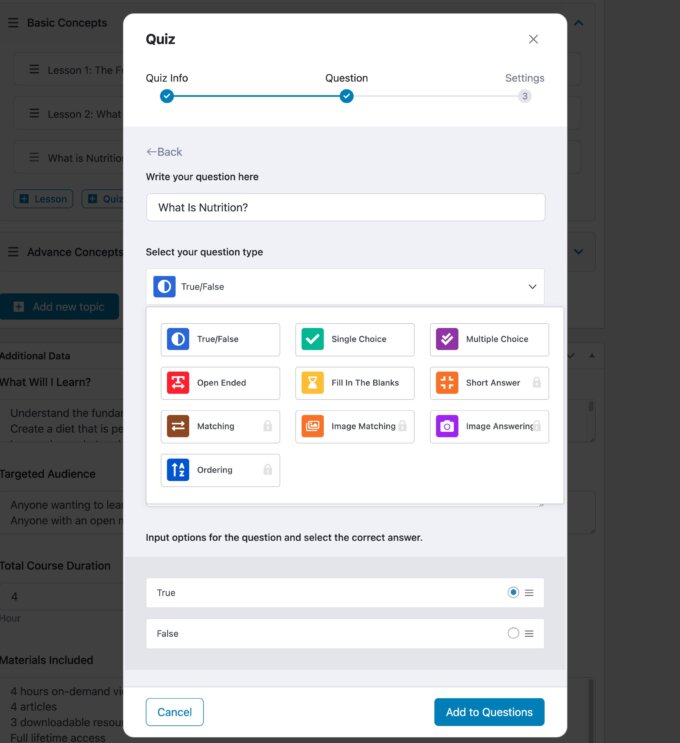
If you click the Add Topic Quiz button in the course builder, it will open up a pop-up where you can configure your quiz questions without needing to go to a separate page.
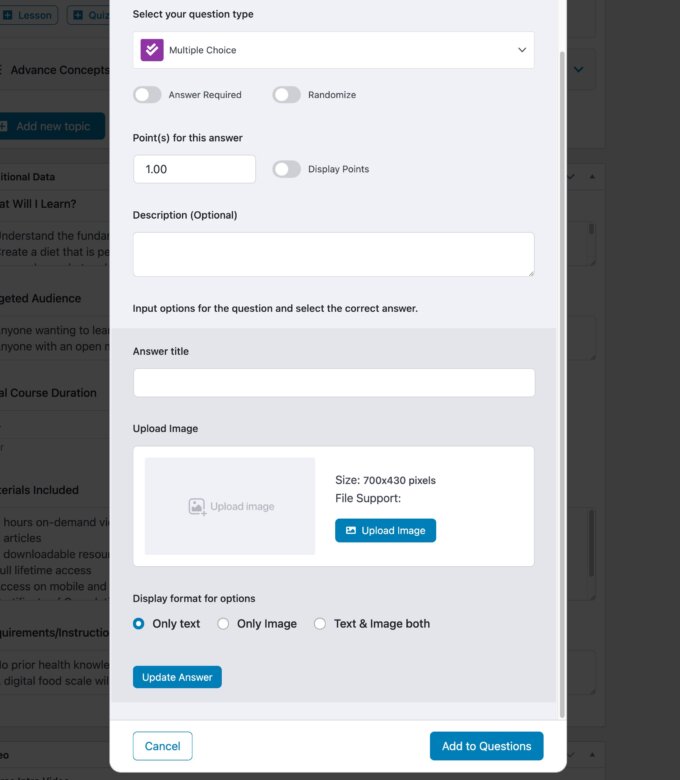
Adding questions is simple. First, you enter the question text. Then, you can choose from a range of question types (some of which require the premium version):
You’ll also be able to mark questions as required, randomize the order of the questions, and assign a mark:
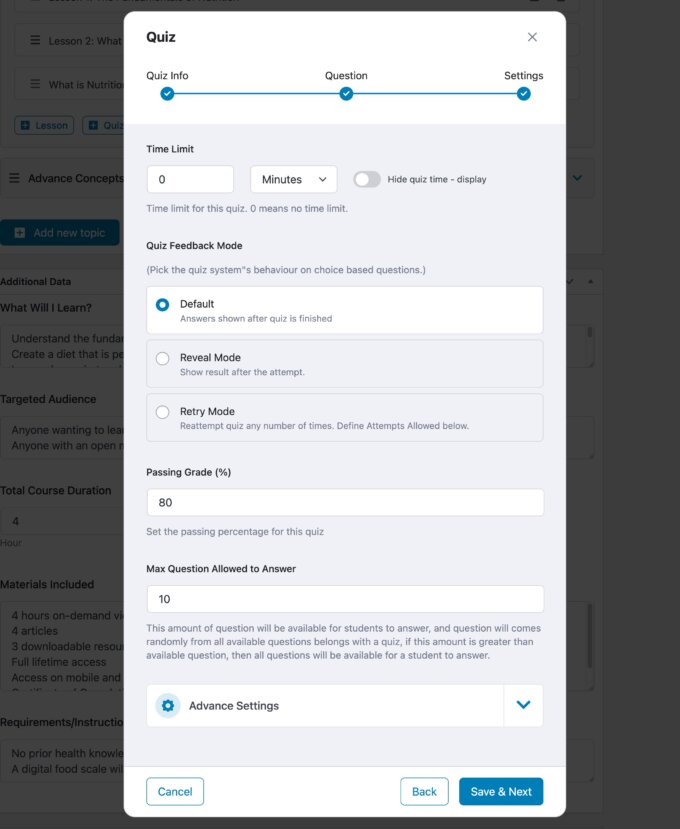
On the next page, you can set a time limit, choose how many attempts the quiz-taker has, and set a passing grade.
You can also set a max question limit which, when combined with randomization, lets you create a totally unique quiz for each course-taker:
Add an Instructor
If you want to add other instructors, Tutor LMS gives you a dedicated Instructor interface:
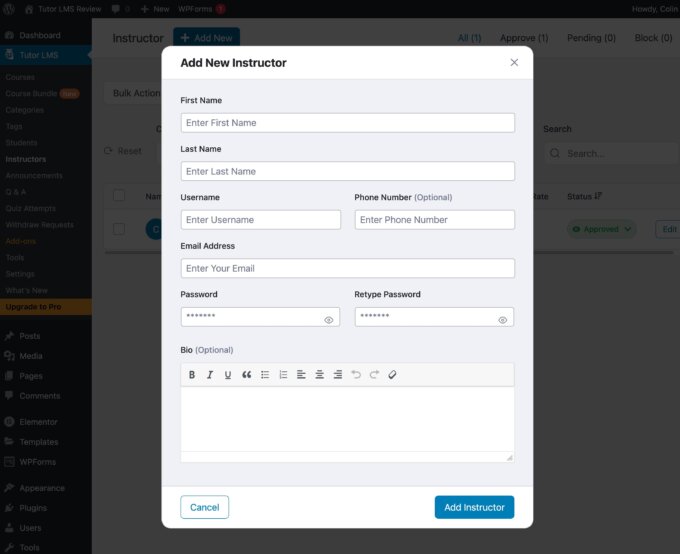
Instructors will then be able to create and manage their own courses from the backend. With the premium version, they’ll be able to do this from the frontend of your site, while the free version requires them to use the WordPress admin area.
Instructors can manage other things such as their earnings from their own frontend dashboard.
Configure Settings
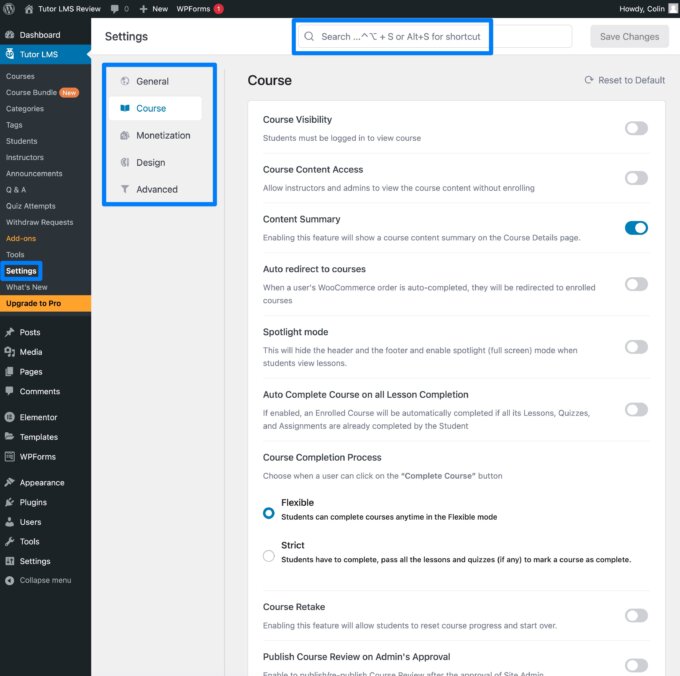
For other aspects of how your online courses function, you’ll use the detailed Settings area. Here, you’ll get a bunch of tabs to control important functionality.
There’s also a nice search feature that lets you quickly search for a specific setting:
You get a lot of options for configuring default course and instructor behaviour such as whether instructors can publish new courses live immediately or they need to wait for an admin to review the course.
However, what I’m most interested in here right now are the commission and payment options.
In the Monetization tab, you get lots of options for controlling monetization on your site, including whether or not to pay instructors a commission for their courses.
You can also choose your preferred “eCommerce Engine” from WooCommerce, Easy Digital Downloads, or Paid Memberships Pro:
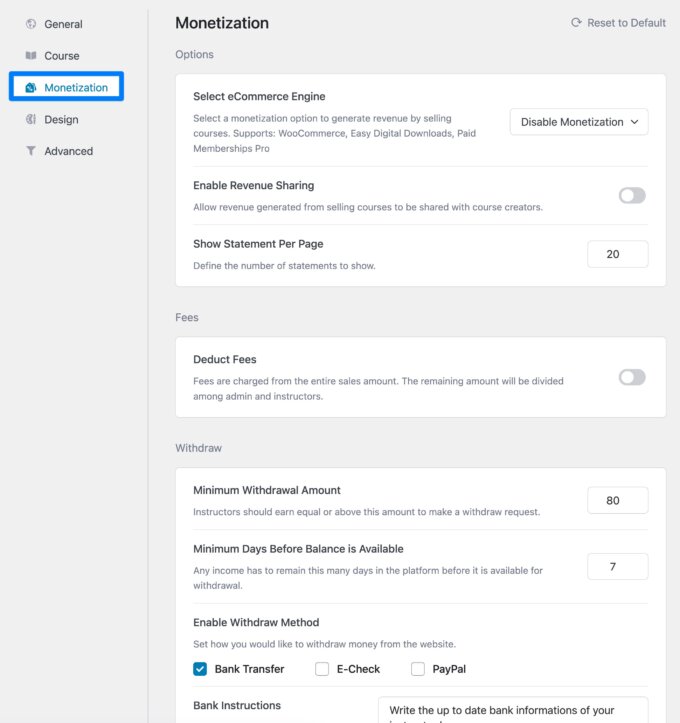
You’ll then be able to set up paid courses by linking to products or memberships in those plugins. For example, if you choose WooCommerce, you can link your course to a WooCommerce product.
So, that’s how you handle selling paid courses with Tutor LMS.
And, in general, that’s a high-level look at the various configuration options that you get with the free version of Tutor LMS.
As you can see, you get pretty generous functionality in the free version, and you can certainly create working courses without the need to pay for the premium version of the plugin.
Next, let’s dig into how your visitors and students will experience the course content that you created.
How Your Courses Work on the Frontend
Below, you can see an example of a great-looking course site created with our free Sydney theme and its pre-built starter site for Tutor LMS.
On the main course listing page, you get a nice look at the course details and outlines, information about the instructor, and an Enroll now call-to-action button.
If you want, you can also replace the featured image with an introduction video:
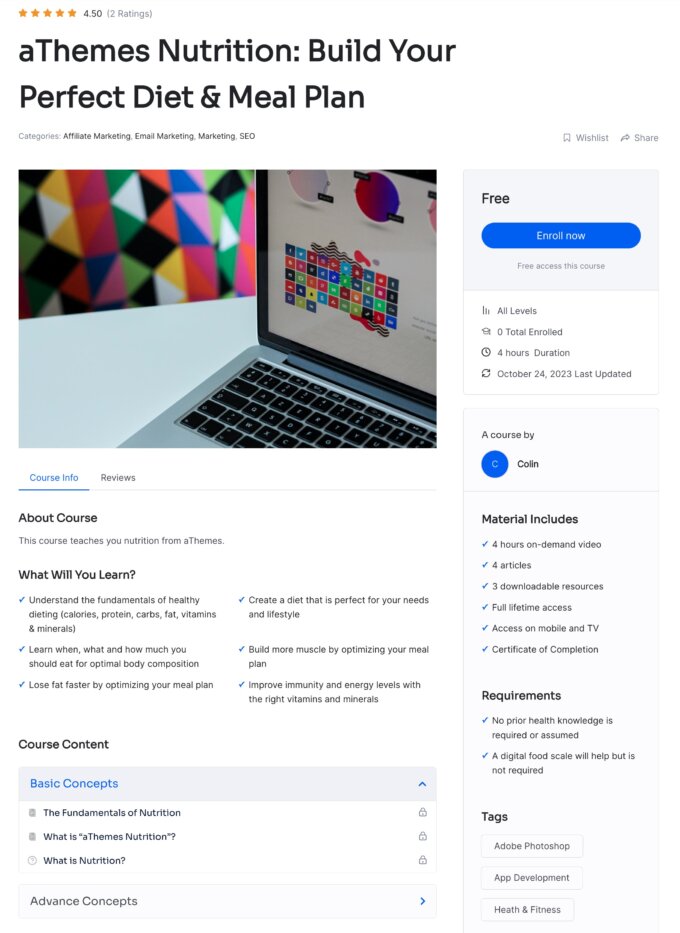
I like that it looks good right out of the box. While you do get style options, I don’t think you’ll need to rely on a lot of custom CSS just to make things look nice.
When someone clicks Enroll now, they’ll get a modal prompt to log in or create a new account:
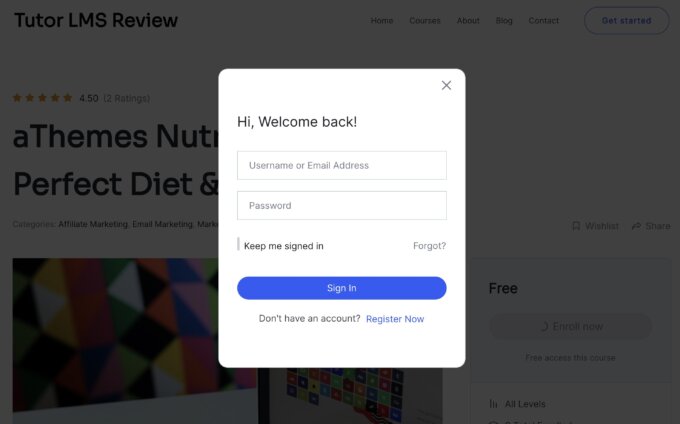
Then, they’ll be in the course dashboard.
Here, they can use the same interface, except now they’ll see the course status, progress, announcements, and other details, too:

Here’s an example of what an individual lesson looks like with an embedded video. Course-takers can also see the course outline on the left:
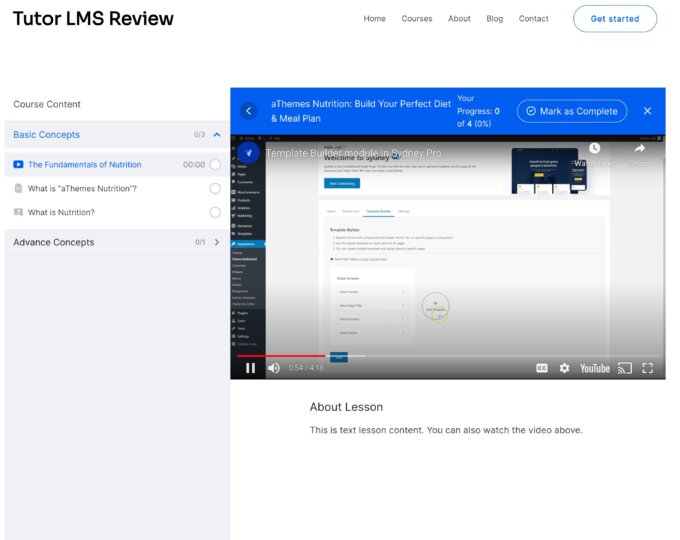
Overall, I see a lot of similarities to the Udemy course interface, which I think is a positive, as I’ve always found the Udemy interface to be nice to use.
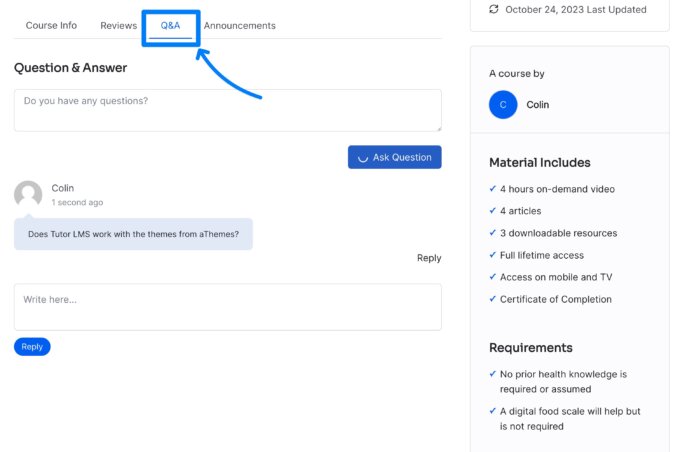
Another feature that I like is the Q&A tab, which lets course-takers submit questions to the instructor and other course participants and browse questions that other people have submitted. This adds some nice interactivity to your course (though you can also disable the Q&A feature if you don’t want to use it):
Students get their own dashboard where they can manage their courses and reviews, and instructors also get options in the dashboard that let them see their earnings.
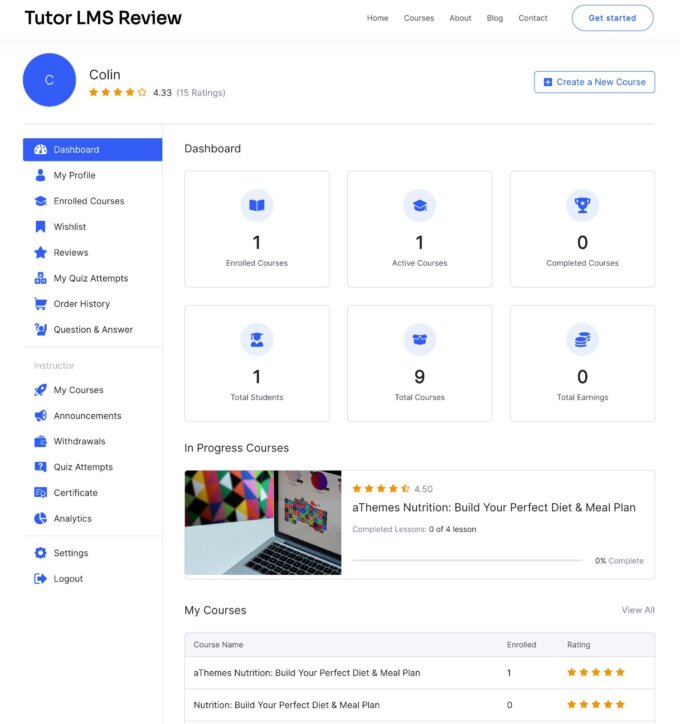
All in all, I think Tutor LMS has a really polished design from a user experience perspective. Without any custom styling on your own part, you’ll be able to create courses that offer your students a great learning experience that’s reminiscent of Udemy.
How to Create a Beautiful Course Site with Sydney and Tutor LMS
While you can use Tutor LMS with any WordPress theme, let’s see how you can set up the frontend examples above using our Sydney theme and its free eLearning starter site.
You can import the demo site with just a few clicks and instantly start with a strong foundation for your course website.
Here’s all that you need to do:
- Install the free Sydney theme — it’s available at WordPress.org or you can download it directly from our website. You can always upgrade to Sydney Pro if you want more features, but you don’t need the premium version to access the eLearning starter site.
- Install the companion aThemes Starter Sites plugin to access the importable starter sites — you should be automatically prompted to install it once you activate Sydney, or you can install it manually from WordPress.org.
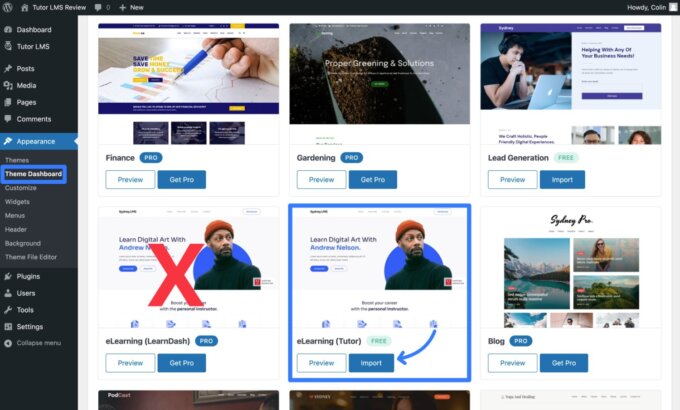
- Go to Appearance → Theme Dashboard. Then, select the Starter Sites tab and look for the eLearning (Tutor) starter site. Make sure you specifically choose the version for Tutor LMS, as there’s also a separate starter site for LearnDash.
- Click the Import button.
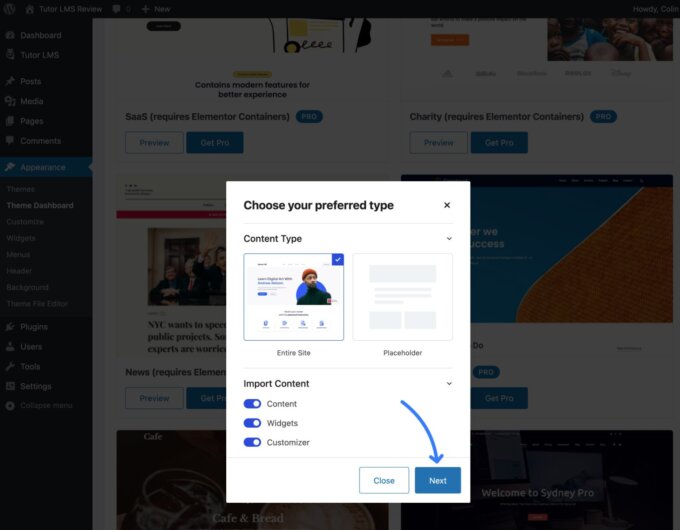
The demo importer will open a pop-up where you can choose how to import the starter site.
Most of the time, you can just leave everything as the default, which will make your site look exactly like the demo:
On the next screen, you’ll be prompted to install some companion plugins. For the best results, we recommend installing all of the recommended plugins.
Then, click the button to start the import process:
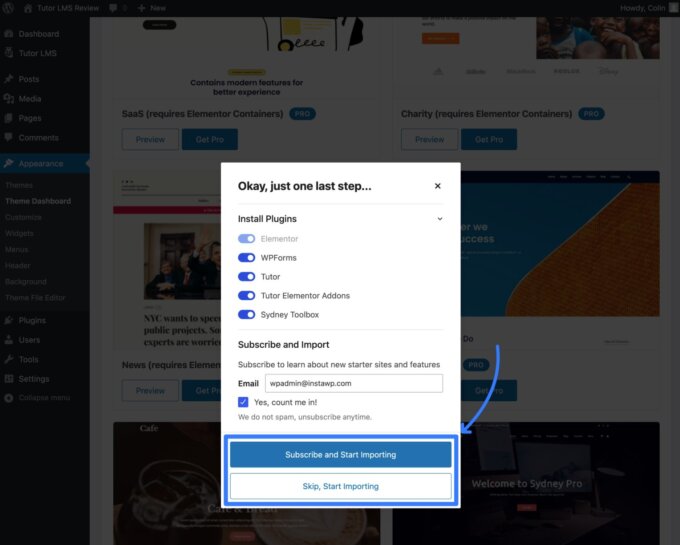
After a short wait, your live website should look exactly like the eLearning demo site (assuming that you did a full import). You’re now free to go in and customize everything using the Elementor page builder plugin.
Next, let’s see Tutor LMS’s course management features.
Course Management Features
In your WordPress dashboard, you’ll get a few separate areas to manage students, Q&A questions, quiz attempts, and withdrawal requests from instructors:
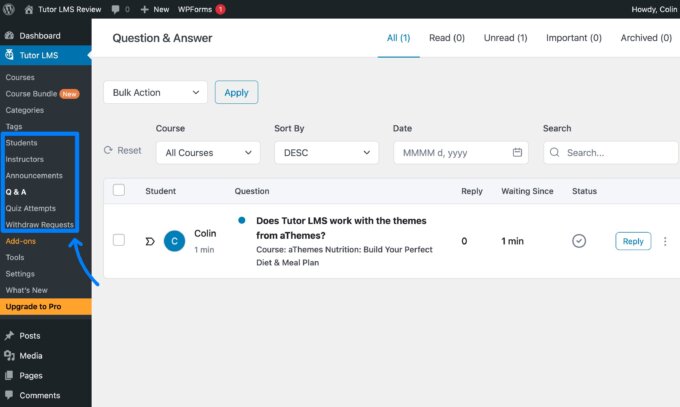
The management options aren’t super detailed in the free version, but you get more in the premium version.
Everything that you saw above was done with the free version of Tutor LMS available at WordPress.org. Now, though, let’s dig into some of the premium features that you get when you pay for Tutor LMS Pro.
Add-ons Area
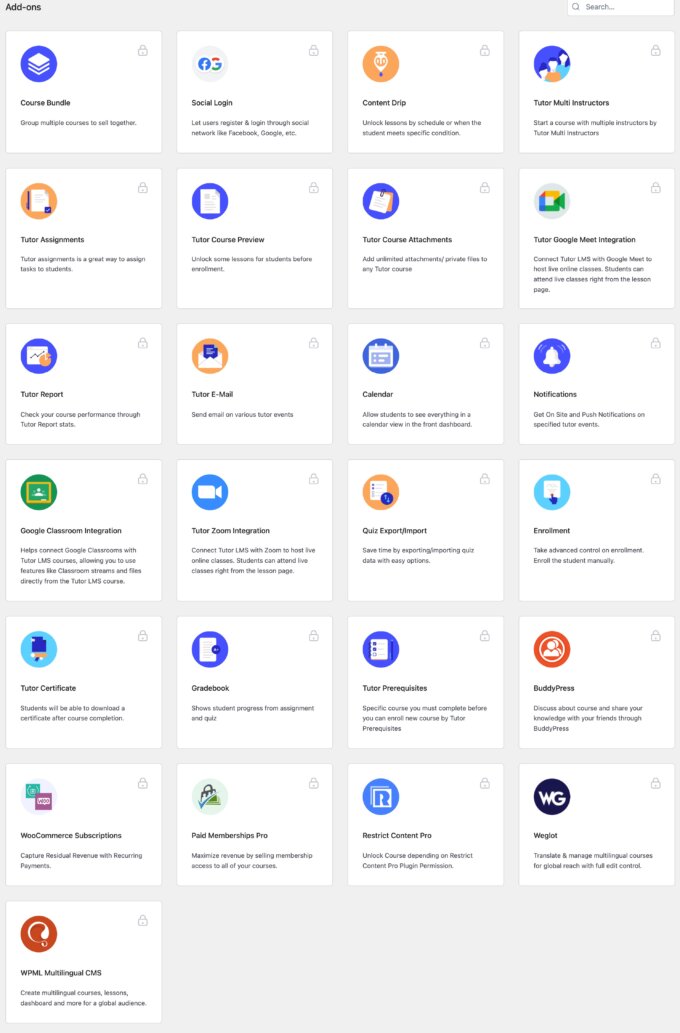
First off, you’ll get a modular Add-ons area where you can enable or disable the premium functionality according to your preferences:
Frontend Course Builder
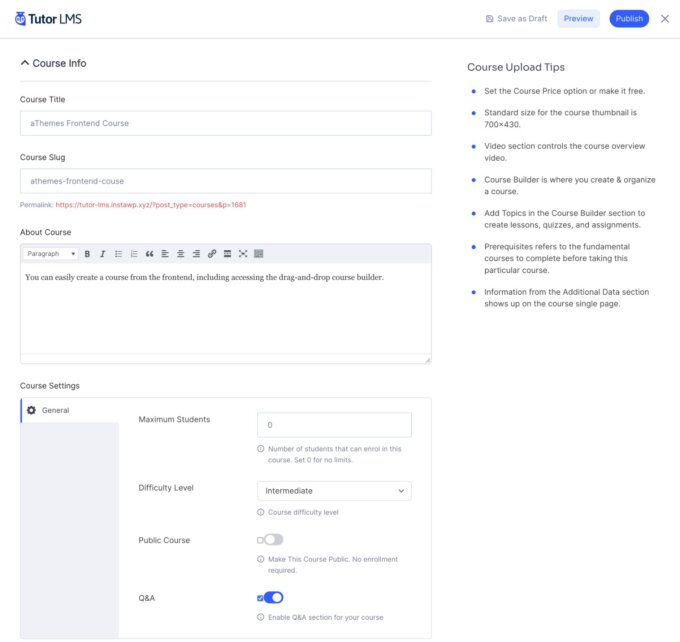
With the Pro version, you, or other instructors at your site, can build courses from the frontend, rather than needing to use the WordPress dashboard.
The actual course options are exactly the same — you just get to do everything from the frontend.
Another nice feature is that the frontend editor will automatically save your work every 30 seconds so that you never accidentally lose your course data.
Reports
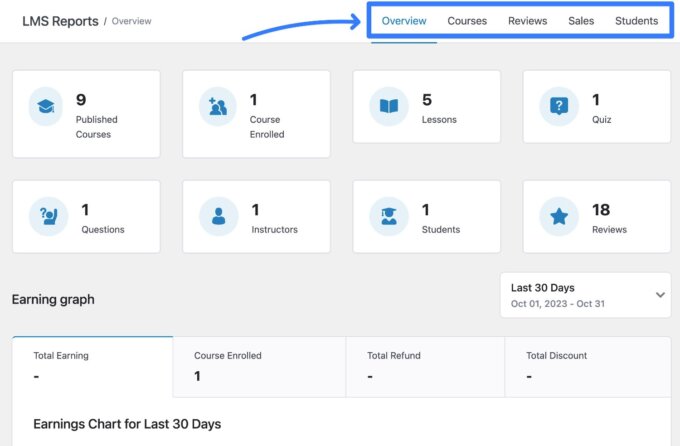
You’ll also get a Reports tab that lets you view key metrics for your website.
In addition to a general overview, you also get access to dedicated reports for your courses, reviews (from students), sales, and students:
Emails
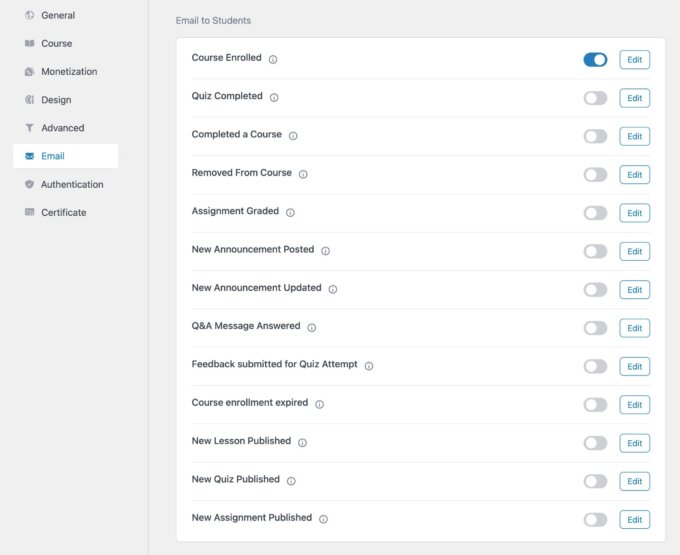
This one is super important — you’ll be able to set up automatic emails for key events, for instance, when someone completes a quiz or course.
You get a very large number of emails for all types of actions, which is something that Tutor LMS has really improved since when I originally wrote our Tutor LMS review a few years ago.
Here’s a sampling of just the emails that you can send to students — you also get other emails that you can send to instructors, admins, and so on:
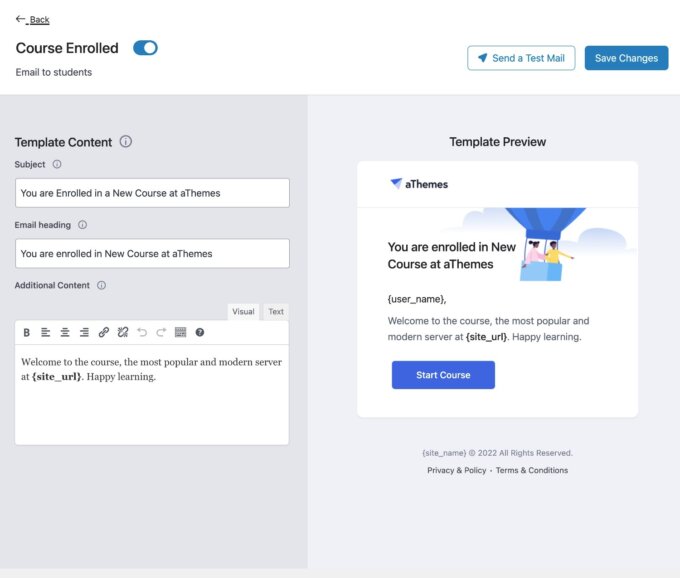
If you edit an individual email, you’ll get a simple text editor that supports dynamic merge tags, along with a live preview of what the email will look like:
Certificates
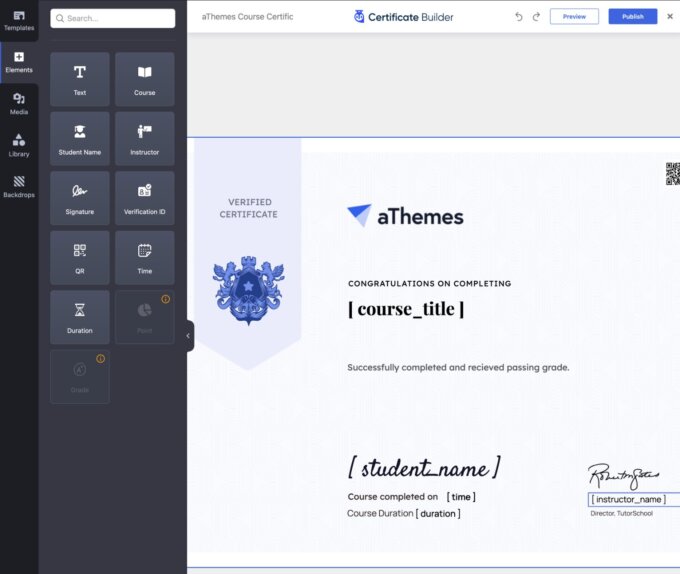
If you want to offer certificates when students complete your courses, Tutor LMS offers a visual, drag-and-drop certificate builder, along with a number of premade certificate templates.
It’s definitely one of the nicest certificate builders that I’ve seen in any LMS plugin. It feels very much like a full page-building experience:
Other Premium Course Management Features
Beyond what I showed you, you’ll also get access to other premium features, such as:
- All the quiz question types
- The ability to add unlimited attachments to a course
- An option for guest visitors to preview some course content without needing to enroll in the course
- The ability to set course prerequisites to limit who can enroll in certain courses
- The option to start courses with multiple instructors, rather than just a single instructor
- Course bundles
- Integrations with Google Meet, Google Classroom, and Zoom
- Content dripping
- Notifications for assignments, quizzes, Q&As, and more
Here’s a link to a full breakdown of Tutor LMS free vs Pro features.
Tutor LMS Pro Pricing
There are a few different pricing plans for Tutor LMS Pro — all of which are full-featured. The only difference is the license and number of sites you can use it on.
First, you can pay for an annual license, which gets you one year of support and updates:
- 1 site — $199
- 10 sites — $399
- Unlimited sites — $799
Or, you can pay for lifetime support and updates:
- 1 site — $499
- 10 sites — $899
- 50 sites — $1,899 (there’s no unlimited lifetime option)
Final Thoughts on Tutor LMS
I think Themeum, the developer, has built a really polished plugin that’s continued to rapidly improve since its launch.
The backend interface is convenient and makes it easy to create course content without opening a million tabs like some other plugins force you to.
Additionally, I think the frontend experience for course-takers is really nice, right out of the box. I especially like the Udemy-style lesson viewer, complete with that great Q&A feature.
Speaking of Udemy, I also like that you can open up your site to courses from other instructors and collect a commission from them. This gives you another way to monetize your site.
Since its features have grown over time, Tutor LMS has now become a very robust option for creating online courses.
While LifterLMS and LearnDash are still the big names in the space, I think it’s very possible that you might prefer Tutor LMS over those big names, since its growth in features.
With such a generous free version available at WordPress.org, I’d encourage you to give it a test spin and see if it’s right for your online courses.


