Editor’s Rating
- Ease of Use 5
- Functionality 5
- Value for Money 5
- Documentation & Support 4
Summary
WP Rocket is a premium WordPress caching plugin packed with tons of performance optimization features such as file minification, elimination of render-blocking resources, database optimization, CDN integrations, and more. It makes your web pages load faster, improves your Core Web Vitals and other web performance metrics, and helps you deliver a better user experience.
Pros
- Reduced page load times by 50%+.
- Easy to use, especially in comparison to W3 Total Cache.
- Includes performance optimization features that go beyond caching, e.g. improve Core Web Vitals metrics.
- Well-designed dashboard area.
Cons
- Doesn’t offer a custom script manager tool like Perfmatters and some other plugins.
Considering using WP Rocket to speed up your site? In our hands-on WP Rocket review, we’ll help you decide if it’s a good option, including sharing some of our real test data.
In general, WP Rocket does a great job of giving you a simple way to implement pretty much all important speed optimizations. This includes some unique options designed for Google’s Core Web Vitals, such as the ability to remove unused CSS on a page-by-page basis.
Put together, WP Rocket was able to reduce our site’s Largest Contentful Paint time by 65.1%, and it can probably do the same for you.
So — is it worth paying for WP Rocket? That’s what our WP Rocket review will help you decide, along with giving you a full look at the WP Rocket interface and how you can use it to speed up your site.
Join me for a look at some real performance data, a tour of the WP Rocket dashboard, and my thoughts on whether WP Rocket’s features justify its price tag.
Note — we originally published our WP Rocket review in 2019. However, we did a full update and re-ran our tests in late 2022 to ensure that everything is up to date when it comes to features and performance.
If you want to use WP Rocket on your eCommerce site, check out my tutorial on how to speed up WooCommerce with WP Rocket and Botiga too.
WP Rocket Is More Than Just a Caching Plugin
Page caching is one of the absolute best things you can do to speed up your WordPress site.
But here’s the thing:
There are tons of popular free WordPress caching plugins, which means that in order for WP Rocket to justify its premium price tag, it needs to find a way to differentiate itself from those free options.
How WP Rocket Stands Out From the Crowd
WP Rocket tries to do that in three ways:
- User interface – WP Rocket offers an interface that’s beginner-friendly and easier to use than many other caching plugins.
- Unique features – In addition to handling page caching and other basic optimizations, WP Rocket offers some unique features that you won’t find in other WordPress performance plugins. These features can make meaningful improvements to your site’s performance.
- Support – As a premium plugin, WP Rocket gives you dedicated support to help you use the plugin and configure it on your site.
You’ll see how the interface is designed a little later on, but let me lead quickly with some of those other optimization tweaks because I think they’re where most of WP Rocket’s value comes from.
“Basic” Performance Optimization Features
Here are some of the “standard” optimizations that you get. As you can find these features in some other optimization plugins, I don’t find them to be the biggest differentiators:
- Minification – shrinks the size of your site’s code by removing unnecessary content, such as whitespace, without changing the code’s functionality.
- File combination – does what it says! This feature combines multiple files (e.g. CSS files) into a single file. Personally, I don’t recommend using file combination if your host supports HTTP/2. Instead, you’ll want to use some of WP Rocket’s unique features.
- Render-blocking CSS/JS – helps you get rid of the famous “Eliminate render-blocking resources” warning in Google PageSpeed Insights.
- Lazy loading – speeds up your site by only loading certain media content once it enters the visitor’s viewport. Essentially, your site won’t load images and/or videos until absolutely needed.
- Easy CDN integrations – helps you connect to CDNs (Content Delivery Networks) such as Cloudflare, or you can use WP Rocket’s official CDN service.
- Database optimizer – lets you clean your database right from the user interface of WP Rocket, rather than requiring you to install a separate plugin.
- Heartbeat control – enables you to take control of the WordPress Heartbeat API.
Unique Features for Core Web Vitals and Page Experience
As I mentioned above, you can find those features in some other WordPress optimization plugins. But, where WP Rocket goes further is in these two features that they released in late 2021:
- Remove unused CSS – This feature lets you remove unused CSS on a page-by-page basis. WP Rocket will actually scan each page to make this happen. Personally, I’ve noticed that this can easily drop a page’s file size by 100+ KB.
- Delay JavaScript execution – This feature allows you to improve initial page load times by delaying JavaScript execution until a user interaction (e.g. a click or scroll). You can also manually exclude certain JavaScript files to avoid any issues.
I’m not aware of any other WordPress plugin that offers both of these features. I’m not saying it doesn’t exist, but I can’t think of any other popular plugin that can fully match WP Rocket’s features list.
So — do those features actually lead to a faster WordPress site? Let’s look at the data.
Putting WP Rocket to the Test – Real Performance Data
Because WP Rocket is all about improving your site’s performance, it wouldn’t be a WP Rocket review without some actual test data.
As all the features I listed above are a moot point if WP Rocket doesn’t actually make your site faster, I’m not going to make you wait to get a look at the data.
Here’s How My Test Site Performed Before WP Rocket
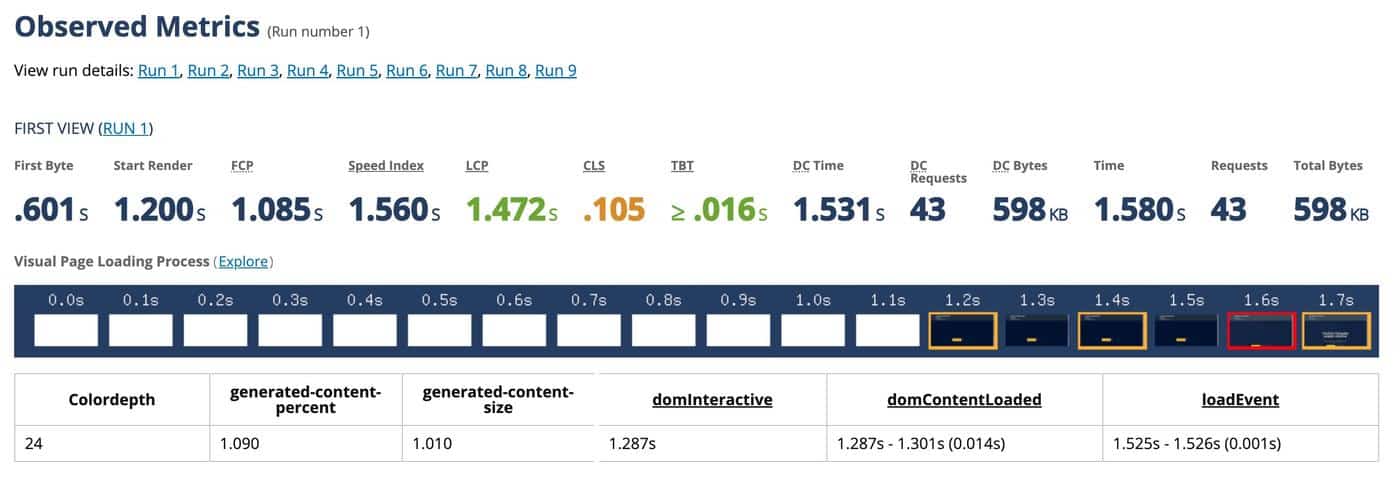
Before installing WP Rocket, here’s how my unoptimized site performed in WebPageTest — this is the median result from nine separate tests.
WP Rocket Cut Largest Contentful Paint Time By 65.1%
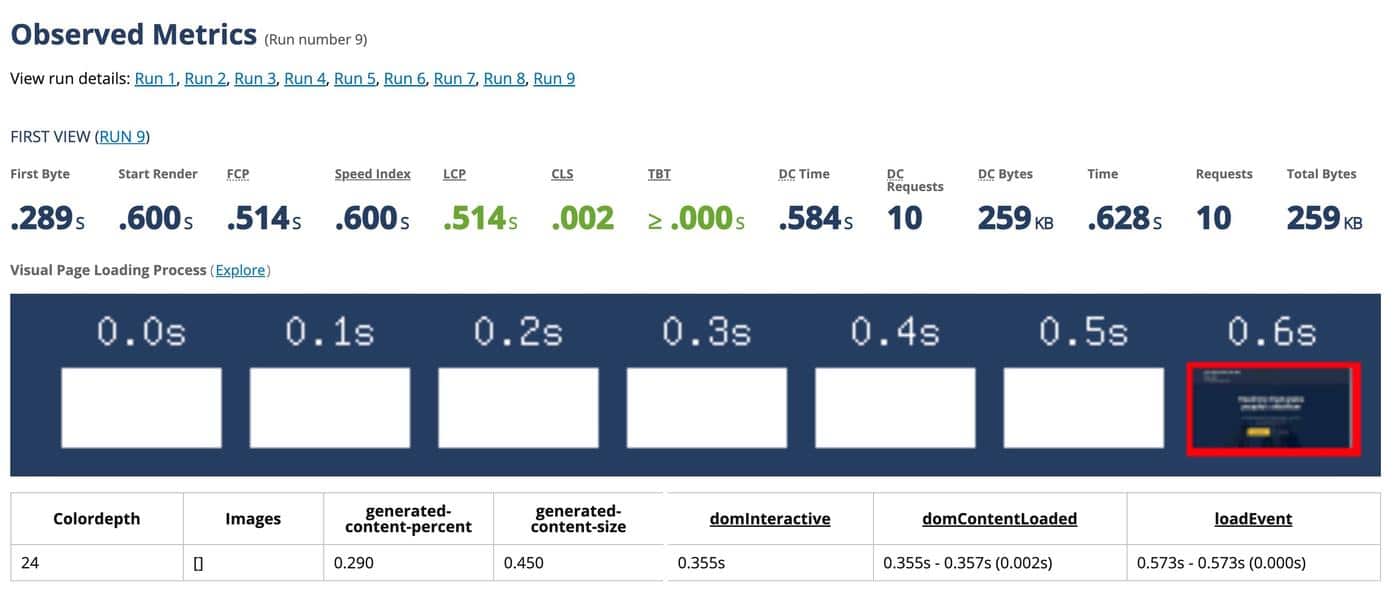
After optimizing my test site with WP Rocket, its page load times dropped by well more than 50% in all the key metrics.
The biggest improvement was a 65.1% decrease in Largest Contentful Paint, which is great for Google’s Page Experience update.
WP Rocket also made improvements beyond that, cutting my server’s time to first byte (TTFB) by 51.9%, shrinking the page size by over 330 KB (56.7%), and dropping the HTTP requests from 43 to 10.
WP Rocket Before and After Compared
To make it easier to see the differences, here’s a table summarizing the change before and after optimizing my test site with WP Rocket:
| Before WP Rocket | After WP Rocket | Percent Decrease | |
| Time To First Byte (TTFB) | 0.601 s | 0.289 s | 51.9% |
| Largest Contentful Paint (LCP) | 1.472 s | 0.514 s | 65.1% |
| Fully Loaded Time | 1.580 s | 0.628 s | 60.2% |
| Page Size | 598 KB | 259 KB | 56.7% |
| HTTP Requests | 43 | 10 | 76.7% |
Our Sydney theme is already very lightweight out of the box when it comes to frontend optimization. However, our demo site used Elementor, which added some extra weight to the page. Despite that, WP Rocket was still able to make a huge improvement in overall performance.
How to Optimize Your Site with WP Rocket
Ok, so now you know that WP Rocket does indeed do a pretty good job of actually speeding up your WordPress site. But, how does it actually go about doing that?
To show you what’s going on underneath the hood, I’m going to take you through the WP Rocket interface now.
But first — here’s the part about WP Rocket that’s pretty nice:
WP Rocket starts working from the second that you activate it, which means you get most of the benefits without needing to do anything or look at any settings:

If you’ve ever tried to configure W3 Total Cache, WP Rocket is going to feel like a breath of fresh air.
In fact, this ease of use is one of the big things to help justify WP Rocket’s price tag, especially for beginners. Without configuring a setting, you already have:
- Page caching
- Browser caching
- GZIP compression
Those three alone are already going to get you a massive performance boost.
All the other smaller settings are optional tools that can boost your performance even more.
However, if you’re a beginner and don’t know what they mean? Well, you could technically never even look at WP Rocket’s interface and still enjoy a big speed boost, which…well, that just isn’t the case with W3 Total Cache (trust me, I’ve had to write 3,500-word tutorials on how to configure W3 Total Cache).
If you want to get into the guts of the plugin, though, here’s what’s going on in the dashboard.
Dashboard Tab
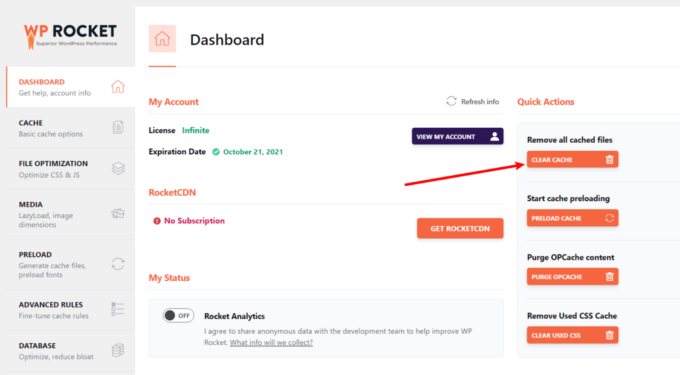
The Dashboard tab doesn’t house any important settings, but it does let you perform important actions:
- Purge your entire cache.
- Start cache preloading.
- Purge your used CSS cache (which only applies if you’re using the “remove unused CSS” feature).
For example, if you recently made a big change to your site, you might want to purge the entire cache so that your visitors see that change right away. After purging the cache, you could start cache preloading to get those pages back into the cache:
Now, let’s dig into some of the actual settings.
Cache Tab
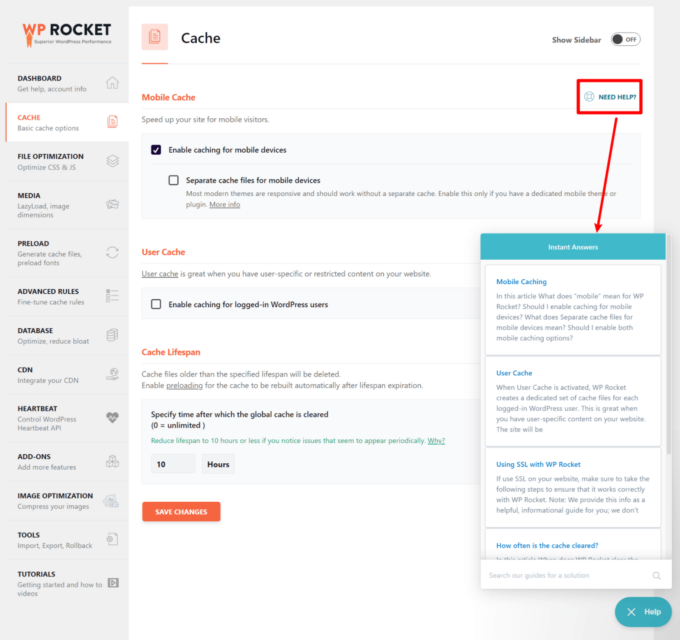
The Cache tab lets you configure some basics about how your site’s caching functionality works:
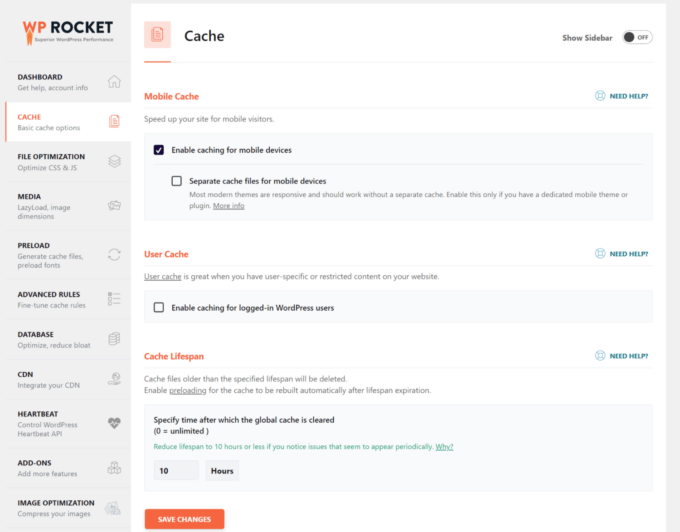
Specifically, you can opt to:
- Enable caching for mobile visitors and, if enabled, also create a separate cache for mobile visitors. If you want to use mobile caching, I, and WP Rocket, recommend enabling both settings to ensure that mobile visitors have an optimized experience.
- Enable caching for logged-in users. WP Rocket will create a separate cache for logged-in users, which is great if you have restricted content that users need to be logged in to see. If you don’t have registered users at your site, I’d recommend leaving this off.
Beyond that, you can also choose the cache lifespan, which is how long WP Rocket stores the cached version of a page before removing it.
For example, if your site pretty much never changes, you might want to tell WP Rocket to store cached files longer. Personally, I do this on my static sites as it ensures visitors are almost always being served a cached page.
One quick note here. If you’re ever unsure what a certain setting does, you can click the “Need Help” button to open a help window right in your WordPress dashboard. This in-dashboard help is part of what makes WP Rocket so user-friendly.
File Optimization Tab
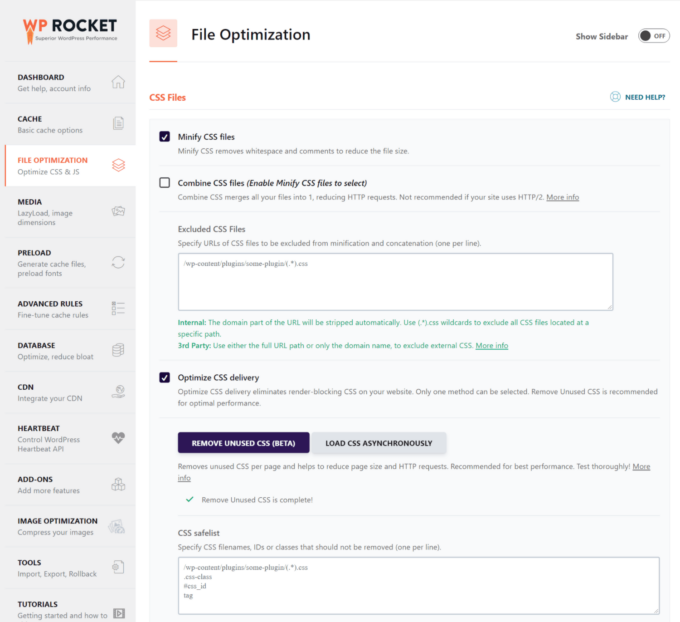
Next, the File Optimization tab holds a bunch of settings that let you optimize your site’s CSS and JavaScript code. This is also the tab that houses WP Rocket’s most unique features — the ability to remove unused CSS and delay JavaScript execution.
For your site’s CSS code, you get the following options:
- Minify CSS files
- Combine CSS files – I don’t recommend using this if your host uses HTTP/2 (WP Rocket agrees).
- Optimize CSS delivery – You can either use the new “remove unused CSS” feature or opt to load CSS asynchronously.
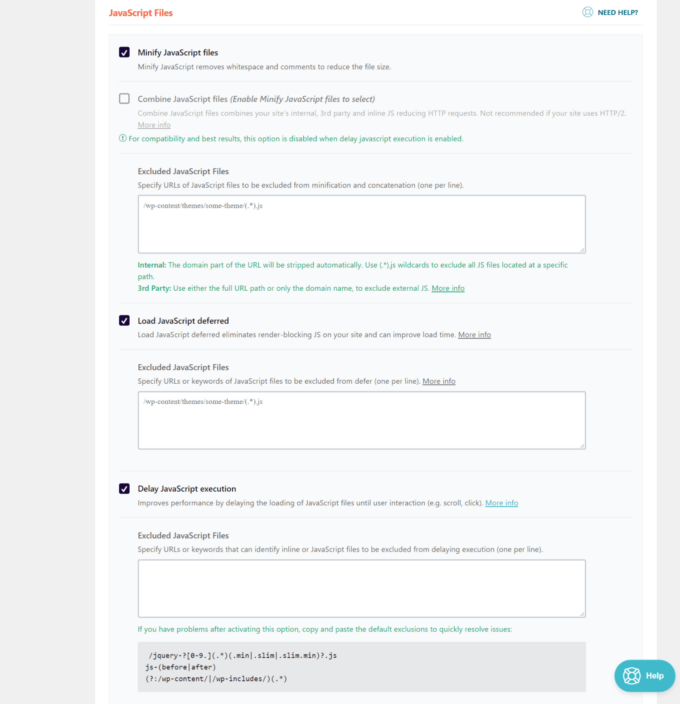
For JavaScript, you get the following options:
- Minify JavaScript files
- Combine JavaScript files – Like CSS files, I don’t recommend using this option if your host uses HTTP/2. Also, you can’t enable it if you’re using the “delay JavaScript execution” feature.
- Load JavaScript deferred – This can help with the render-blocking warning in tools such as PageSpeed Insights.
- Delay JavaScript execution – This is the new feature that I explained above. If you have important scripts that you absolutely must load right away, you can specify those here to avoid issues.
To help you with excluding JavaScript files, WP Rocket maintains a documentation page with common files that you’ll want to exclude for various services and plugins. I recommend checking out this page if you use the “delay JavaScript execution” feature.
Media Tab
The Media tab helps you speed up the images, videos, and other media files on your site by implementing a few different strategies, most notably lazy loading.
With lazy loading, your site will wait to load certain below-the-fold content until a visitor starts scrolling down the page. You can enable lazy loading separately for:
- Images
- Iframes and videos
If you embed a lot of YouTube videos, you’ll also love the ability to replace the YouTube embed with a static preview image. This can make a big difference on your page load times, as WordPress will wait to load the actual YouTube embed until a visitor clicks on the preview image:
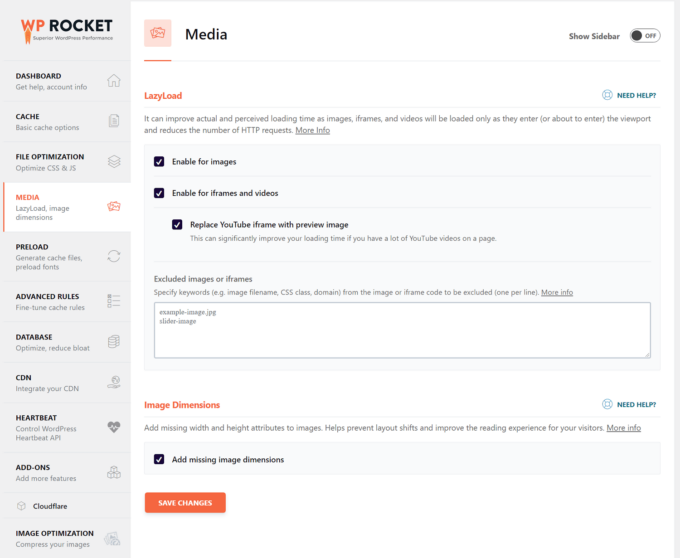
You can also automatically add missing image dimensions, which will help you avoid layout shifts and improve the Cumulative Layout Shift (CLS) metric in Google’s Core Web Vitals.
Preload Tab
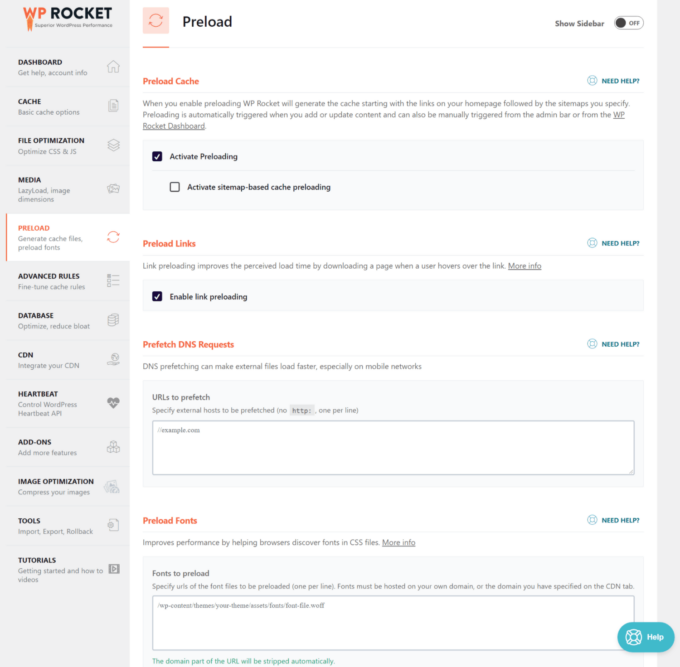
The Preload tab helps you implement cache preloading.
With most WordPress caching plugins, a page is only loaded into the cache after a person visits the page, which means that the first visitor after each purge doesn’t get a cached version of the page.
If you have posts or pages that get infrequent traffic (even high-traffic websites will have these types of posts), that’s not a good thing for your site’s performance.
The Preload tab helps you change that by “preloading” your content into the cache, even if it hasn’t been visited yet.
WP Rocket lets you implement preloading at two different levels:
- Activate Preloading – WP Rocket will only preload your homepage and all the links found on your homepage.
- Activate sitemap-based cache preloading – WP Rocket will preload your entire site, based on your sitemap. This can be more resource-intensive and most sites probably don’t need to do this.
This tab also lets you prefetch DNS requests and fonts, which can help you make important files load faster.
Advanced Rules Tab
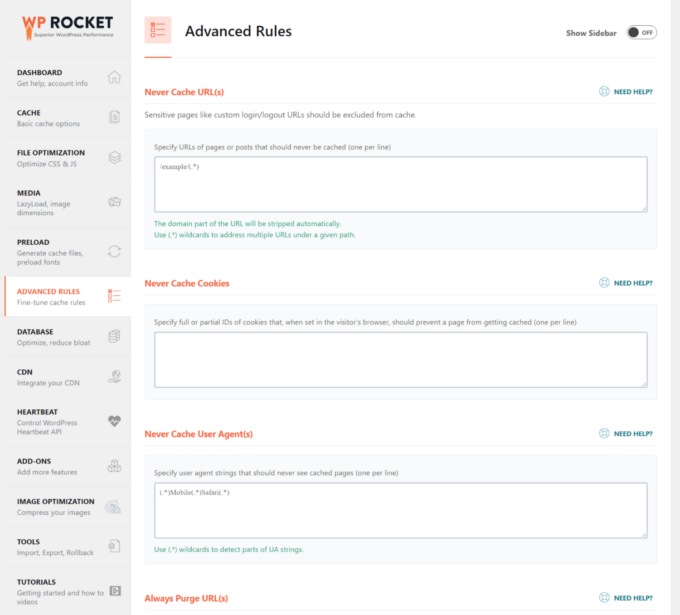
If you’re a casual user, you can ignore the Advanced Rules tab.
Basically, this tab gives you more control over exactly which content is cached, who sees cached content, and when certain content is purged.
You can:
- Specify URLs to never cache, including wildcards. For example, I usually exclude my contact form page from being cached, because caching can cause issues with some form plugins.
- Exclude certain cookies or user agents from being served cached content.
- Specify URLs to always purge whenever you update any post or page.
- Force caching for specific query strings.
Database Tab
As your WordPress site ages, its database picks up all kinds of “gunk” in the form of post revisions, auto drafts, and other content that’s not necessary for the functioning of your site.
The Database tab lets you clean your database and remove all those extraneous details:
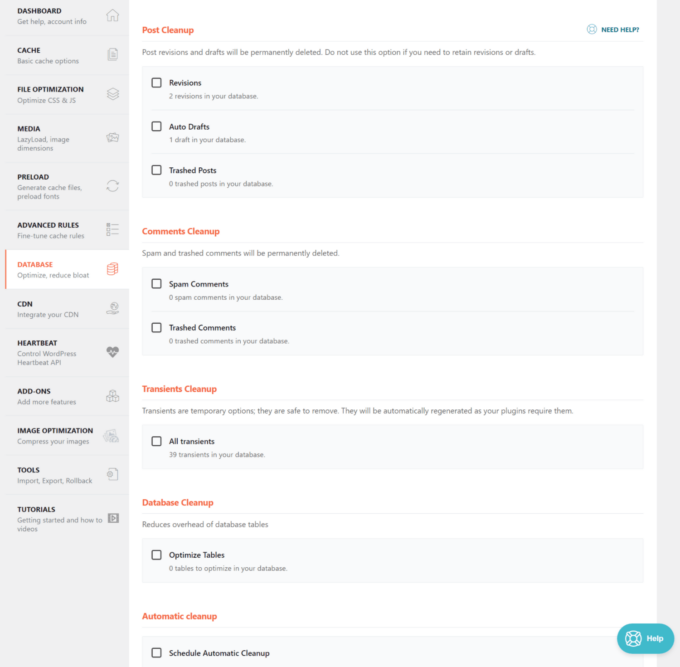
While, like some of the other features, there are free plugins that can do this for you, you’re essentially paying for the convenience of having it all under one roof.
And one thing that I especially like about WP Rocket’s Database area is that you can schedule your database cleanup to run automatically.
CDN Tab
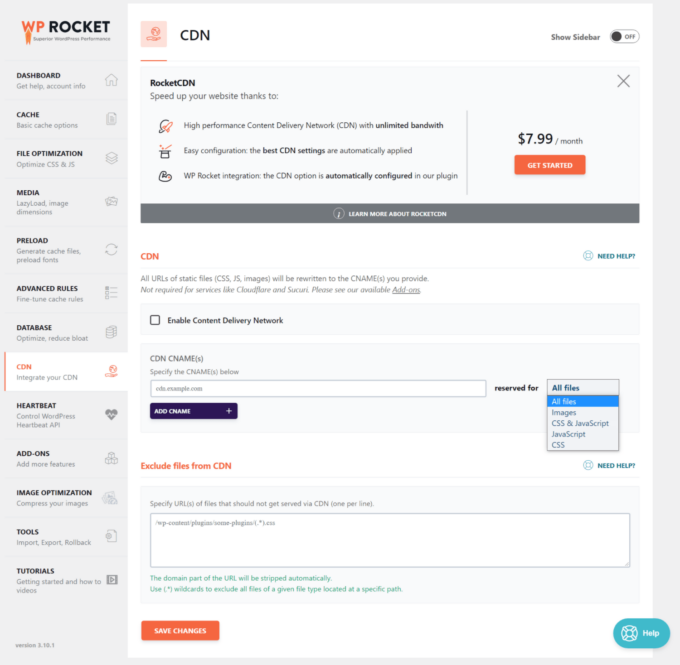
The CDN tab helps you use a content delivery network (CDN) to speed up your site’s global load times. WP Rocket can help you use a CDN in two ways:
- You can easily integrate with WP Rocket’s official RocketCDN service, which is powered by StackPath’s global network. This is a paid service that costs $7.99 per month for unlimited bandwidth. That price is affordable for a high-traffic site but might be more expensive than other services for low-traffic sites.
- You can integrate with a third-party CDN service such as KeyCDN, StackPath, Amazon CloudFront, and so on. More specifically, you can tell WP Rocket to serve all your image files from a subdomain (e.g. cdn.yoursite.com) instead of your root domain (e.g. yoursite.com).
What’s nice is that you can create separate rules for:
- All files
- Images
- CSS and JavaScript
- Just CSS
- Just JavaScript
Beyond that, you can manually exclude certain files from being served over the CDN.
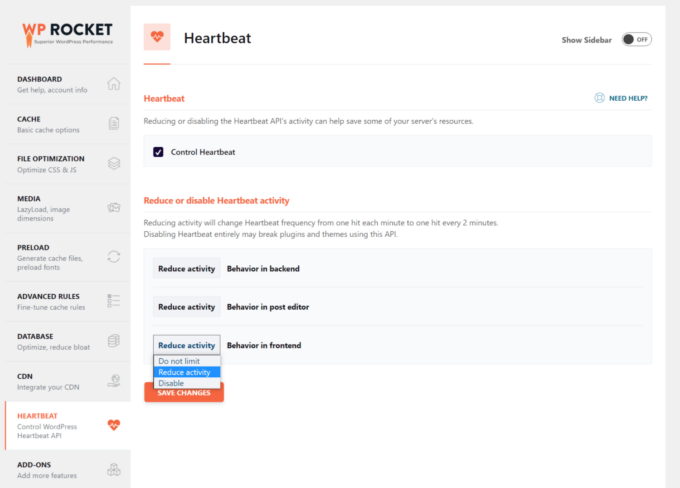
Heartbeat Tab
The WordPress Heartbeat API is an always-running feature that helps with important actions. For example, it is responsible for the post auto-save feature in the WordPress editor.
However, because it’s always running, it can also stress your server’s resources.
The Heartbeat tab lets you either:
- Reduce the frequency of the Heartbeat API
- Completely disable the Heartbeat API
You can also create different rules for different parts of your site:
Add-ons Tab
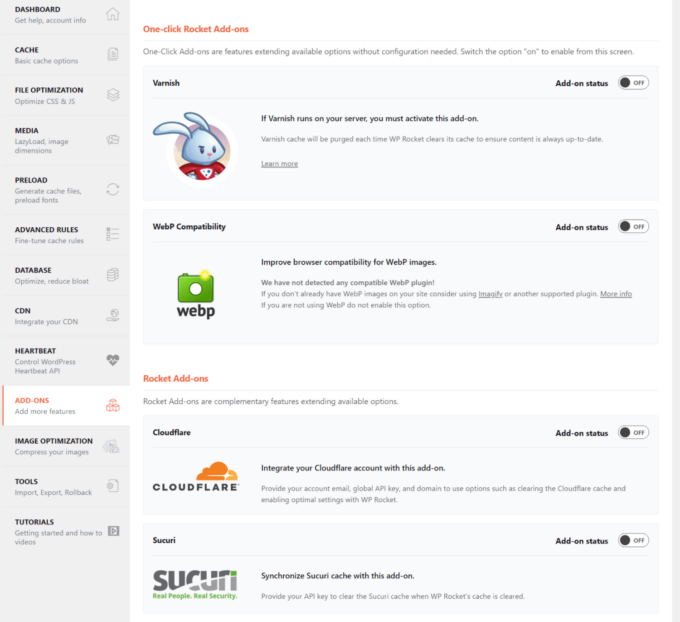
The Add-ons tab houses a few different add-ons for:
- Varnish
- WebP Compatibility
- Sucuri
- Cloudflare
WP Rocket used to offer add-ons to locally host the tracking scripts for Google Analytics and Facebook Pixel. However, they removed these add-ons in WP Rocket 3.9 because they were made redundant by the new “delay JavaScript execution” feature.
The Varnish add-on lets you purge the Varnish cache each time you purge the WP Rocket cache. The Sucuri add-on does the same thing for Sucuri’s cache.
If you’re using WebP images, the WebP Compatibility add-on configures WP Rocket to work well with WebP images.
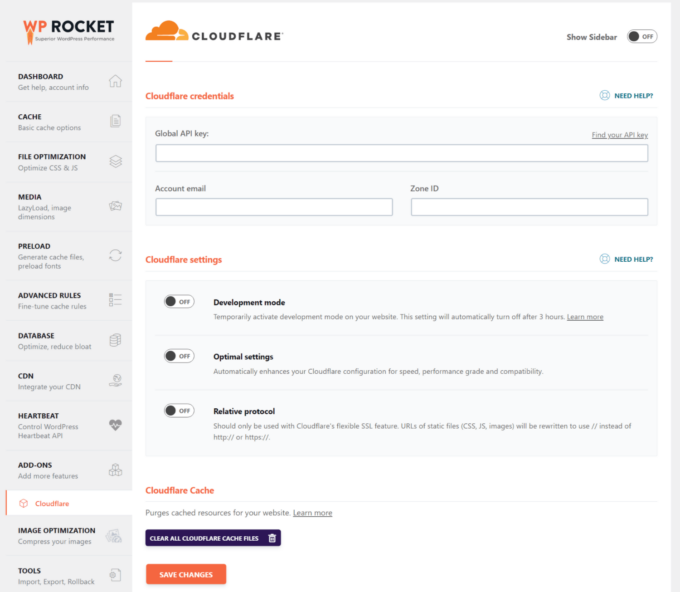
Finally, the Cloudflare add-on lets you sync the Cloudflare cache and control some Cloudflare settings right from your WordPress dashboard.
If you enable the Cloudflare add-on, you’ll get a new settings area for Cloudflare:
WP Rocket Pricing Review
WP Rocket starts at $49 for a single-site license. In total, there are three different pricing plans. The only difference between the plans is the number of sites that are supported — there aren’t any feature limitations:

Each plan includes one year of support and updates. It’s worth pointing out, though, that you do get 30% off renewals if you want to continue receiving support/updates after the first year.
WP Rocket also offers a 14-day refund policy, in case you’re not happy with the plugin.
WP Rocket Review – Final Thoughts
Honestly, if you’re on a shoestring budget, I think it is possible to cobble together a stack of free plugins that get you pretty close to the same functionality as WP Rocket. Maybe not everything. But pretty close.
You can absolutely create a fast-loading WordPress site using just free tools, so I certainly don’t want to leave you with the conclusion that you must use WP Rocket to get a fast site.
But here’s what I think paying that $49 gets you (and why WP Rocket has been so successful):
- Convenience – Everything is housed under one roof and easy to access and configure, whereas if you built your own free stack, you’d constantly be bouncing back and forth between different plugins.
- Compatibility – Because WP Rocket is a single cohesive plugin, you can be sure that none of the features will interfere with each other. If you try to stack together different plugins, you can quickly start hitting compatibility issues.
- Support – When you go with free plugins, you’re either getting no support or severely limited support. With something as potentially complicated as performance, it’s worth it to have an expert to talk to sometimes.
- Updates – Because WP Rocket is a premium plugin, you can be more confident that it will continue to receive regular updates because there’s a financial incentive for the developers to do so (though to be fair, plenty of free plugins receive regular updates as well).
As of version 3.9, WP Rocket also offers some unique features in the ability to remove unused CSS and delay JavaScript execution. This can make a big improvement to your site’s load times, especially when it comes to Google’s Core Web Vitals.
So — yes, you can get a quick-loading site with the free options, and plenty of people do. But if paying $49 for those benefits sounds like a good investment to you, I think WP Rocket is a great product that manages to give you tons of functionality while still keeping things beginner-friendly.
After all, time is money. So if WP Rocket’s ease of use and convenience saves you a couple of hours of hair-pulling and gets you a faster website, I think the pricing is fair.
Do you still have any questions about WP Rocket or our WP Rocket review? Let us know in the comments.
