Are you looking for ways to add a size chart to your WooCommerce store?
Size charts offer customers helpful information that they can use to make better buying decisions. As a result, size charts increase customer engagement and reduce cart abandonment in your online store.
In this article, I’ll show you how to add a size chart to your WooCommerce product pages using two excellent eCommerce plugins: first, Merchant Pro, which works with any WooCommerce theme, and second, Botiga Pro, which is an extension for the free Botiga theme.
You don’t need to implement both methods. If you don’t want to change your existing theme, start with the Merchant Pro tutorial below.
However, if you don’t mind changing your existing theme or you don’t have a theme yet, then scroll down to the Botiga Pro tutorial.
Both plugins provide you with a plethora of eCommerce features and allow you to set up a conversion-optimized WooCommerce store.
Let’s get started with the tutorials.
Merchant Pro: How to Add a Size Chart in WooCommerce
Merchant is an all-in-one WooCommerce plugin that offers 40+ eCommerce related modules, including the Size Chart module.
1. Install and Activate the Merchant Pro Plugin
To enable the Size Chart module, first, you need to add Merchant Pro to your WooCommerce store.
Merchant Pro is a premium plugin that extends the free Merchant plugin with 30+ advanced eCommerce modules.
You can purchase, install, and activate it on your WordPress site following our Quick Start Guide to Merchant Pro:
2. Enable the Size Chart Module
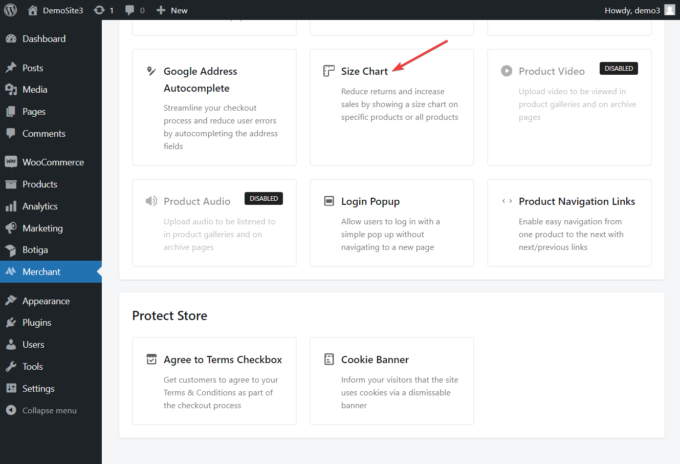
To access the module, go to Merchant in your WordPress dashboard, scroll down to the Improve Experience section, and select the Size Chart module:
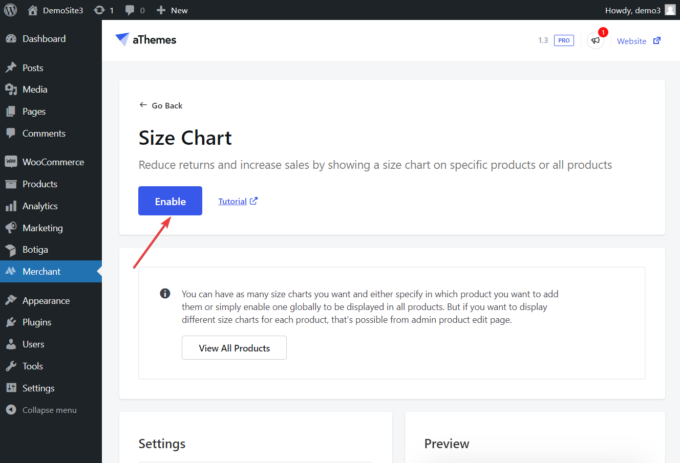
Inside the module, click the Enable button to activate it:
3. Create Your Size Charts
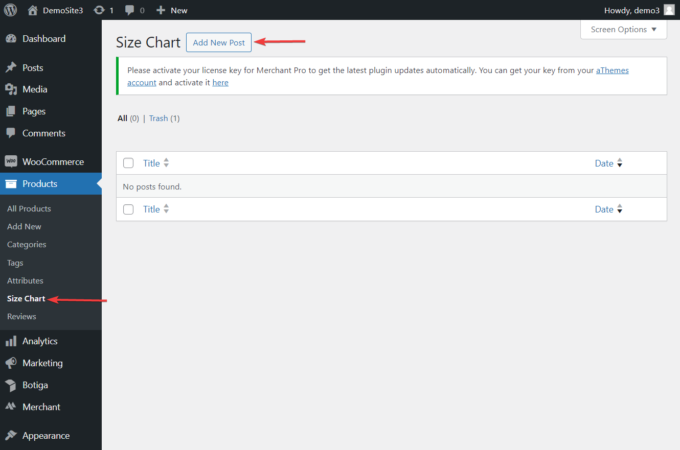
After enabling the module, refresh your website, go to Products → Size Charts, and click the Add New Post button:
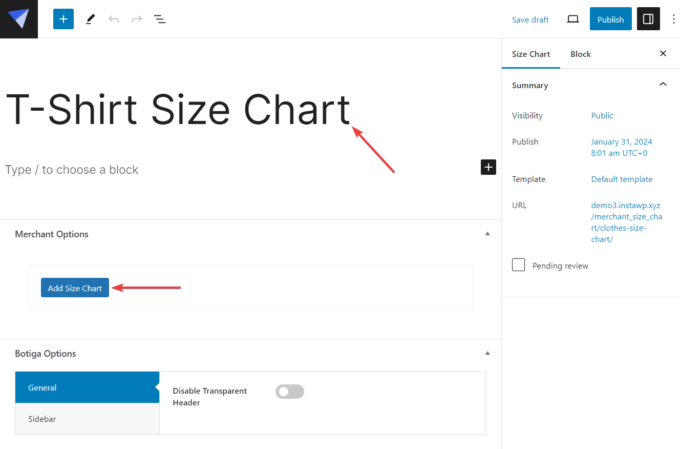
On the next screen, add a title to the size chart (e.g. ‘T-Shirt Size Chart’).
Then, scroll down to Merchant Options, and click the Add Size Chart button:
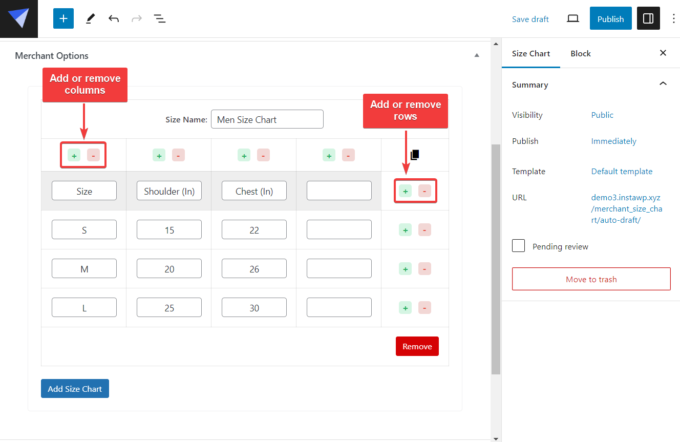
Name your size chart (e.g. ‘Men’s Size Chart’, then proceed to fill in the fields:
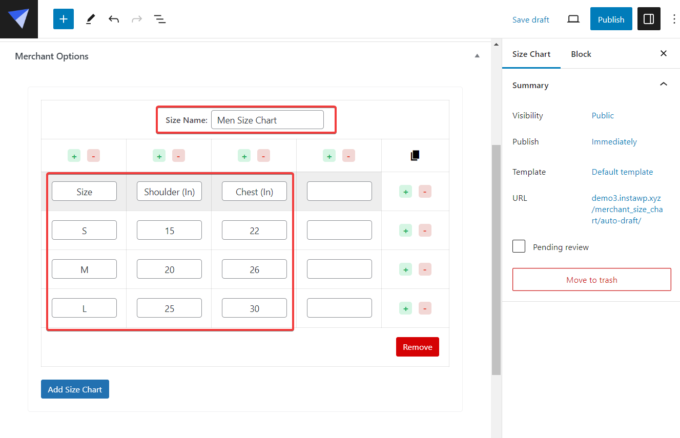
You can add or remove columns or rows to your size chart by clicking the “+” or “-“ buttons:
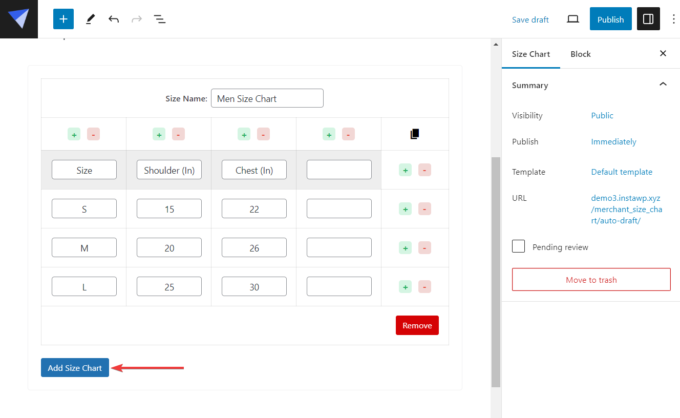
To add more charts (e.g. to create another chart for Women), click the Add Size Chart button located below the first chart:
After creating the size chart, click the Publish button at the top of the page.
If you need different types of size charts, e.g. you created a size chart for T-shirts and now you need one for trousers, go back to Products → Size Charts, click the Add New Post button again, and proceed to create the new chart.
4. Configure the Size Chart Settings
To configure the settings of your size charts, go back to the Size Chart module (Merchant > Improve Experience > Size Chart).
Inside the module, you’ll find three sections: one for the general settings (Settings), one for the design settings of the size chart popup (Popup Design), and one for enabling the size chart shortcode (Use shortcode).
Let’s see them one by one.
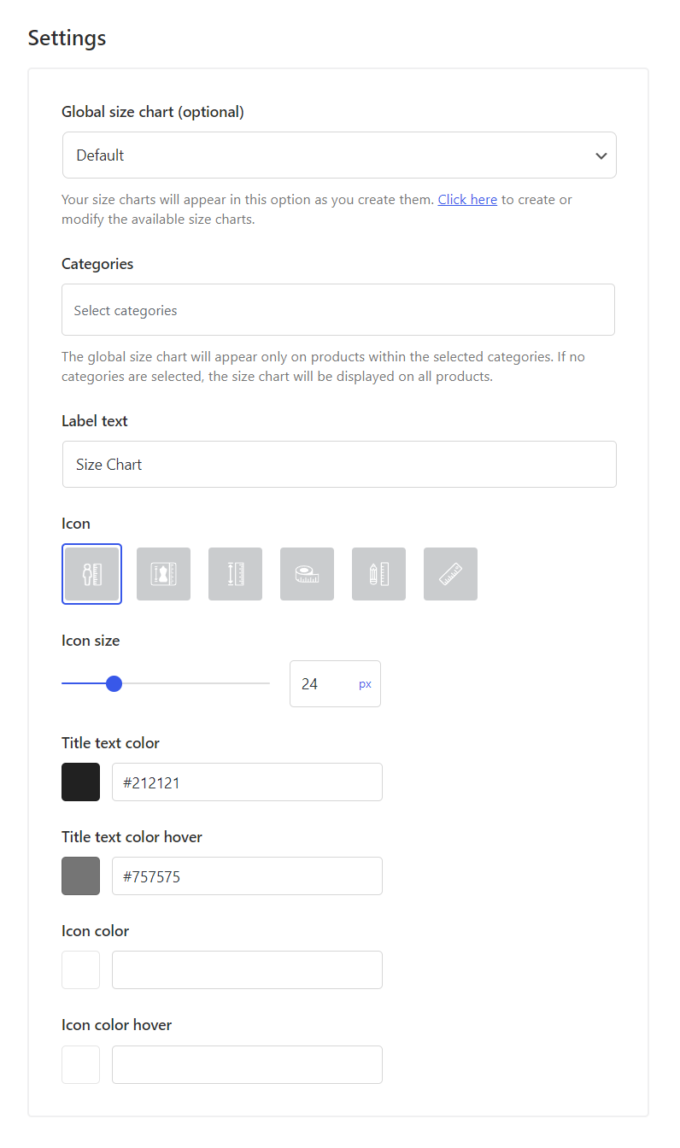
i. Settings
The Global Size Chart option lets you set a default size chart that Merchant Pro displays on all your product pages. It shows all the size charts from the Products > Size Chart menu in a dropdown list.
If you don’t want to show a global size chart for your products, set it to Default.
You can also override your global size chart by assigning other size charts to individual products or product categories (we’ll look into how to do so in Step 5 and Step 6).
The Categories option makes it possible to assign the global size chart only to specific product categories. You can select multiple categories.
You’ll also find the label and icon options in the Settings section, which refer to the size chart label and icon on your product pages.
You can choose from six icons and customize the size and color settings so that the module matches your brand’s aesthetics:
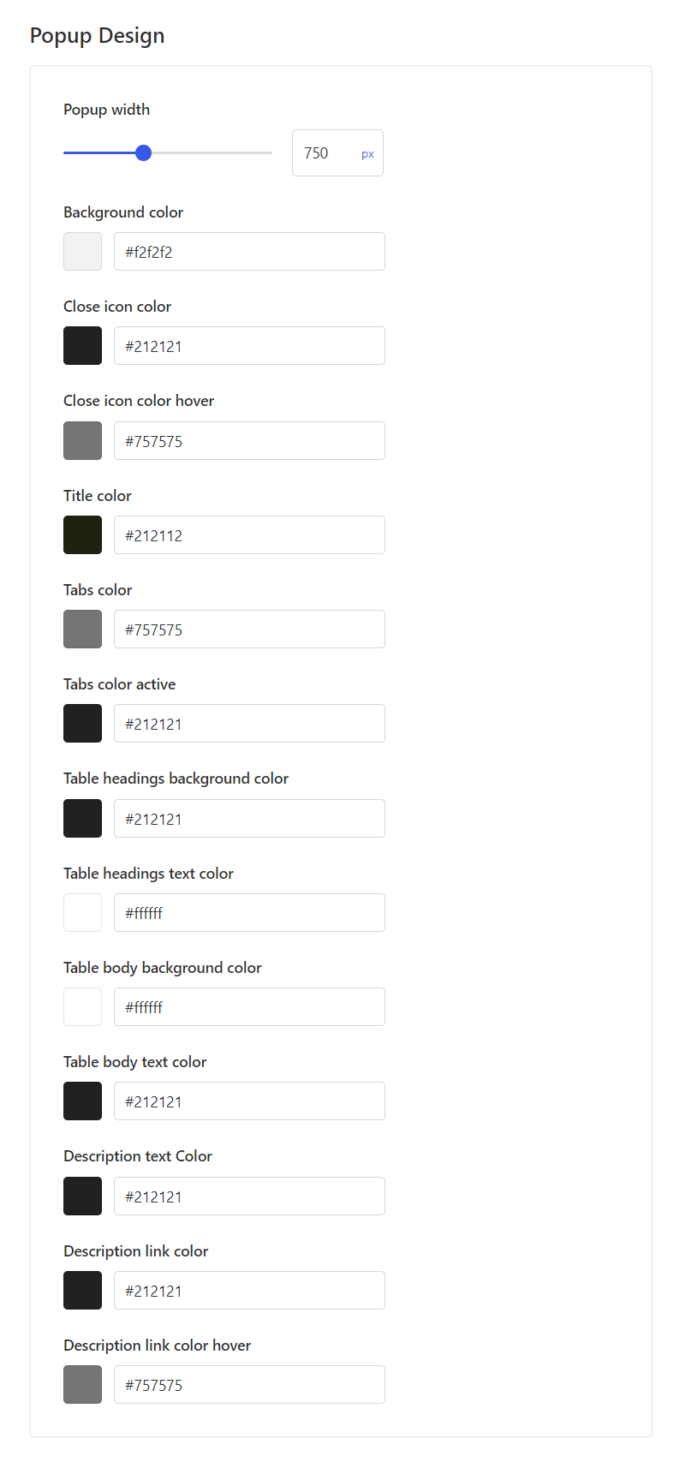
ii. Popup Design
Here, you can customize the design of your size chart popup that shows up on the screen when a customer clicks the Size Chart icon.
You have the option to increase or decrease the width of the popup and change the colors of its components, including the close icon, title, tabs, and others:
iii. Use shortcode
Here, you can activate a shortcode that lets you add the size chart to a custom location on your product pages.
Note that this is a developer setting, so only use it if you know how shortcodes work in WordPress:
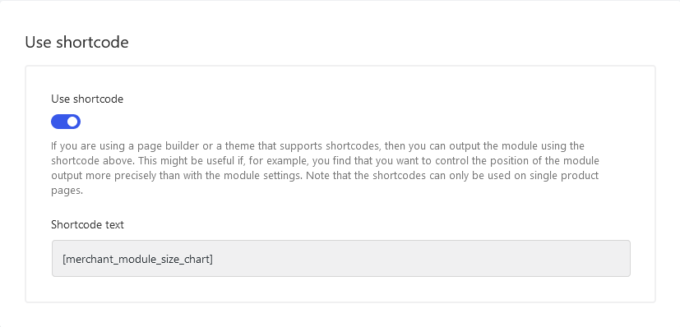
After configuring the settings, click the Save button in the top-right corner of the page to save the changes.
5. Add a Size Chart to Individual Products
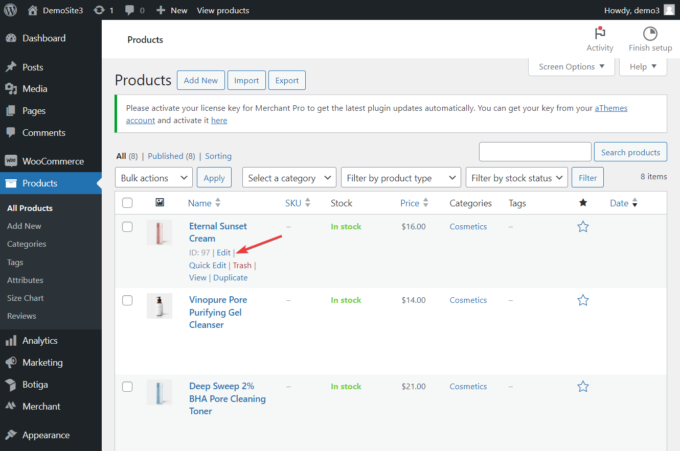
To add a size chart to an individual product, go to Product → All Products and click the Edit button located below the product you want to add the size chart to:
In the product editor, scroll down to the Merchant Product Options section, open the Size Chart tab, and select the size chart you want to assign to the product using the Select a size chart option:
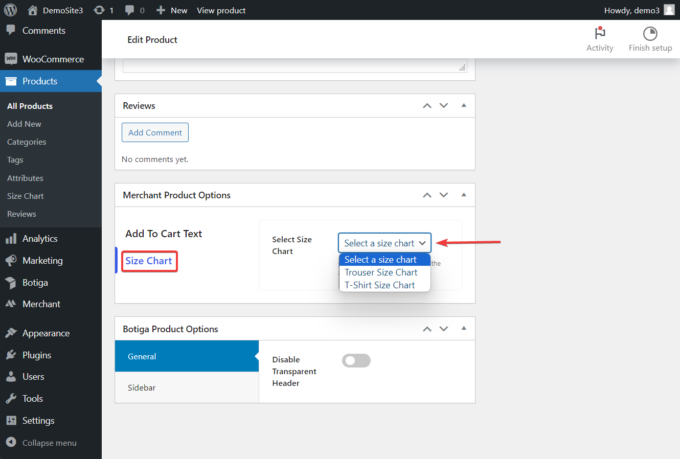
Then, scroll up to the top of the page and click the Update button.
When you open the product page in your WooCommerce store, you should be able to see the chart icon right above the add-to-cart button:
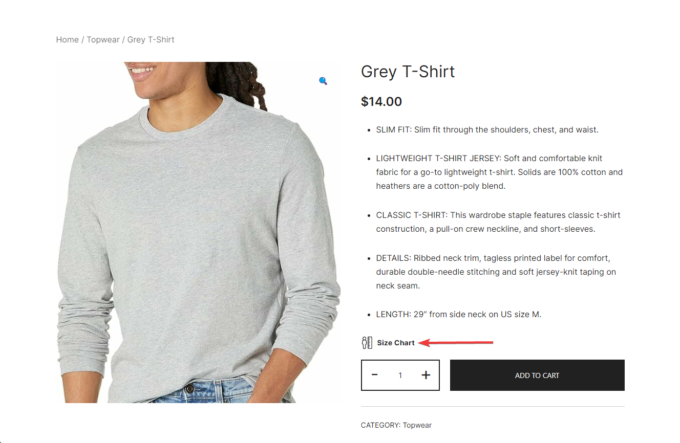
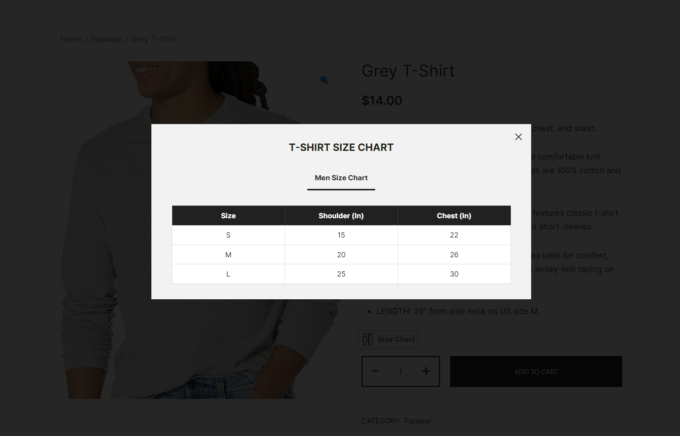
Click the icon, and the size chart will appear as a popup on the screen:
6. Add a Size Chart to a Product Category
You can also assign a specific size chart to a product category, which overrides the global size chart.
For example, you may have a product category named Topwear. Products such as T-shirts, sweatshirts, jackets, etc. fall into this category. If you assign a size chart to this category, all the products in the Topwear category will display that size chart.
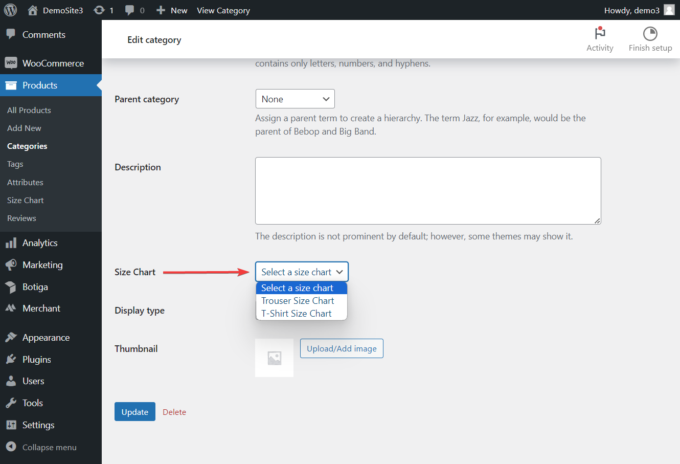
To add a size chart to a product category, go to Products → Categories and click the Edit link below the category you want to add the size chart to:
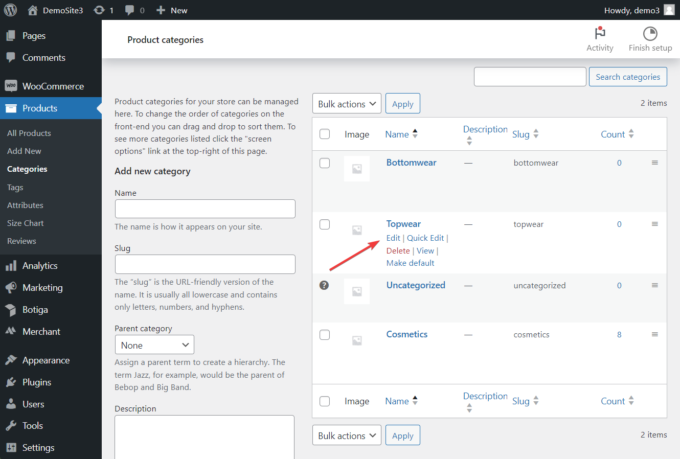
On the Edit category page, scroll down to the Size Chart option and select a size chart from the dropdown menu.
Then, click the Update button at the bottom of the page:
Botiga Pro: How to Add a Size Chart in WooCommerce
Botiga Pro is a premium plugin that extends the functionalities of the free Botiga theme and comes with lots of advanced eCommerce features, including size charts, sticky add-to-cart bars, audio and video galleries, mega menus, and more.
1. Install and Activate the Botiga Pro Plugin
To use Botiga Pro, first, you need to install the free theme.
Then, purchase Botiga Pro and download the plugin from your aThemes account or the Botiga Pro welcome email to your computer.
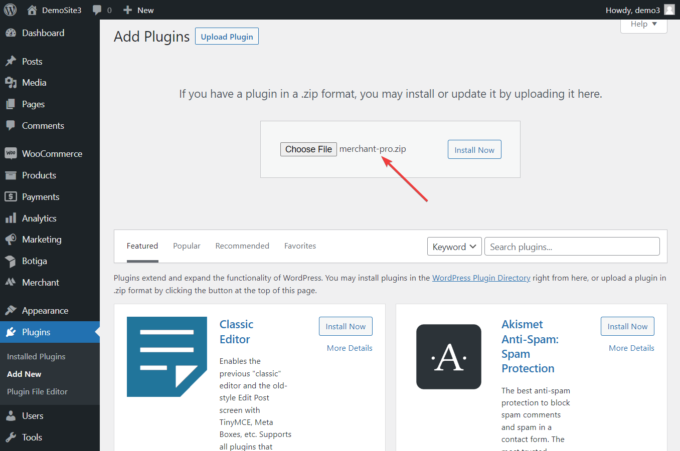
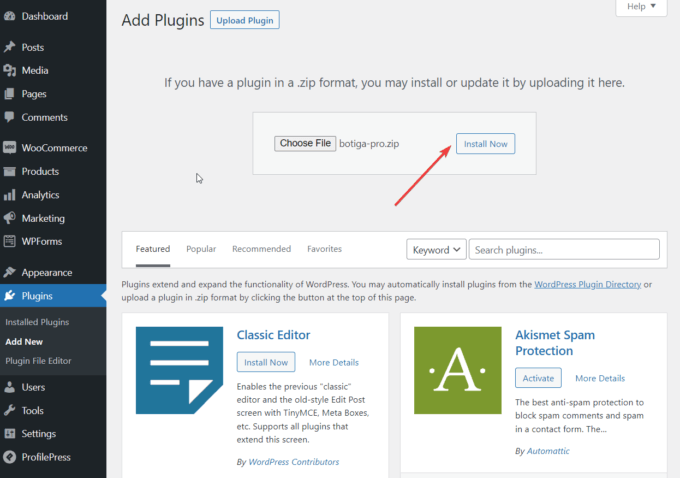
To install the plugin on your WordPress site, go to Plugins > Add New and click the Upload Plugin button.
Then, upload the plugin by using the Choose File option and clicking the Install Now and later the Activate buttons:
You can refer to our quick start guide for more on getting set up with Botiga Pro.
2. Import a Starter Site (optional)
A starter site is a pre-built demo that provides you with a full website design as soon as you import it into your WordPress site.
Botiga Pro offers 10+ starter sites, each targeting a different niche. You don’t have to use a starter site if you don’t want to — however, it can be a useful starting point.
Alternatively, you can create your own website design from scratch, using either the theme options in the WordPress Customizer (you can access it from the Appearance > Customize menu) or the Elementor page builder plugin.
Whether you import a starter site or not, you’ll have access to the same customization options.
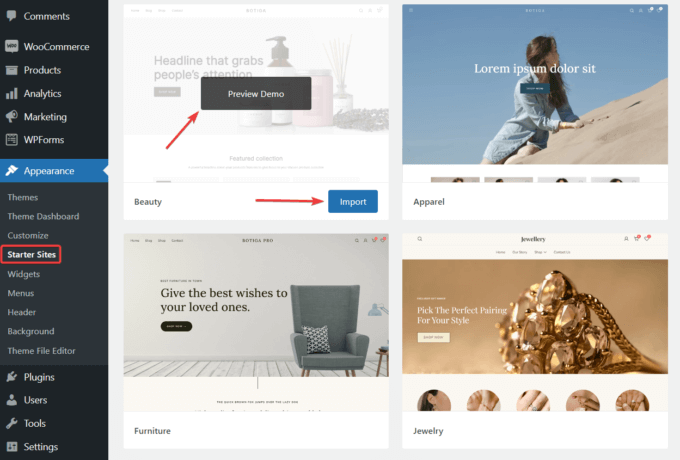
To import a starter site, go to Appearance > Starter Sites in your WordPress admin area. Here, you can preview each site by selecting the Preview Demo option.
When you find a starter site that you like, import it by clicking the Import button:
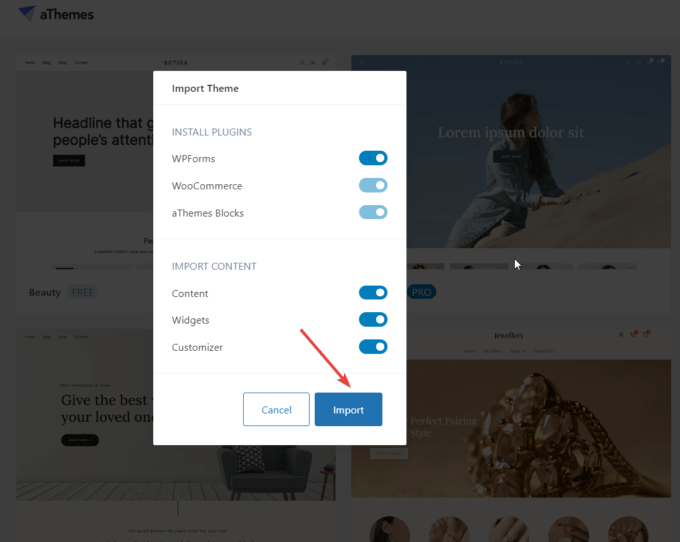
The demo importer will show you a list of the additional plugins and content elements that will be installed on your site as part of the import process.
Although you can opt out of importing some of the plugins and content, I recommend adding everything.
Click the Import button and the import process will start. Note that it will take a few minutes for the imports to complete:
3. Enable the Size Chart Module
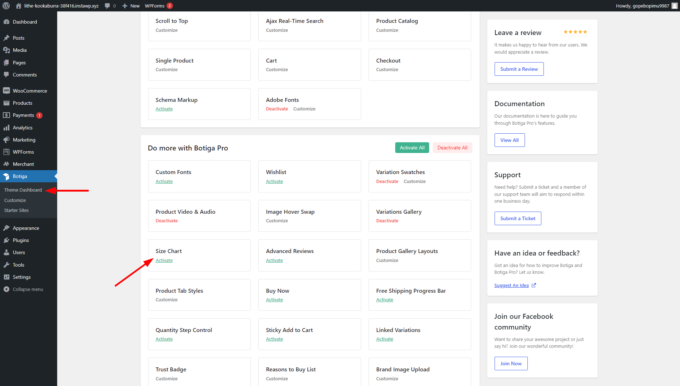
To enable the Size Chart module, go to Botiga > Theme Dashboard in your WordPress admin area, scroll down to the Size Chart module and click the Activate button:
4. Create a Size Chart
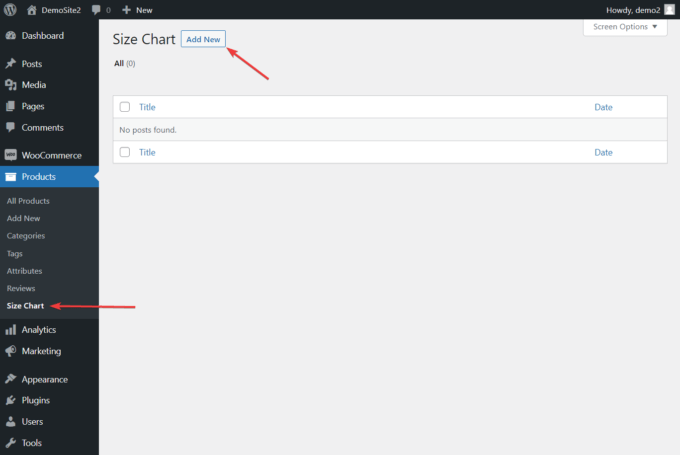
Once you enabled the Size Chart module, go to Products in your WordPress admin area.
Under the Products menu, you will see a new Size Chart submenu.
Select it, then click the Add New button to create a size chart:
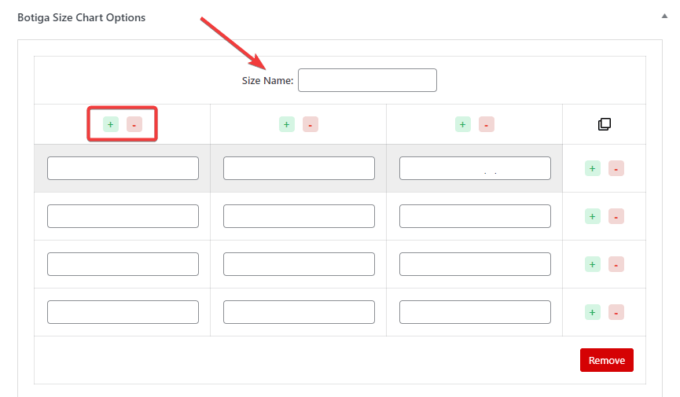
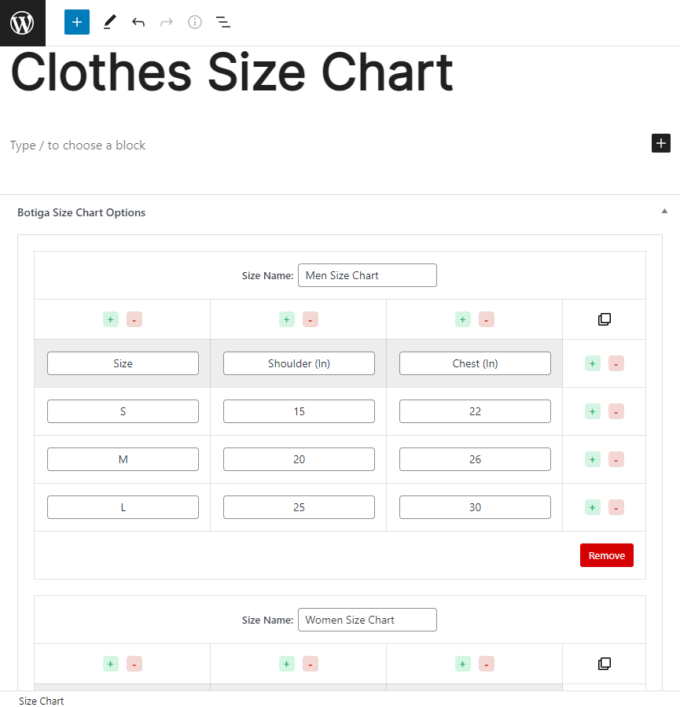
First, add a title to the size chart. One size chart can include more than one chart. For example, you can create a ‘Clothes Size Chart’ with two charts: one for men and one for women.
Once you’ve added the title, scroll down to the Botiga Size Chart Options panel, and click the Add Size Chart button.
A size chart with rows and columns will appear on your screen, along with an option for naming the chart.
You can also add or remove rows and columns by clicking the ‘+’ or ‘–’ buttons:
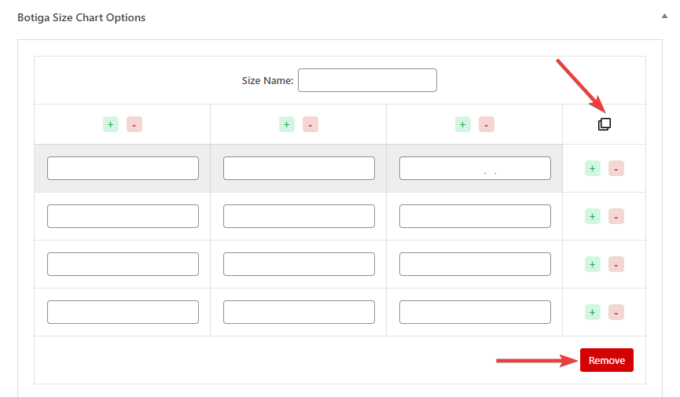
You can duplicate the chart by using the copy icon or delete it by clicking the Remove button:
Here’s what my example size chart looks like:
You can also check out this video guide on how to create a size chart with Botiga Pro:
5. Display the Size Chart on All or Specific Product Pages
There are two ways to display a size chart in your WooCommerce store.
You can show it:
- on all of your product pages by using a global option
- only on specific product pages by using the Size Chart option located on individual product pages
I will show you how to carry out both.
i. Display a Size Chart on All Product Pages
To display a size chart on all product pages, go to Appearance > Customize.
The Customizer will open, and the options will be located on the left side of the screen:

In the Customizer, scroll down to the WooCommerce section, and select the Single Product option:

On the next screen, select Size Chart. It will reveal two options: Global Size Chart and Title.
The Global Size Chart setting will show all your size charts as dropdown options. Select the one you want to add to your product pages and add a title to it.
Then, click the Publish button on top of the screen to save your settings:

ii. Display a Size Chart on a Single Product Page
To display a size chart on a specific product page, go to Products > All Products, and open the product page where you want to add the size chart.
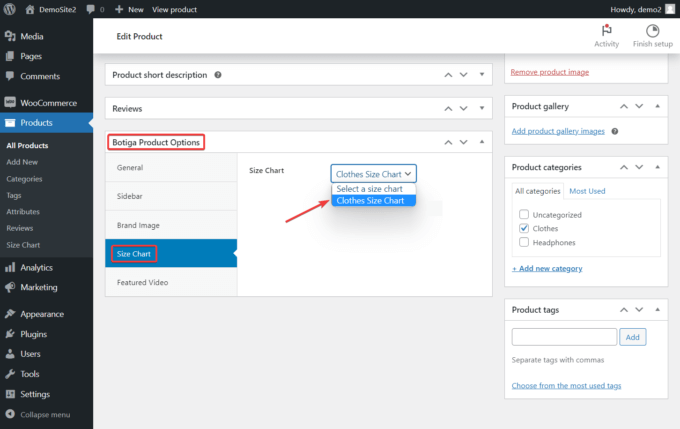
On the product page, scroll down to the Botiga Product Options panel and open the Size Chart tab.
Here, you’ll find a dropdown option that will include your size charts.
Select the one you want to add to your product, then click the Update button at the top of the page to save the changes:
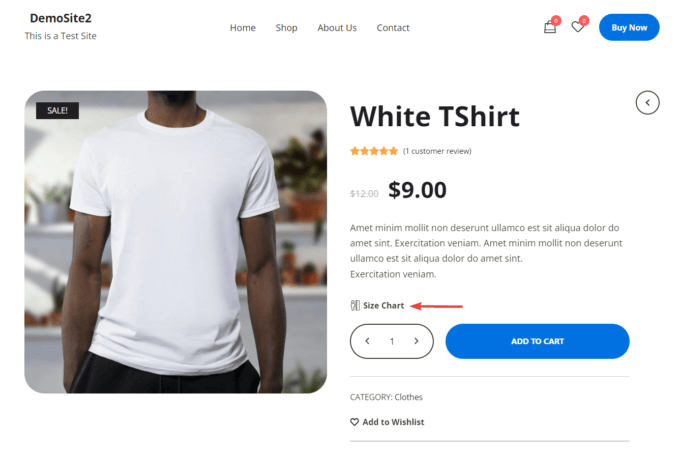
Now, open the product page to check what your size chart looks like in your WooCommerce store.
You’ll see the size chart option under the product description:
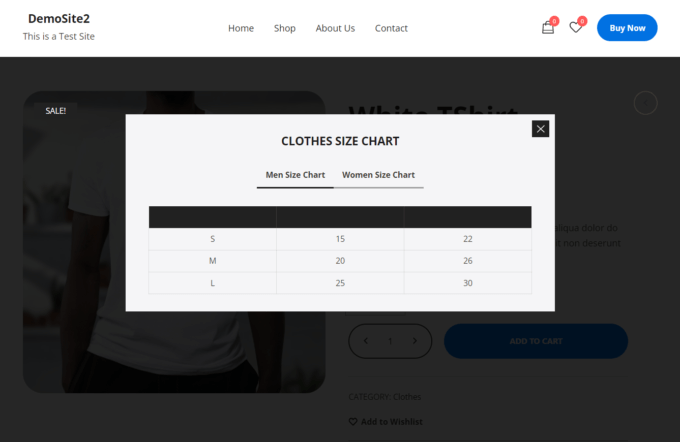
When you click that option, your size chart will pop up as a modal box:
And, that’s it — you’ve created a size chart in WooCommerce using Botiga Pro.
Final Thoughts on How to Add a Size Chart in WooCommerce
Adding a size chart to your WooCommerce site is a great way to boost the user experience and conversion rate of your store.
Since WooCommerce doesn’t include a size chart feature, you’ll need to use a third-party tool to implement it in your store.
In this tutorial, we looked into how to use the Merchant Pro and Botiga Pro plugins to add a size chart in WooCommerce.
While Merchant Pro works with any WooCommerce theme, Botiga Pro has been created specifically for the free Botiga theme.
When to Choose Merchant Pro?
If you already have a working WooCommerce store with a theme that you love, I recommend that you choose Merchant Pro.
To see how it works on a real WordPress site, you can spin up a live demo which gives you access to all the free and premium features, including the Size Chart module:
When to Choose Botiga Pro?
If you’re just starting out or looking for a new WooCommerce theme for your existing store, I recommend that you choose Botiga Pro.
It provides you with both a powerful WooCommerce theme, which you can download for free, and premium eCommerce features, including the Size Chart module:
I hope you found this tutorial helpful. If you have any questions about how to add a size chart in WooCommerce, let us know in the comments section below.
